I mentioned to a weaving friend that I was working on overshot today… and they suggested *gauze*. And we laughed heartily… And then I did it. Lol. Who’s laughing now?
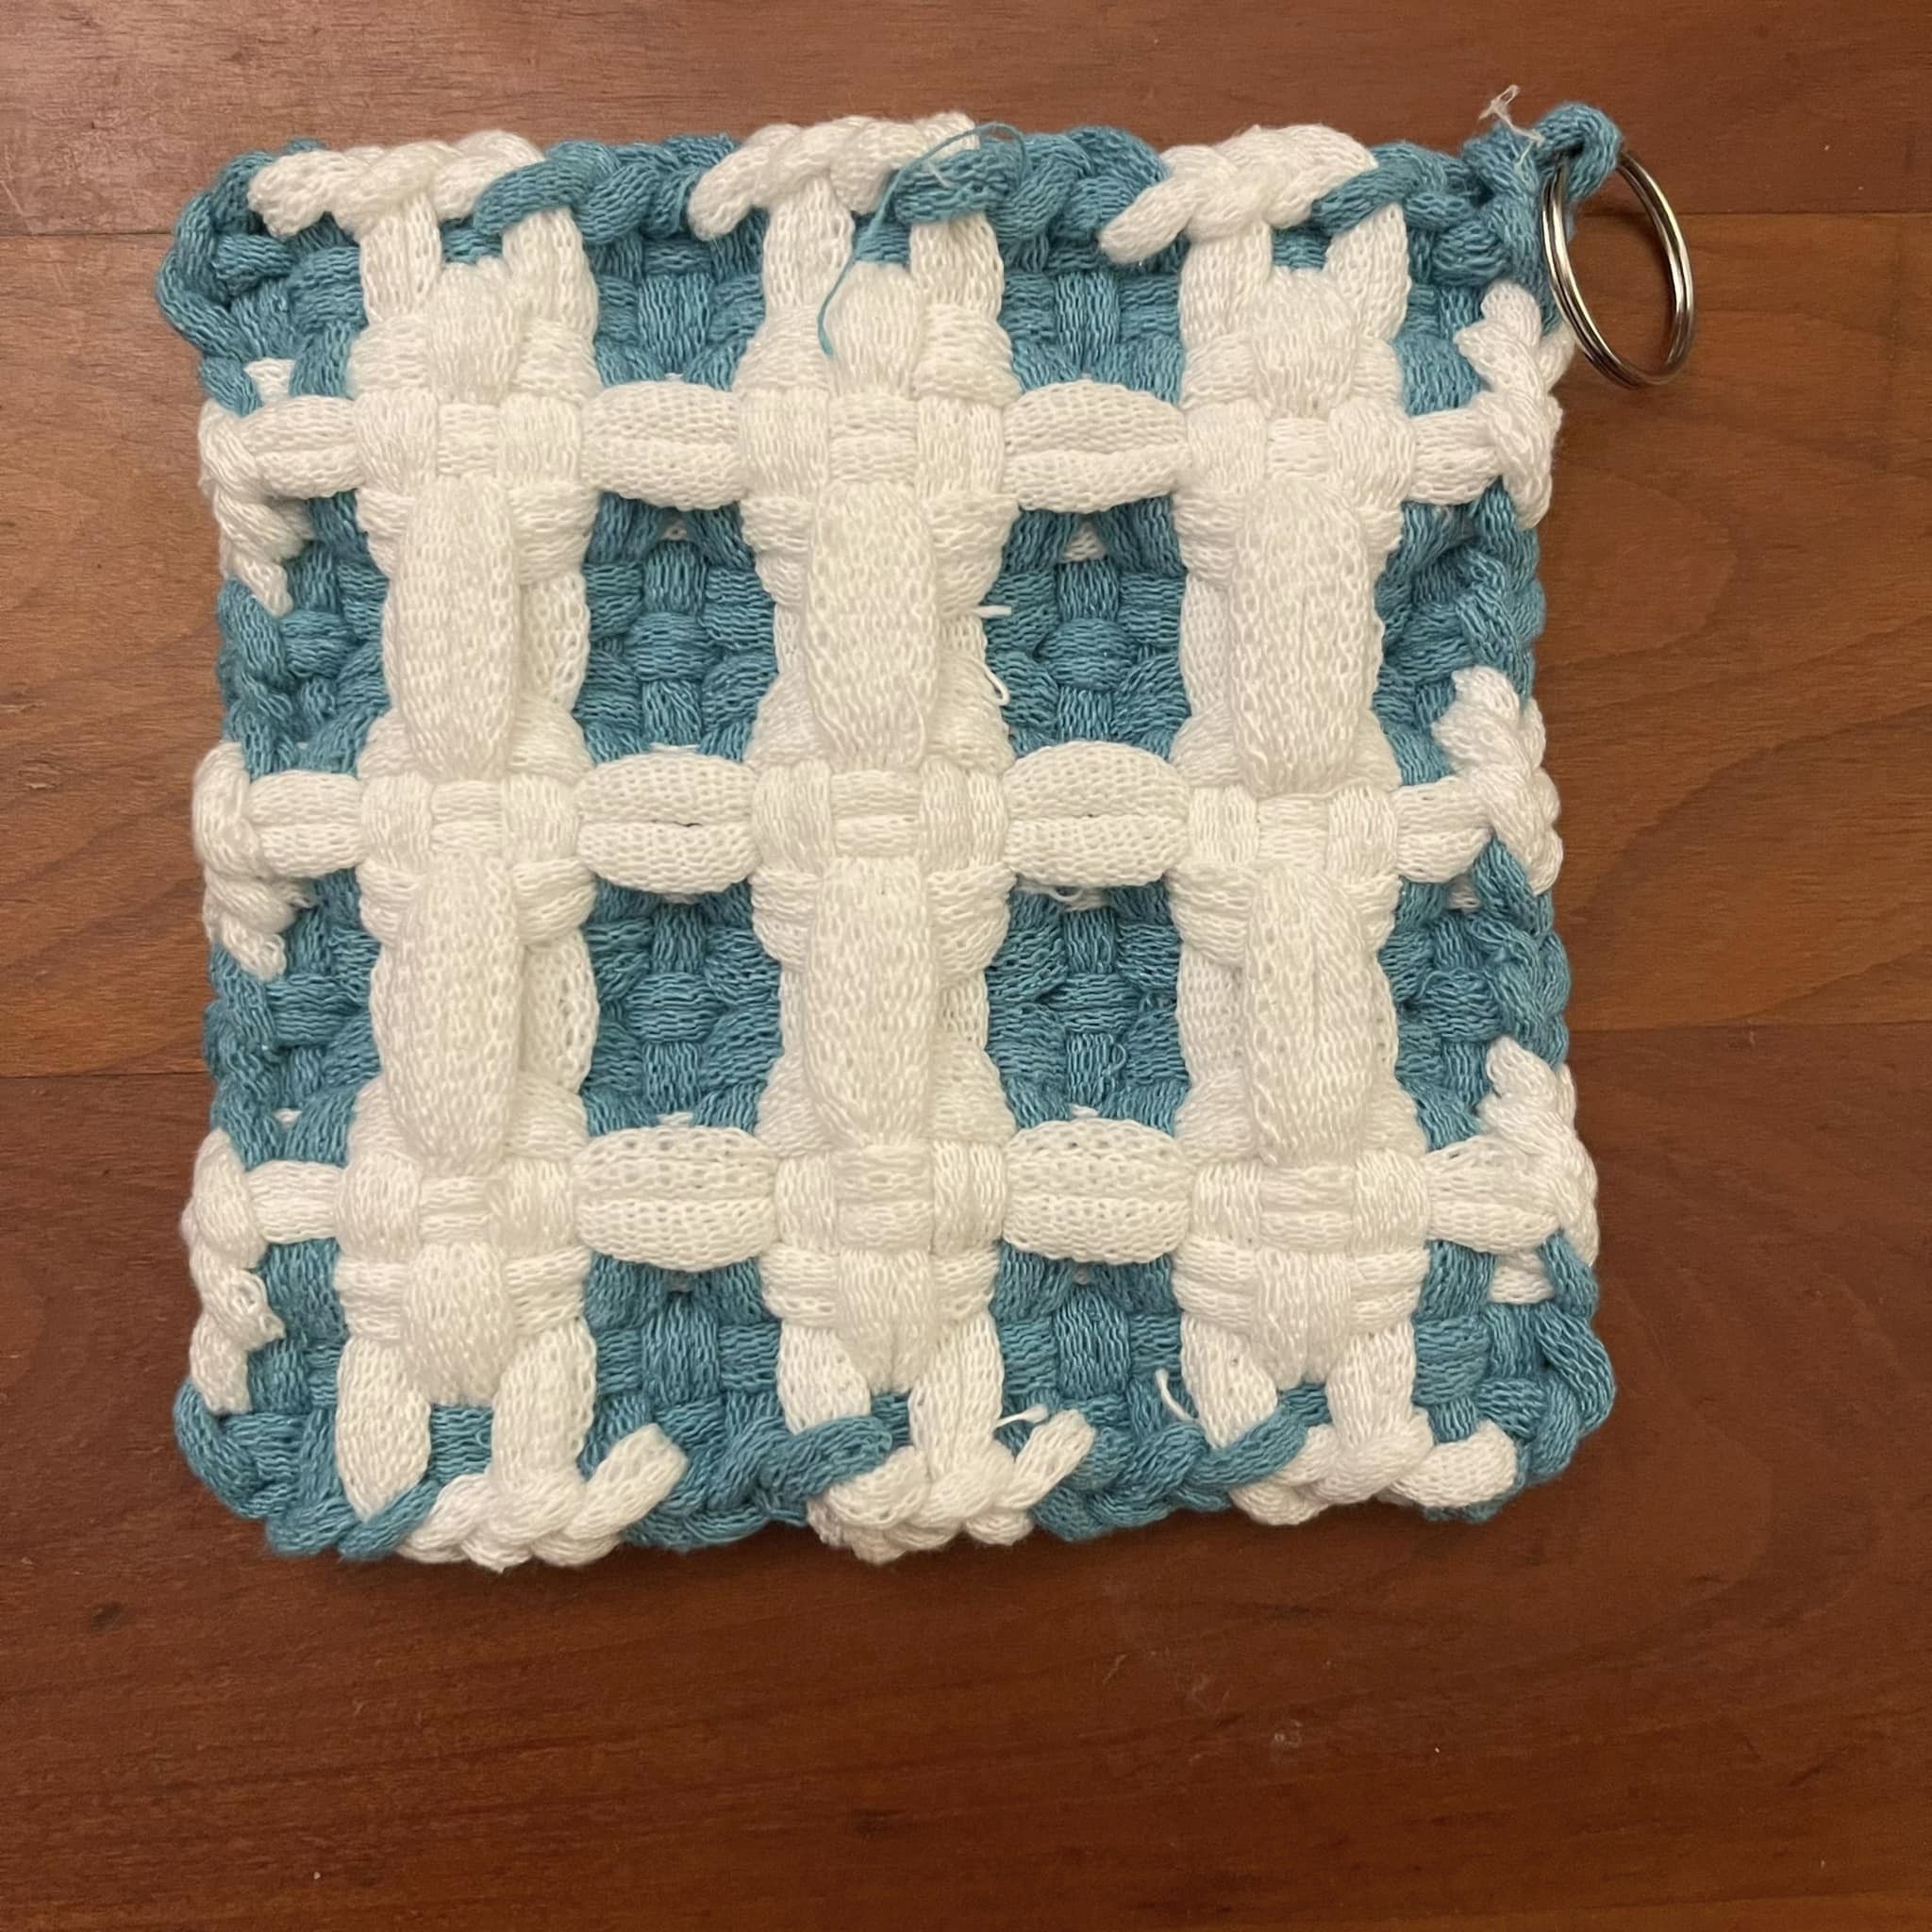
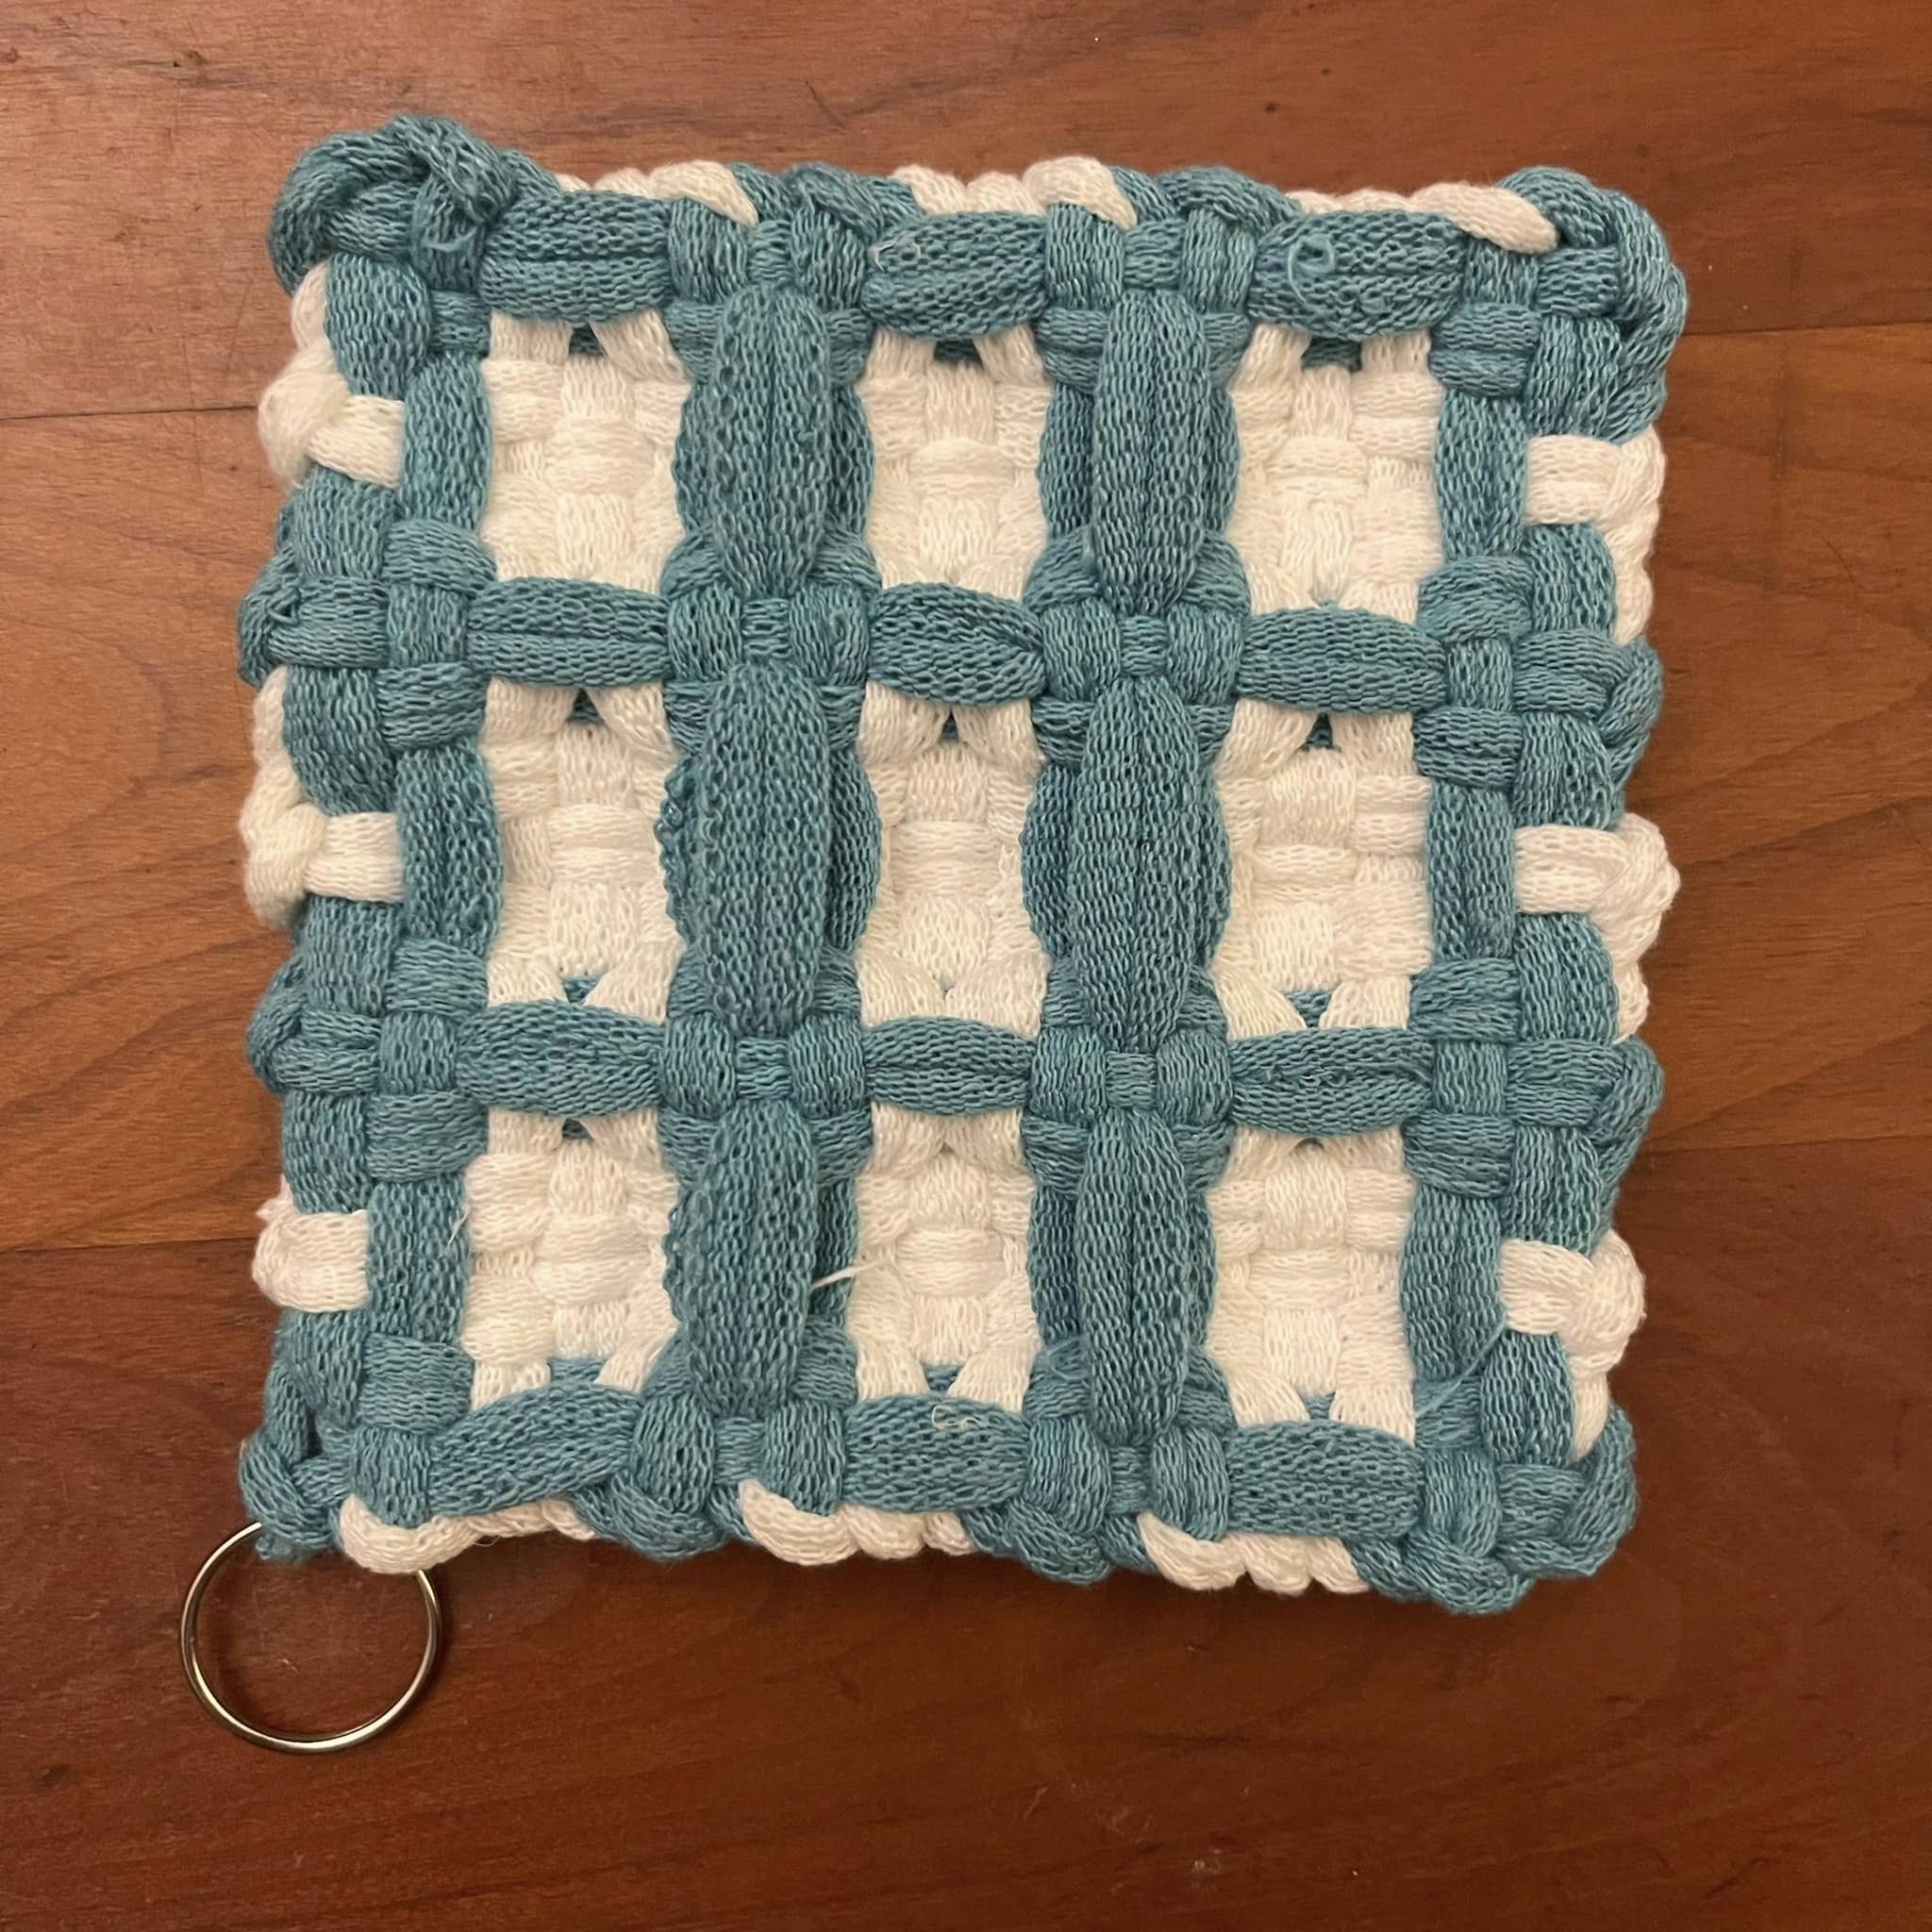
I am (as ever!) surprised by how it came off the loom. It is suitable as a light-duty potholder, and would make a great coaster. You could even sew it onto something (around 3 edges) as a patch pocket! It gently bulges. Another amazing fabric, courtesy our ancestors in string technology.
Ok, so what is gauze, you ask? Wikipedia is pretty solid here:
In technical terms “gauze” is a weave structure in which the weft yarns are arranged in pairs and are crossed before and after each warp yarn keeping the weft firmly in place. This weave structure is used to add stability to fabric, which is important when using fine yarns loosely spaced. However, this weave structure can be used with any weight of yarn, and can be seen in some rustic textiles made from coarse hand-spun plant fiber yarns.
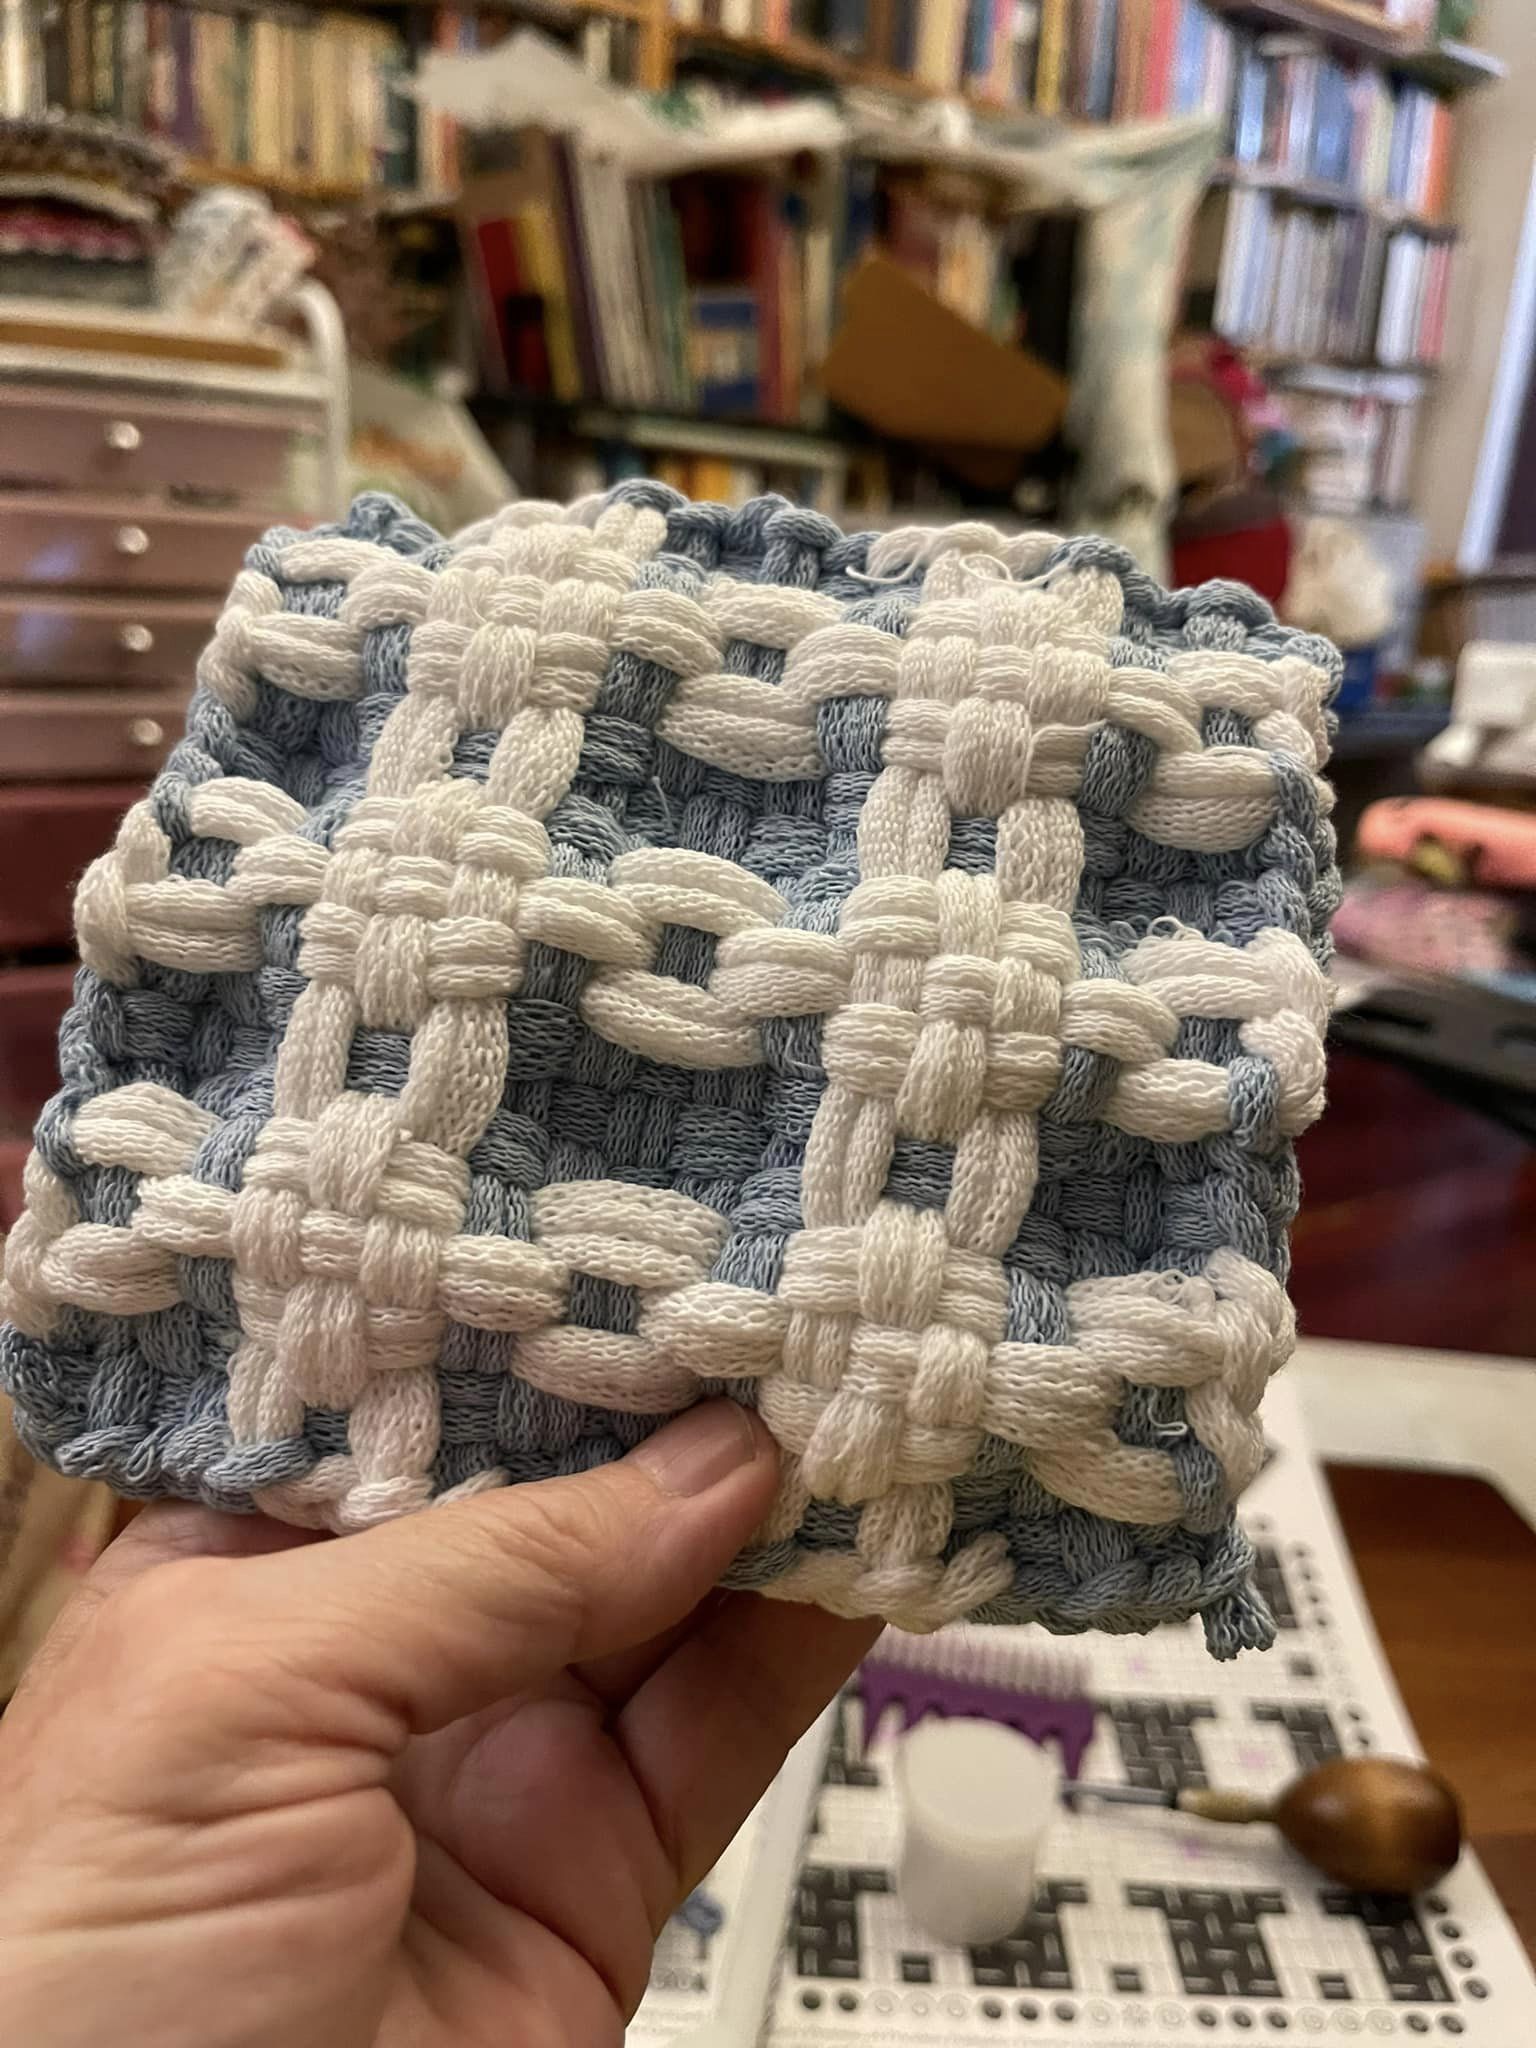
Because of the crossings, I knew my warp threads would tighten up significantly, and also required more space between them, so I decided to use half as many weft loops, on alternating pegs. The last skipped row looked like it would bind off too loosely, to my eye, so I added another weft row on the last row. The result would vary depending how many weft loops were used.
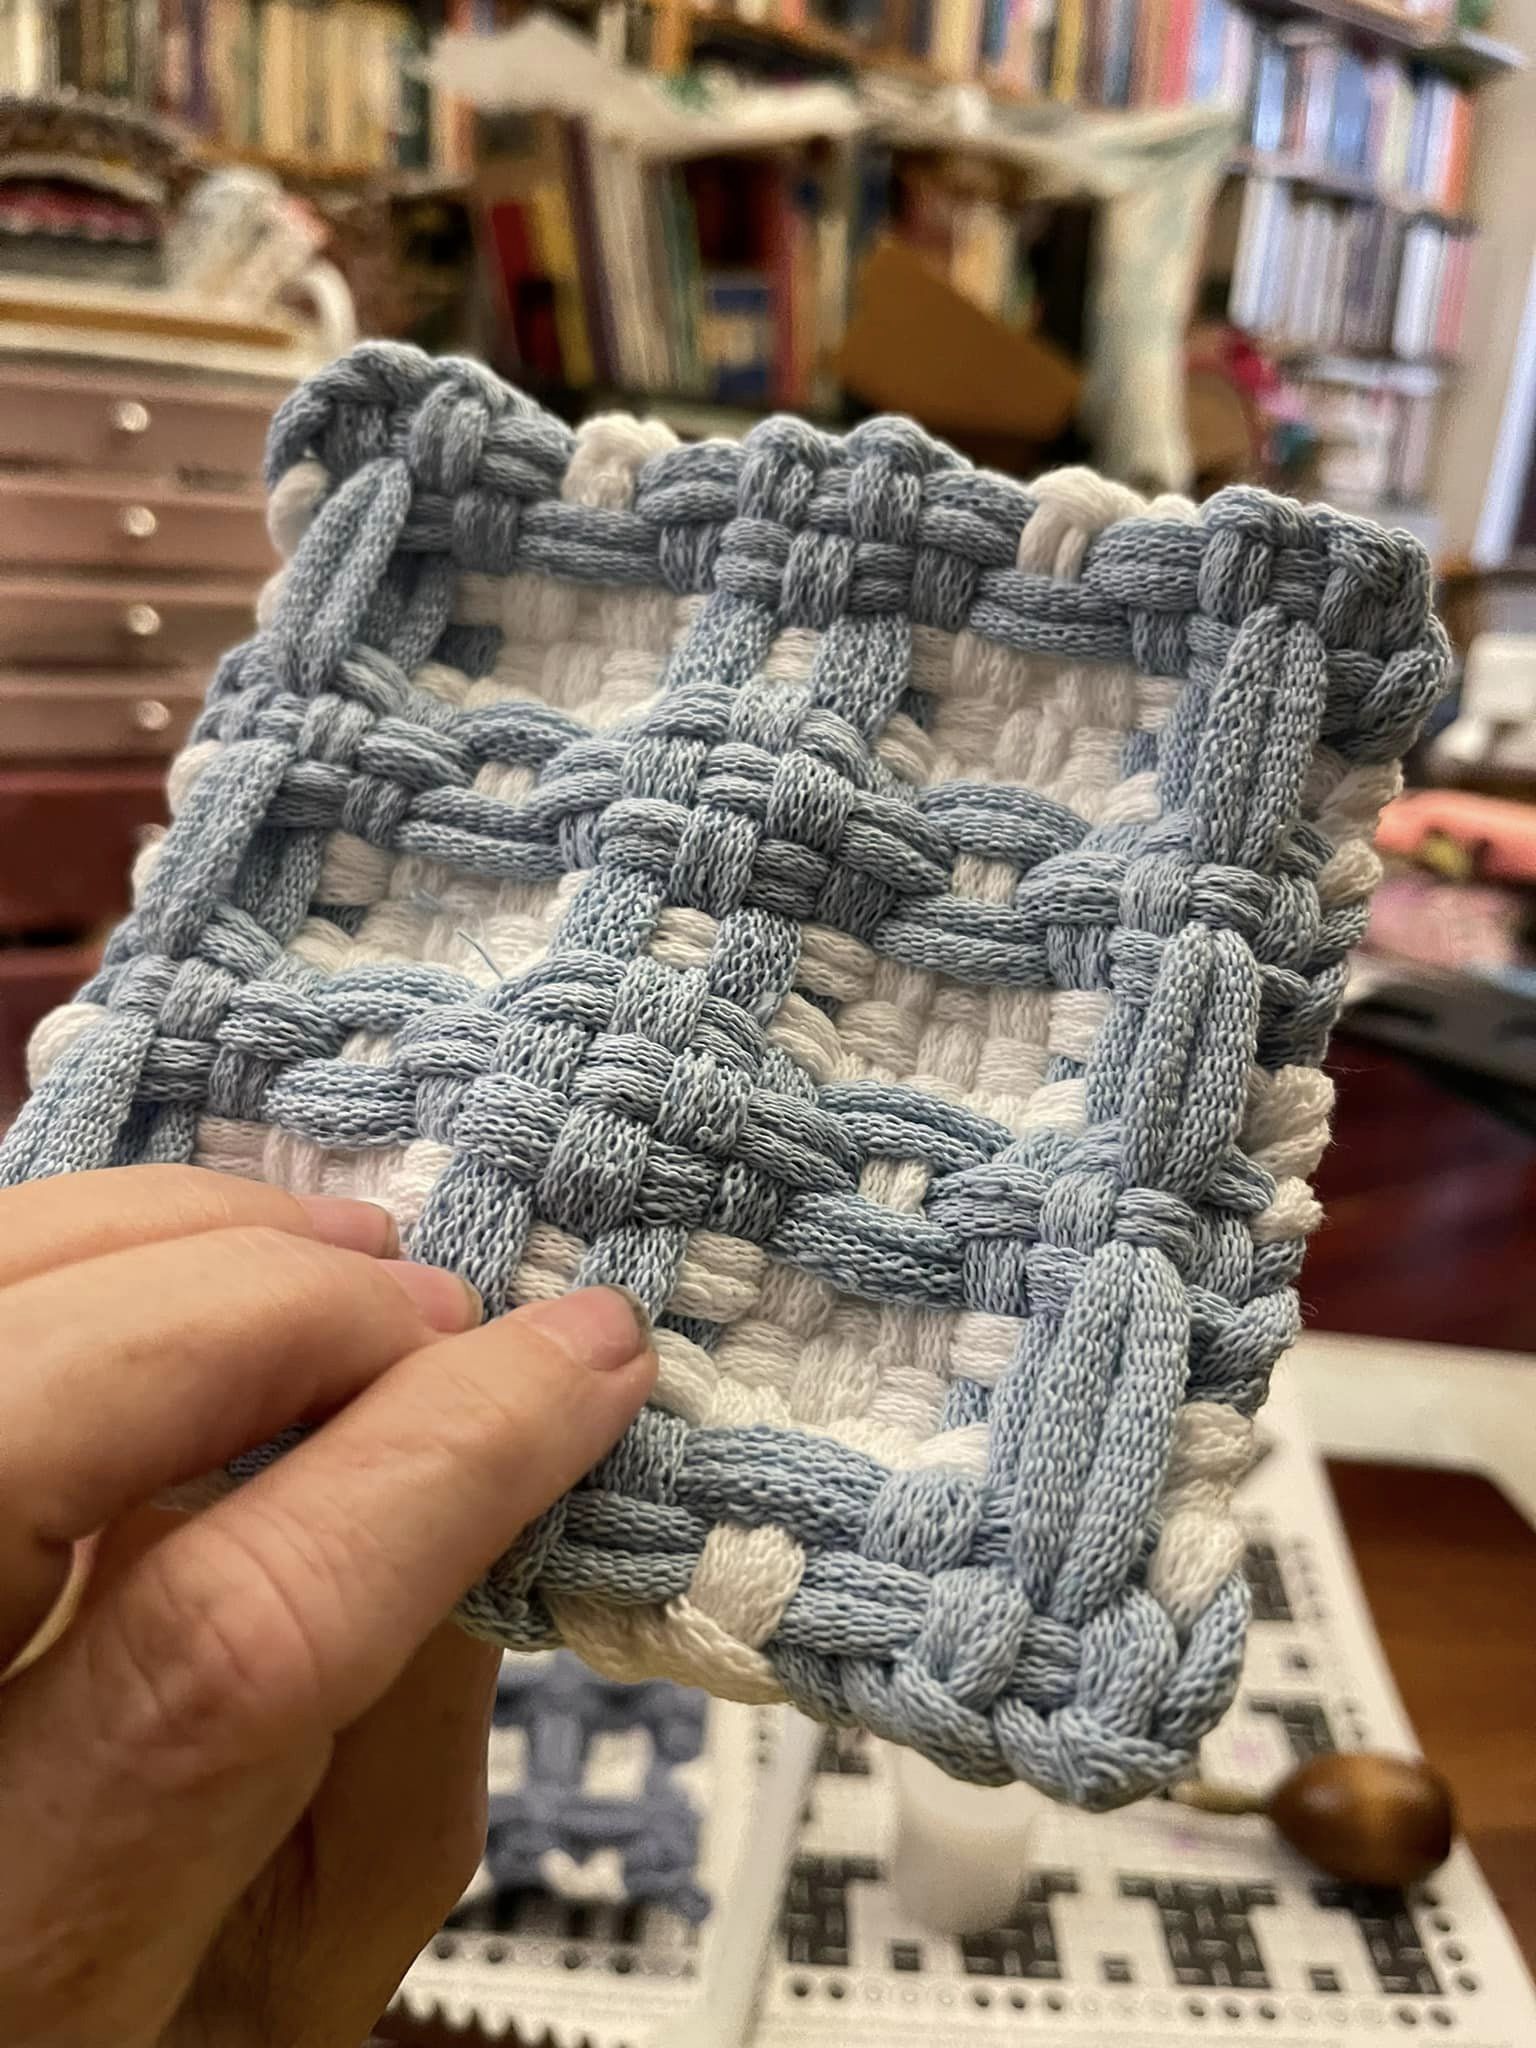
Hopefully the photos give you an idea of how to work the twists. Because we are using potholder looms, with closed loops, we could experiment with putting all the twists in the same direction, introducing a skew in the final fabric that might be interesting. (Also, having done these twists makes me want to try sprang as a technique, lol.)
Postscript, February 2024: I added these notes for someone who was confused about how to weave this structure. — Matthew
The whole piece is worked split-loop, treating the two arms of each warp loop as a pair.
On your starting row, weave over/under across, going over one arm of each warp loop and under the other.
On the next row, for each warp loop, twist it so the arm that was “under” the last time comes up and over its mate, and then back down again so that it can be “under” again but on the other side when the next weft goes through.
The result is that each warp loop is twisted back and forth on alternating rows, with the same arm always being “under” but hopping over its mate to switch from being under on the left to being under on the right and back again.
The result is a light, breathable fabric — the loops are tensioned into place, so they don’t gap or flop around, but there are lots of little spaces built into it.
Oh!! This one is delightful! Such fun to touch. And also easy to weave, with the same pattern shifting across each row. The texture on this one pulls to the inside of the fabric, leaving a remarkably flat surface, good for trivets and coasters. The back side is deeply waffled, or honeycombed. The front is a flat tiled surface. The potholder as a whole is small and thick.
New fabric *boggle*. Waffle weave!!! It is RIDICULOUS. IT WAFFLES.
The “Belgian” version is crazy thick. The “Breakfast” version is modified for flatness. The “Liége” version has smaller pockets.
These would make an excellent trivet. The pockets insulate and separate the base of the hot dish from the table finish, so you don’t end up steaming your trivet onto the surface.
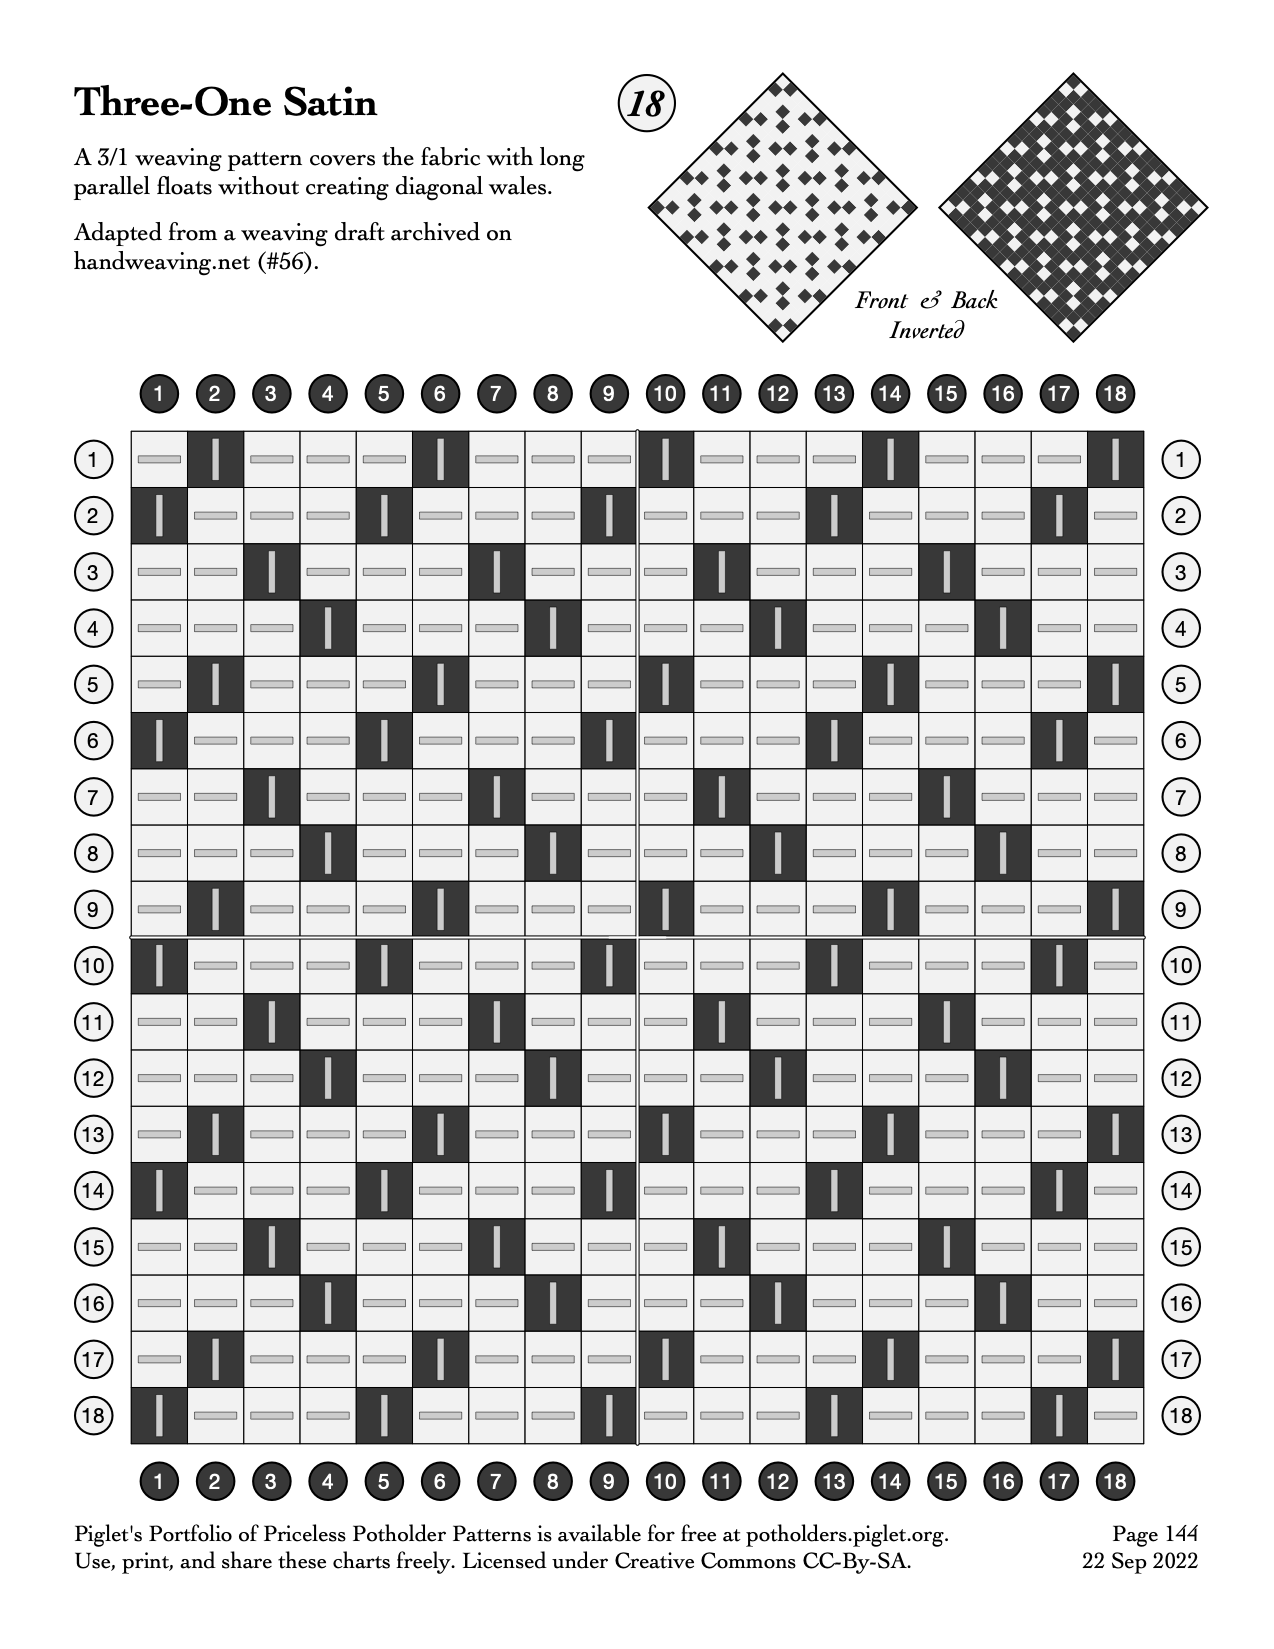
Shown below in traditional size, these patterns are available in both 27-peg and 19-peg charts.
Silent demonstration video showing the three-layer warping technique from end to end, including warping, weaving, and binding off.
The weaving here is done by hand, from the center out, but the same general approach is equally applicable if you use a hook or start your weaving on any side.
This video is uncut and takes just over half an hour; if you’re already familiar with loop weaving, you can use YouTube’s “playback speed” setting to watch it at 2x speed to see the key points of the technique in action.
If you want to jump ahead, here are the key moments in the video:
00:15 First warp
01:13 Second warp
02:15 Third warp
03:40 Weaving
24:05 Binding off
32:51 Finger-blocking
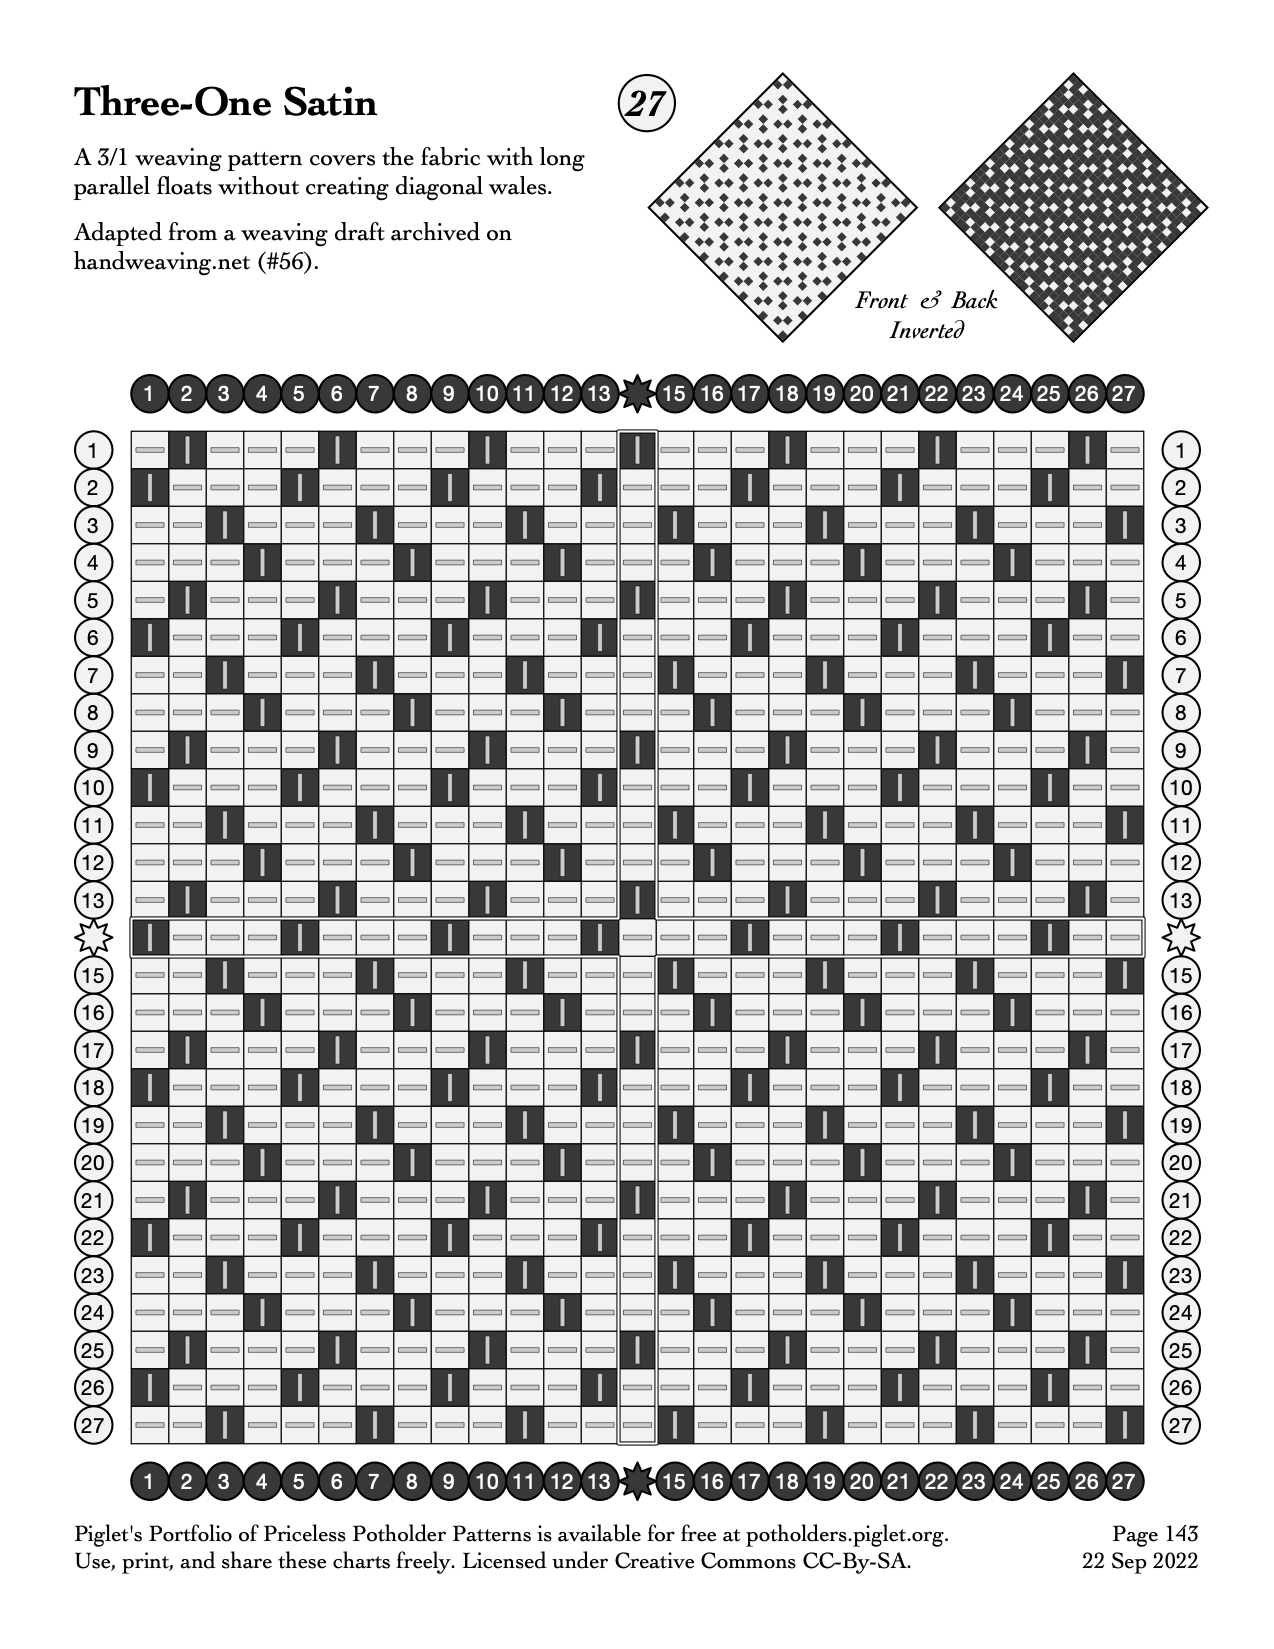
Such fun, exploring a new weave! This is a satin weave, adapted by Matthew Simon Ryan Cavalletto from a handweaving.net draft.
There’s always that moment, taking a new weave with floats off the loom, when you wonder if it will all fall apart, or prove a sturdy, pleasant fabric. Success! This is soft to the touch, resists bias, and drapes well in the hand for a secure grip.
I found it easy to weave, once I got going. The pattern established itself rapidly and I did not need to refer to the chart after the first several rows.
It has a lovely texture, not well captured on photos. The loops here are Harrisville navy and white. I look forward to seeing what people do with the colors!
Testing a new chart holder! Found a picture frame no longer in use. Folded the chart to fit inside.
The pattern is beginning to show itself, as I work from the middle out.
One easy way to weave this wide-spread 3 over / 1 under is to simply take the warp loops off…
…place the weft loop…
…and hook the warp loops back in place, one…
…two, etc.
How it looks from the back, about 1/3 of the way through.
Finished front on the loom, the moment of truth.
And here’s the woven rear view, still on the loom.
Voila! Front side flat, after binding off.
And the back side (as woven), flat, after binding off. I love how the dots dance.
An angled view of the texture of this satin twill fabric.
And how the pattern practically vibrates up close.
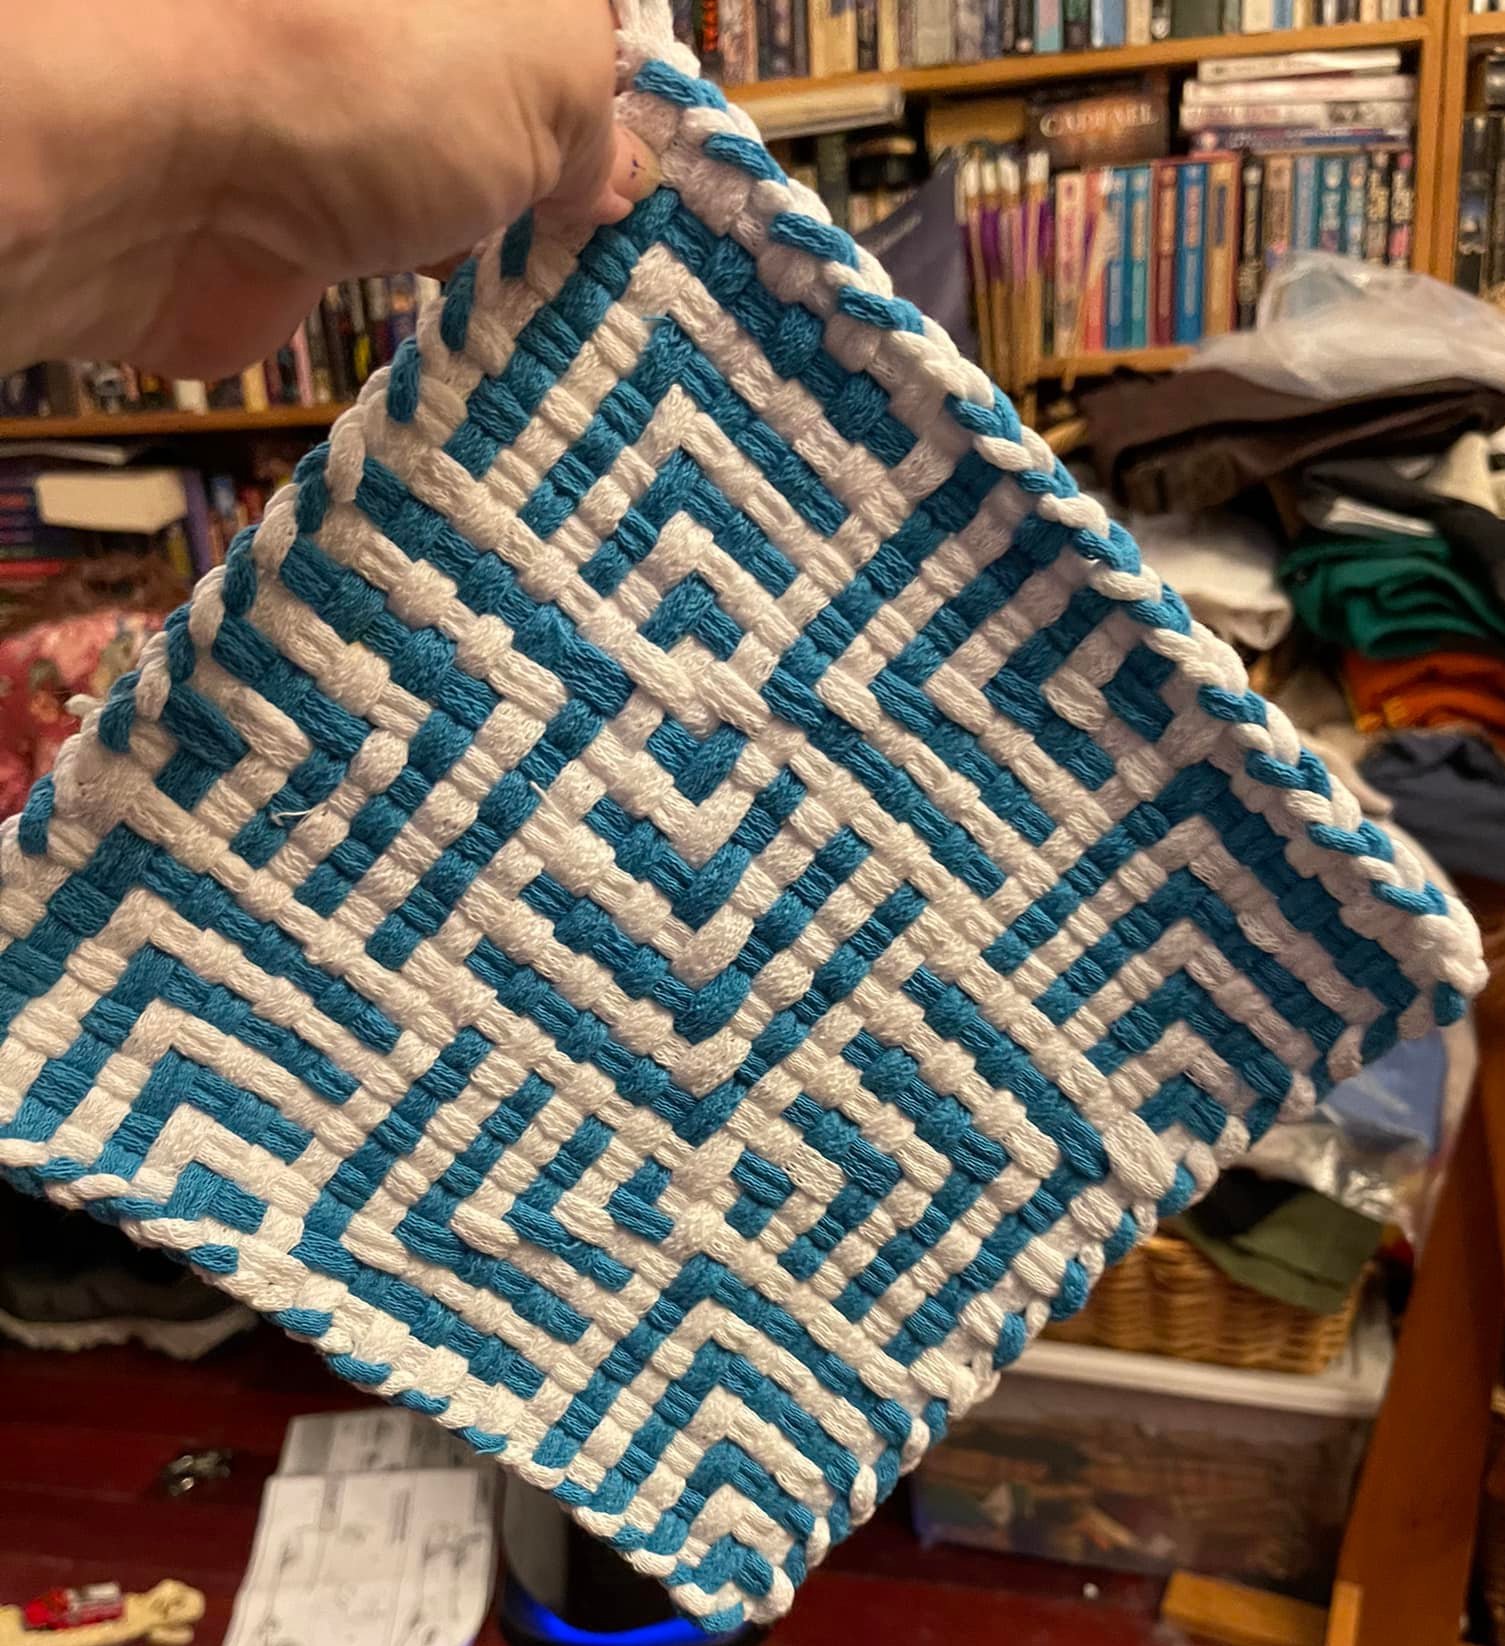
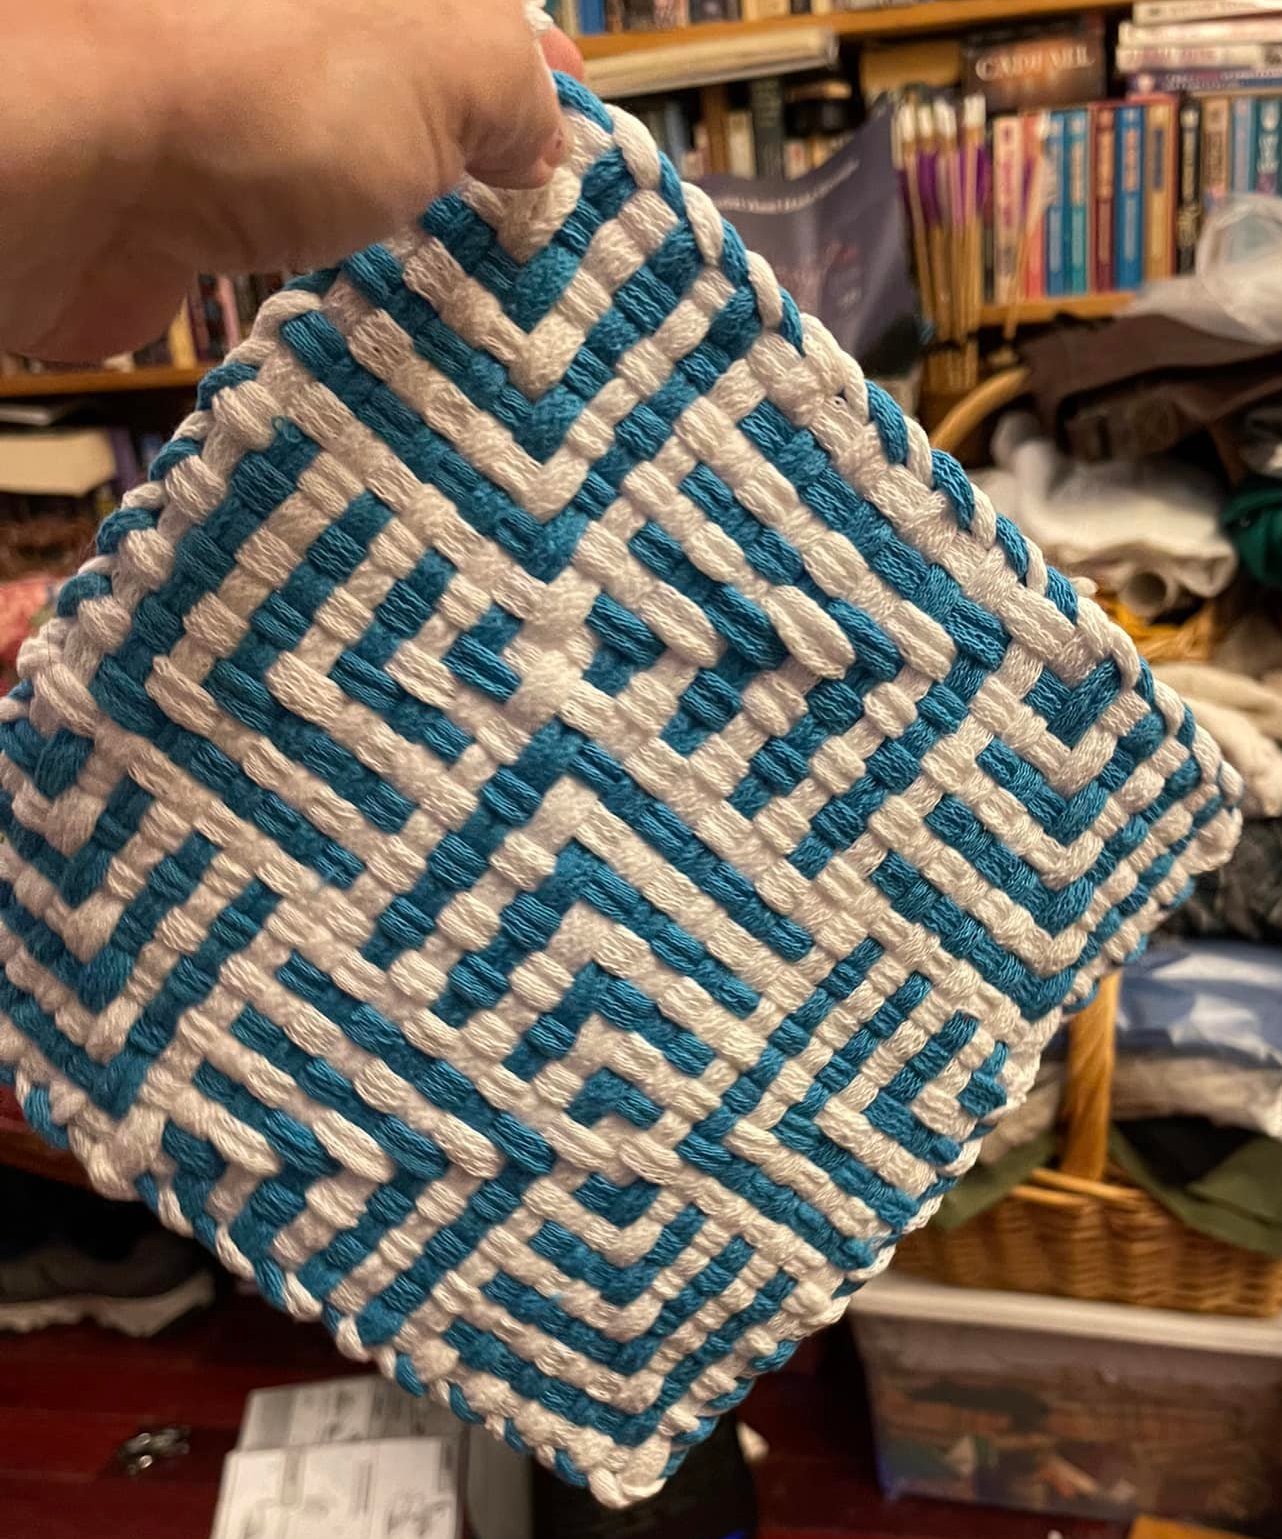
Finished potholder, hanging in action, with the “back” side showing. I like this side better as a front.
Finished potholder, hanging in action with the side woven as front showing. The white loops are longer than the navy, so the fabric bulges on the white side.
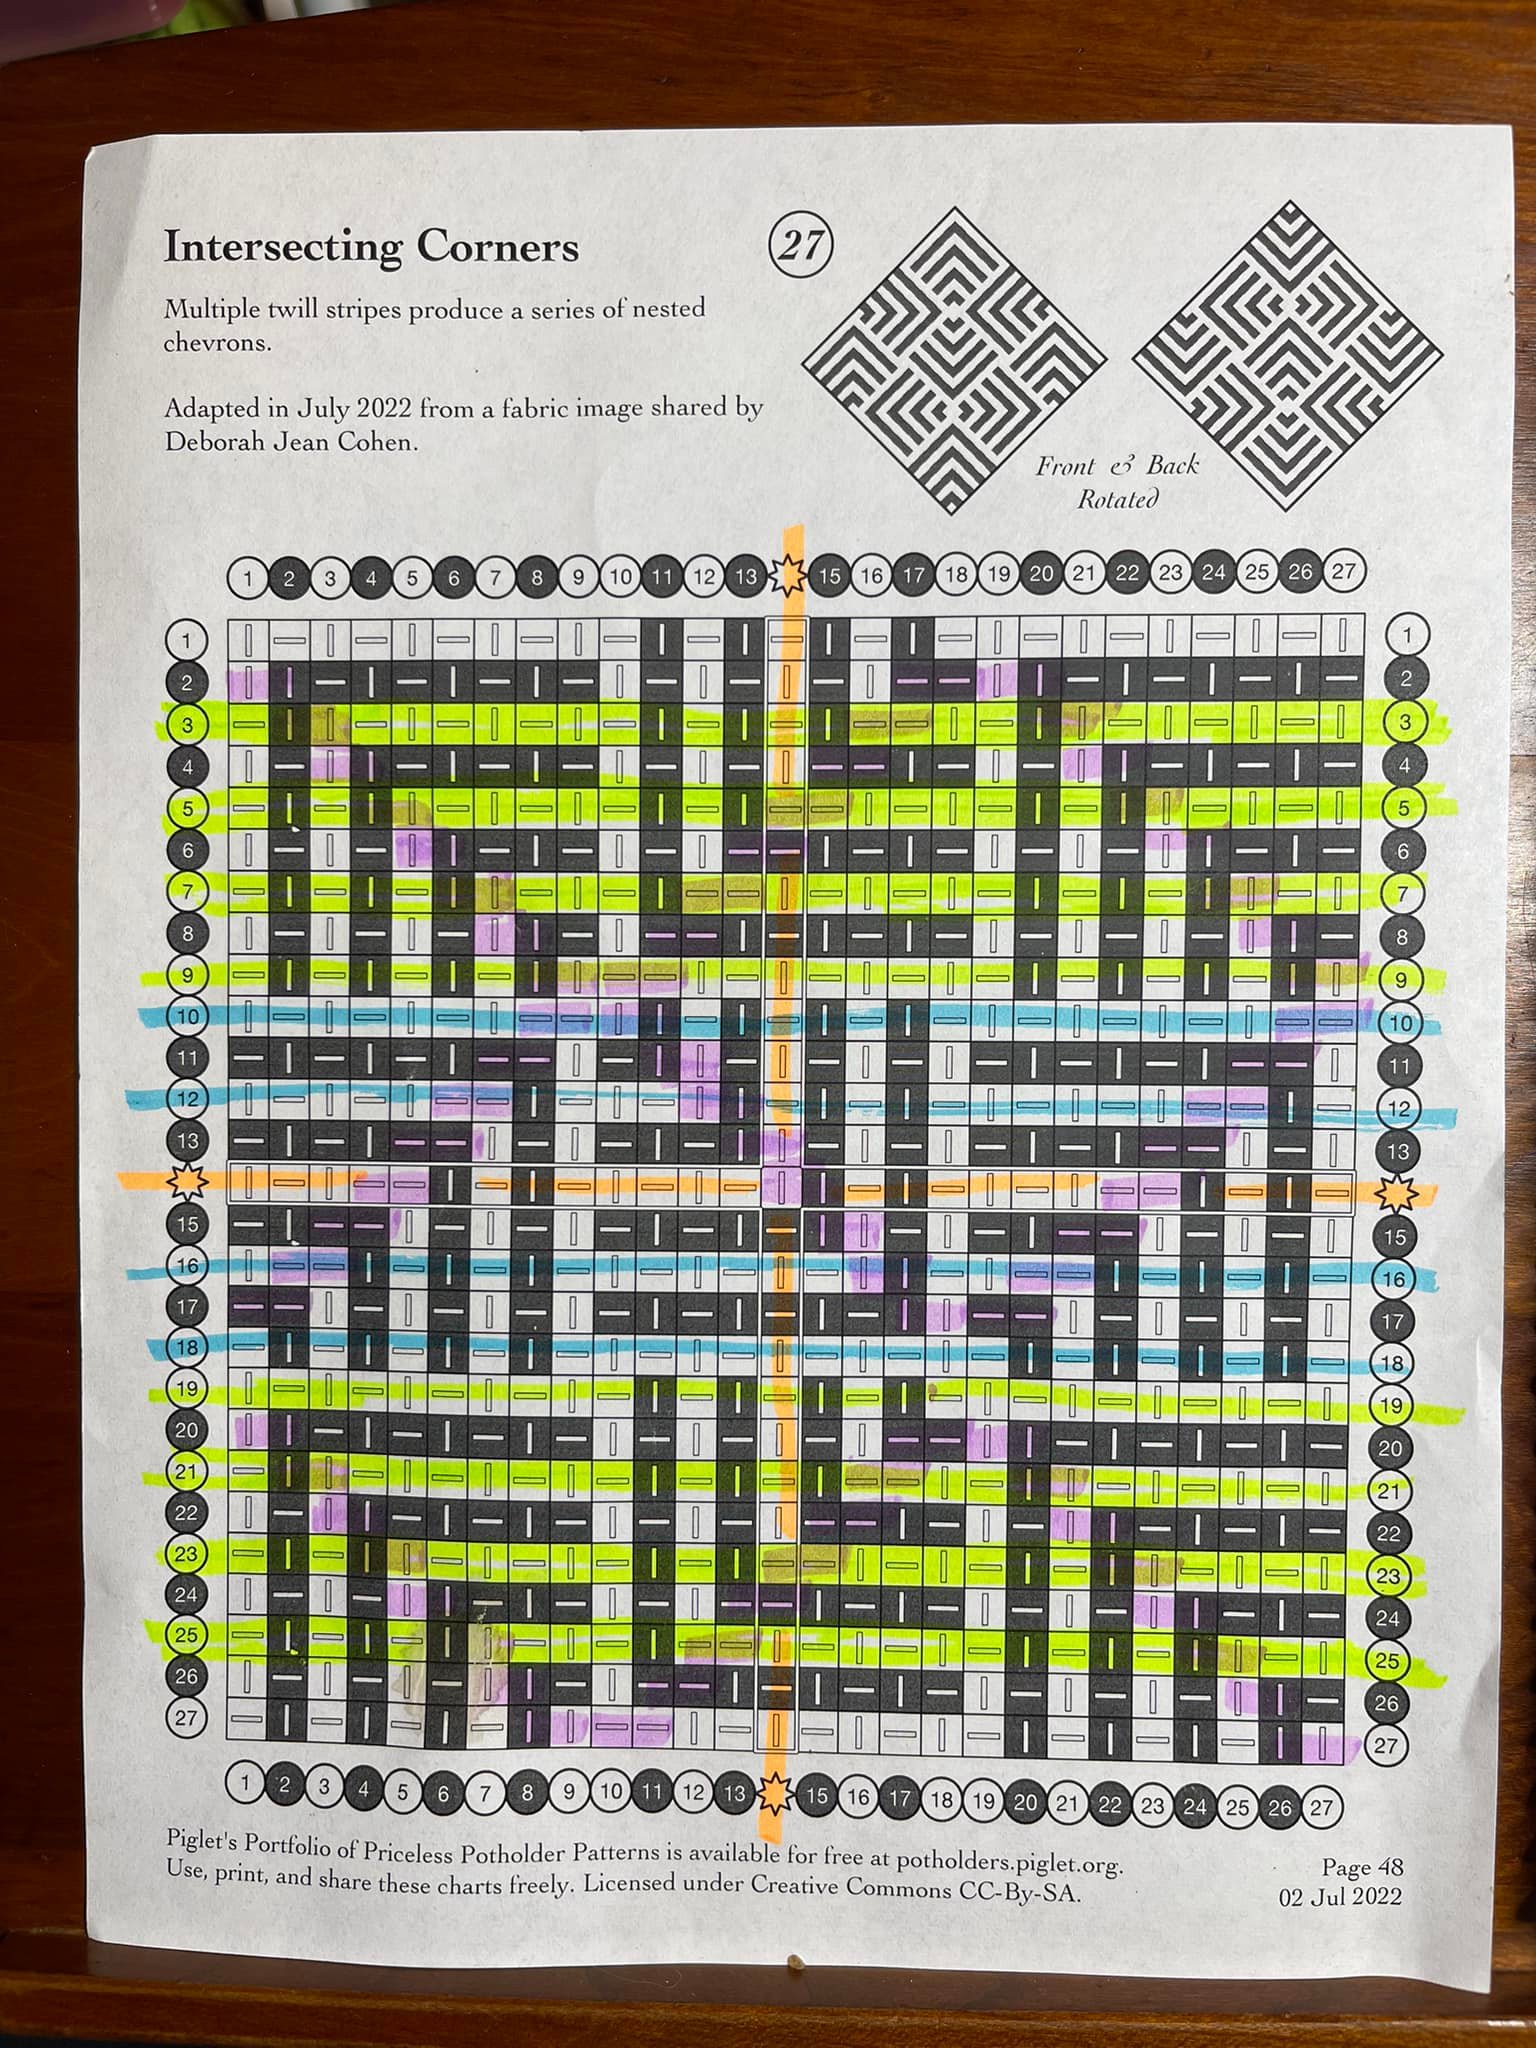
27-peg chart. Woven over-3/under-1, with rows shifted by varying amounts to avoid creating diagonal wales
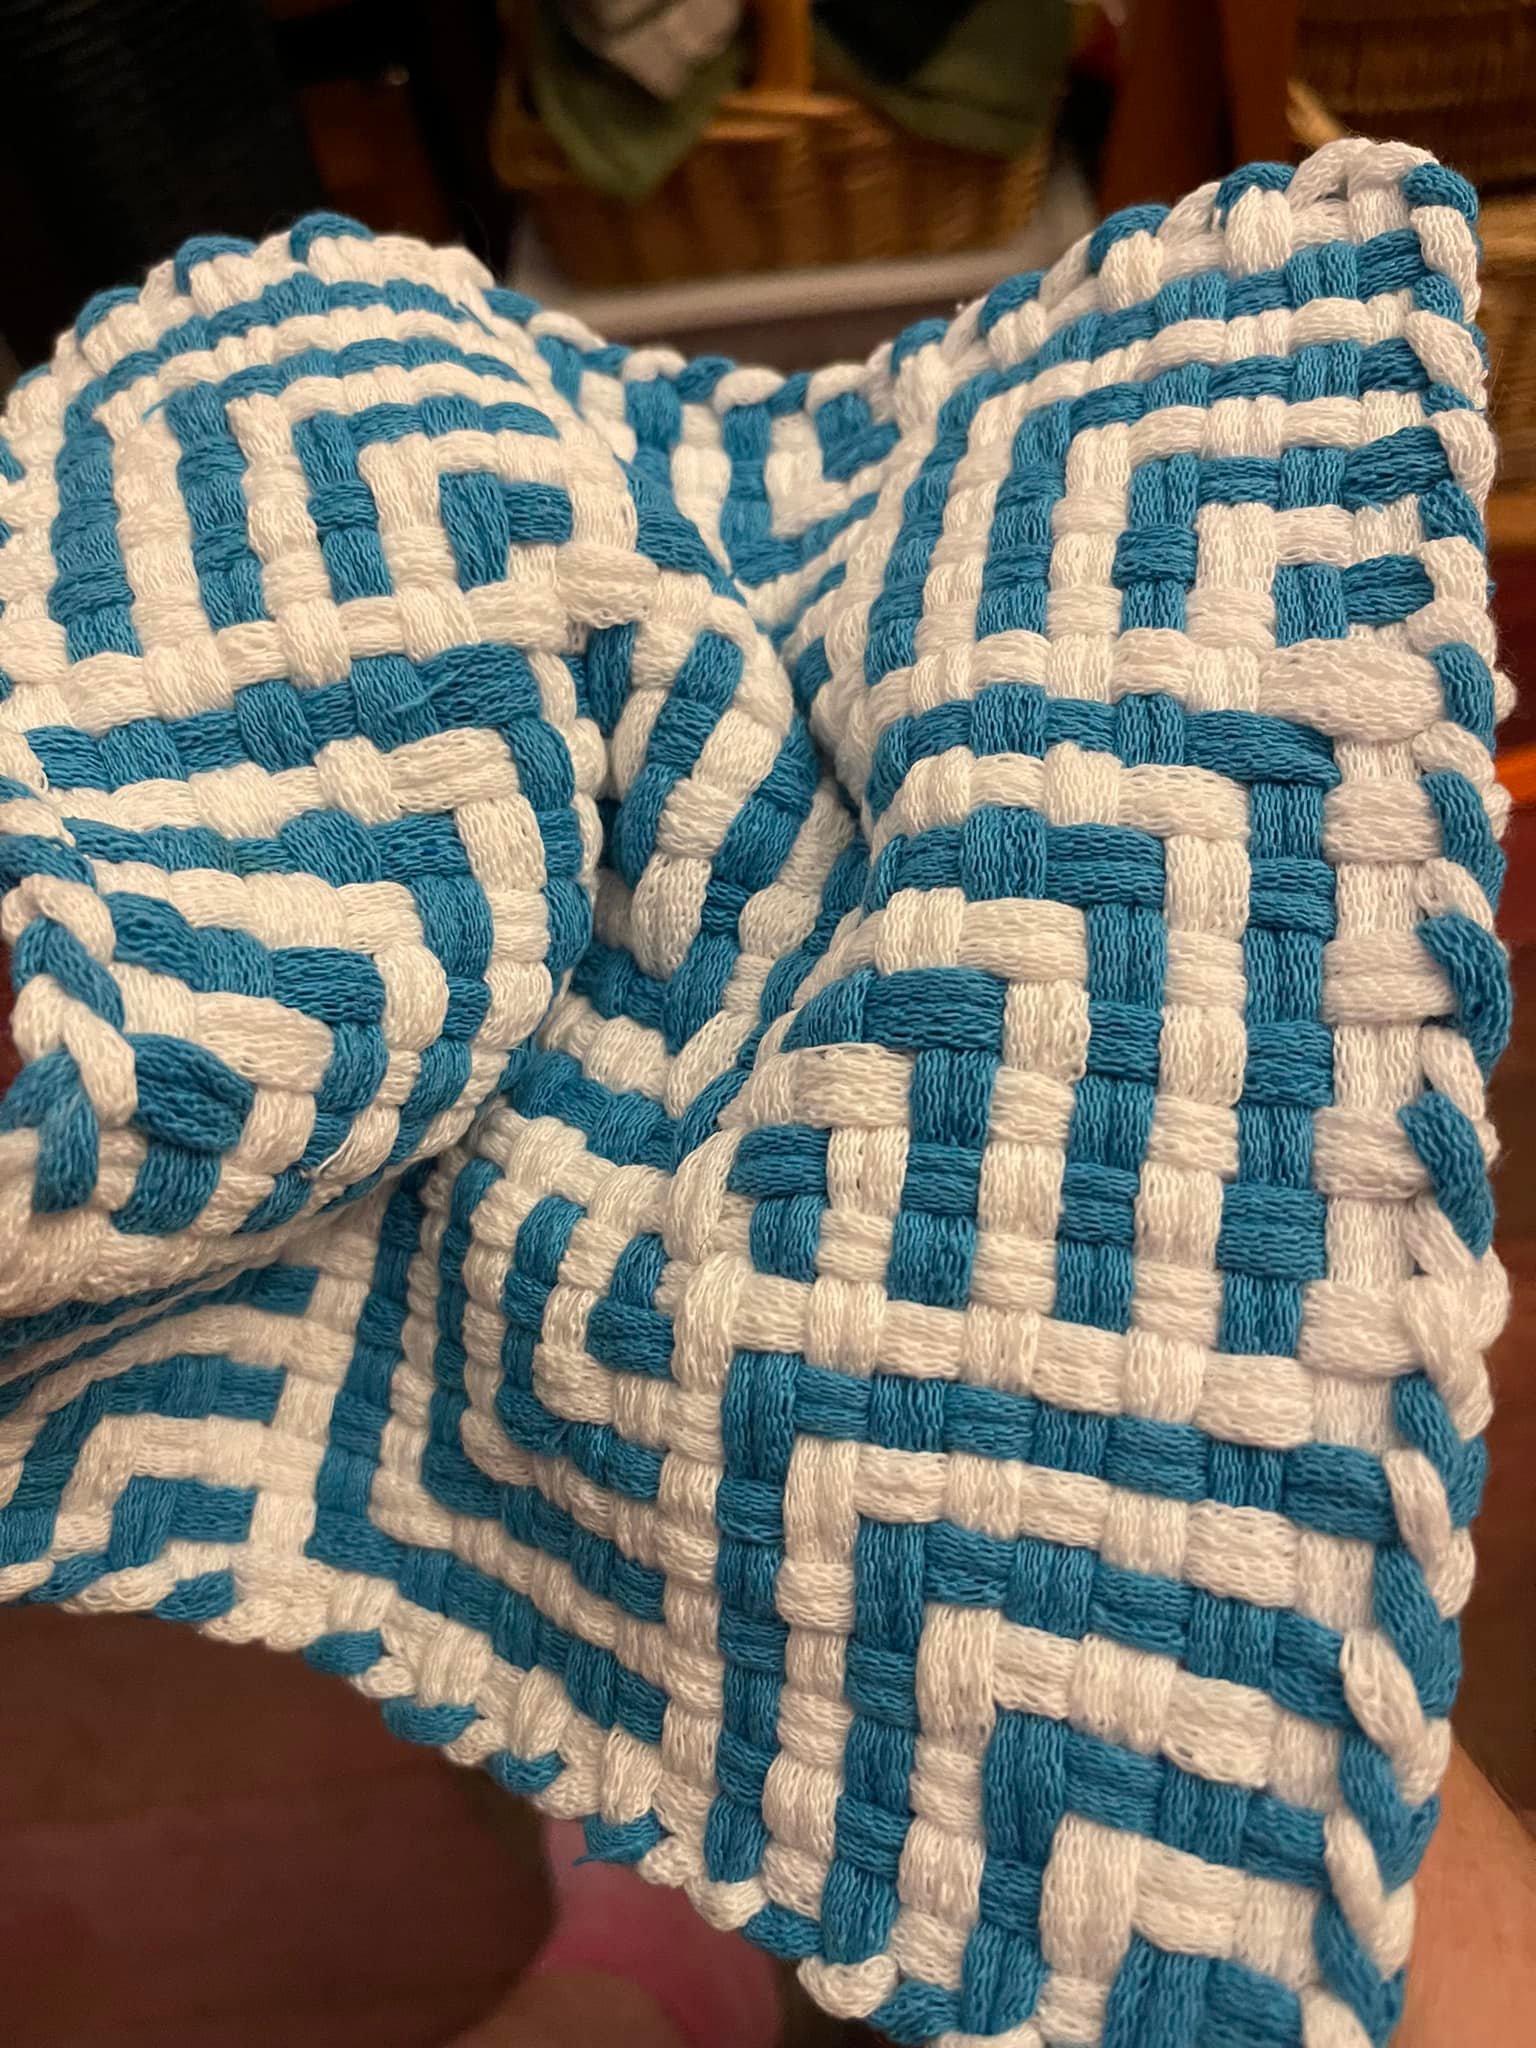
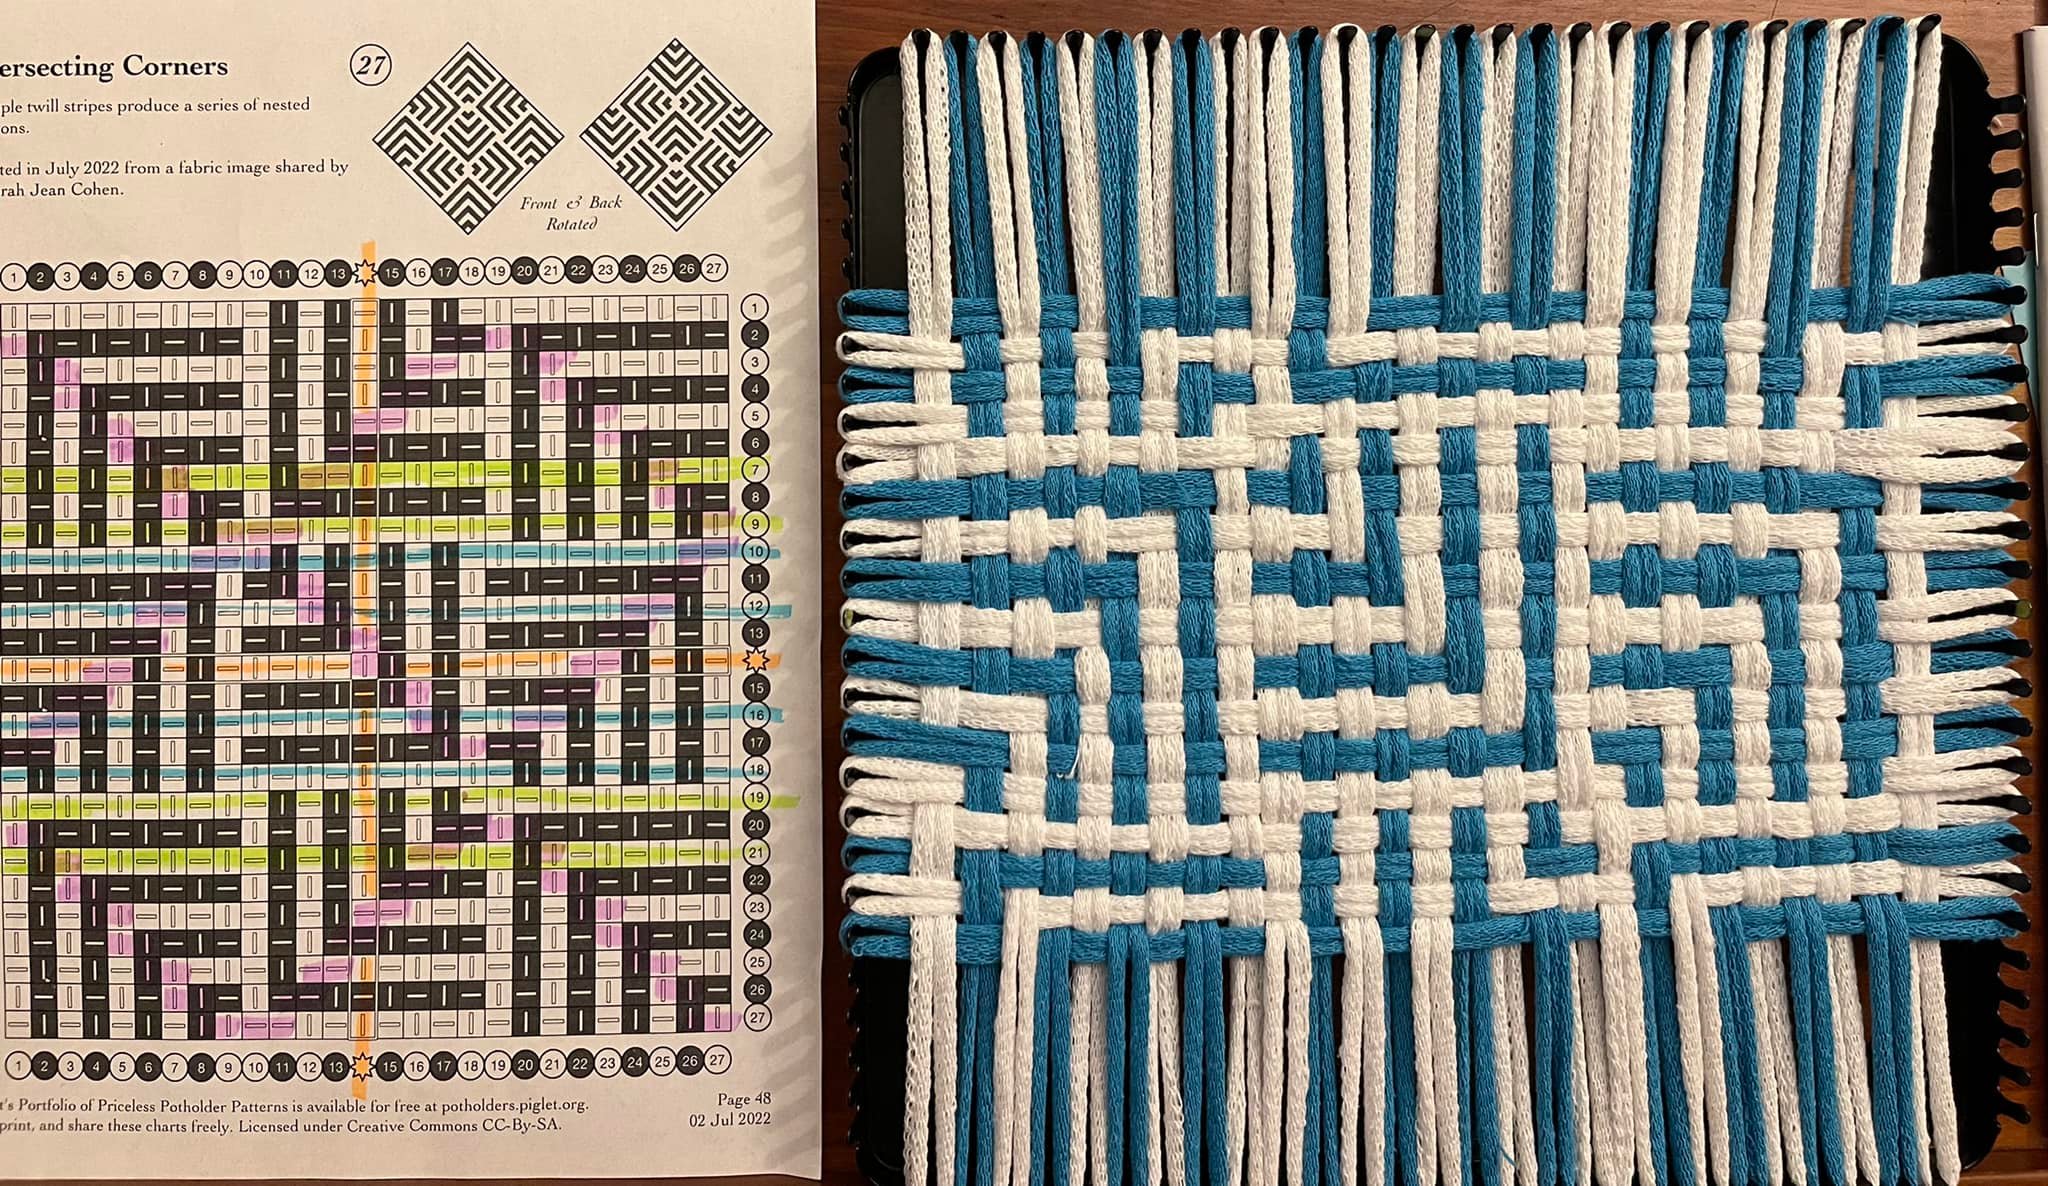
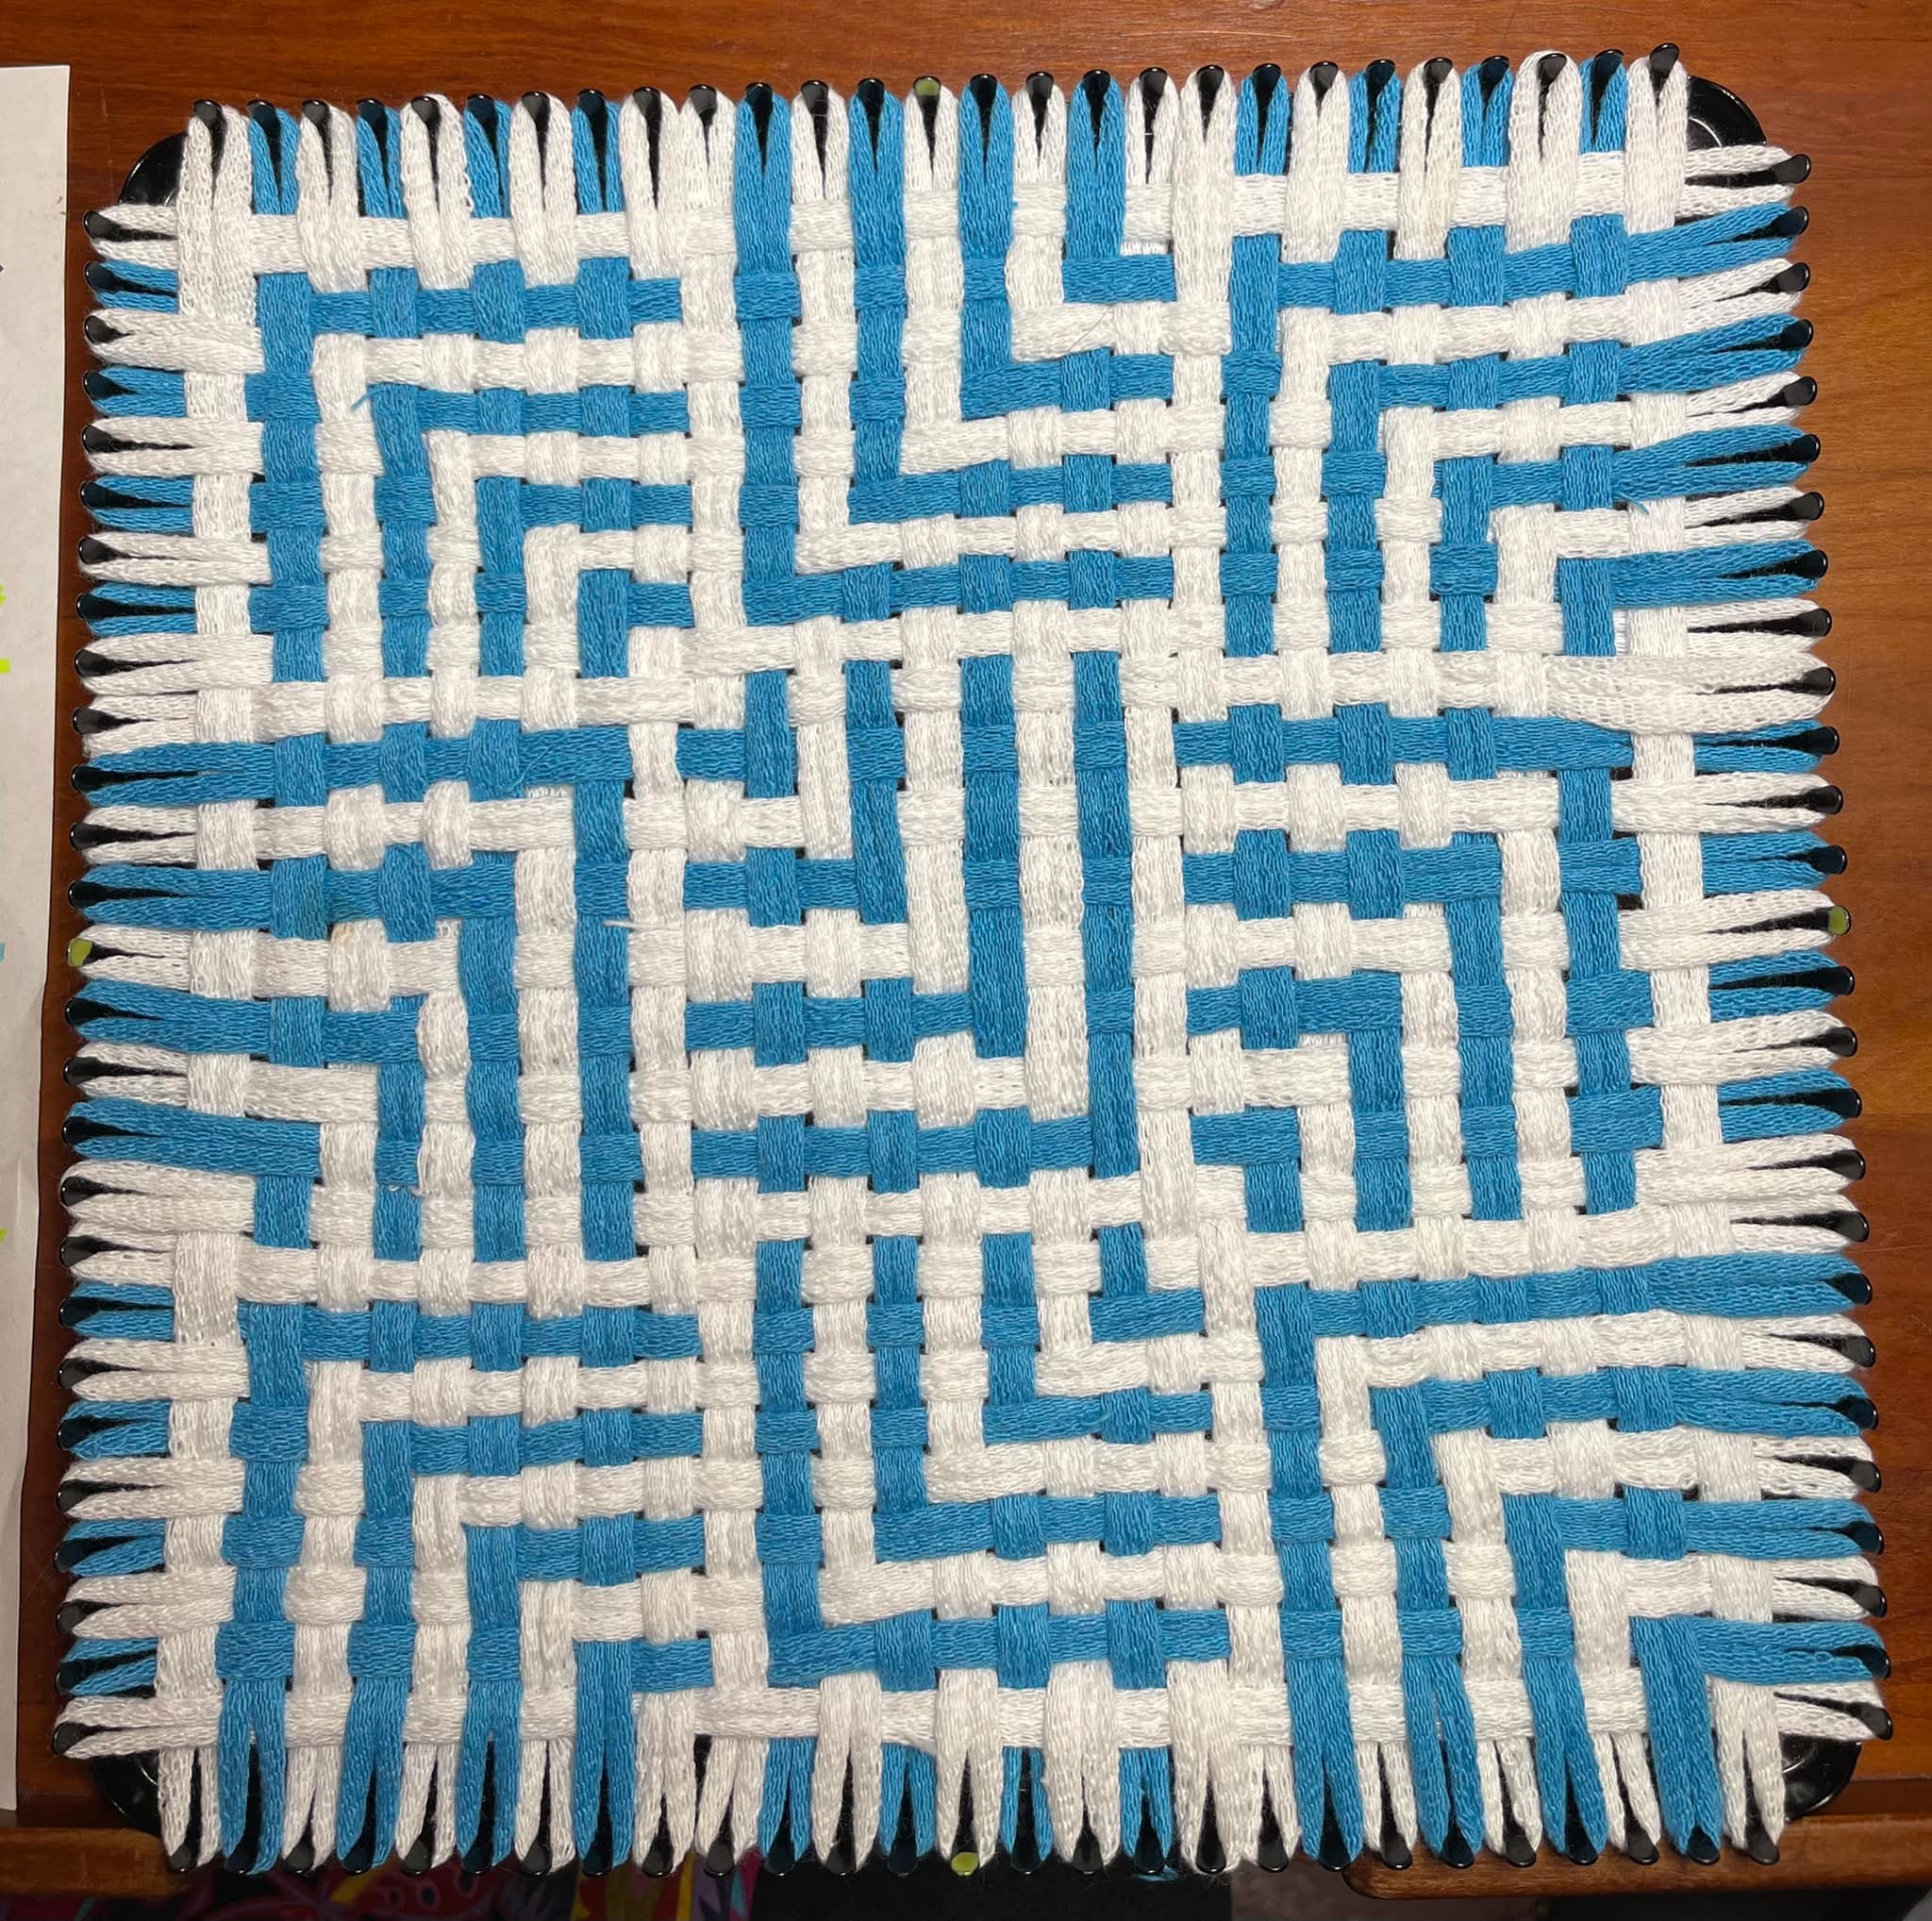
Intersecting Corners is a variation of our earlier “Diverging Corners” chart that was inspired by a fabric image shared by Deborah Jean Cohen. An interesting mix of tabby sections linked by twill diagonals create a flexible, scrunchable fabric that is mostly flat and even.
The diagonal twill lines (which are horizontal and vertical in the hanging position) are evident on the potholder surface.
Look how easily you can scrunch the potholder in your hand.
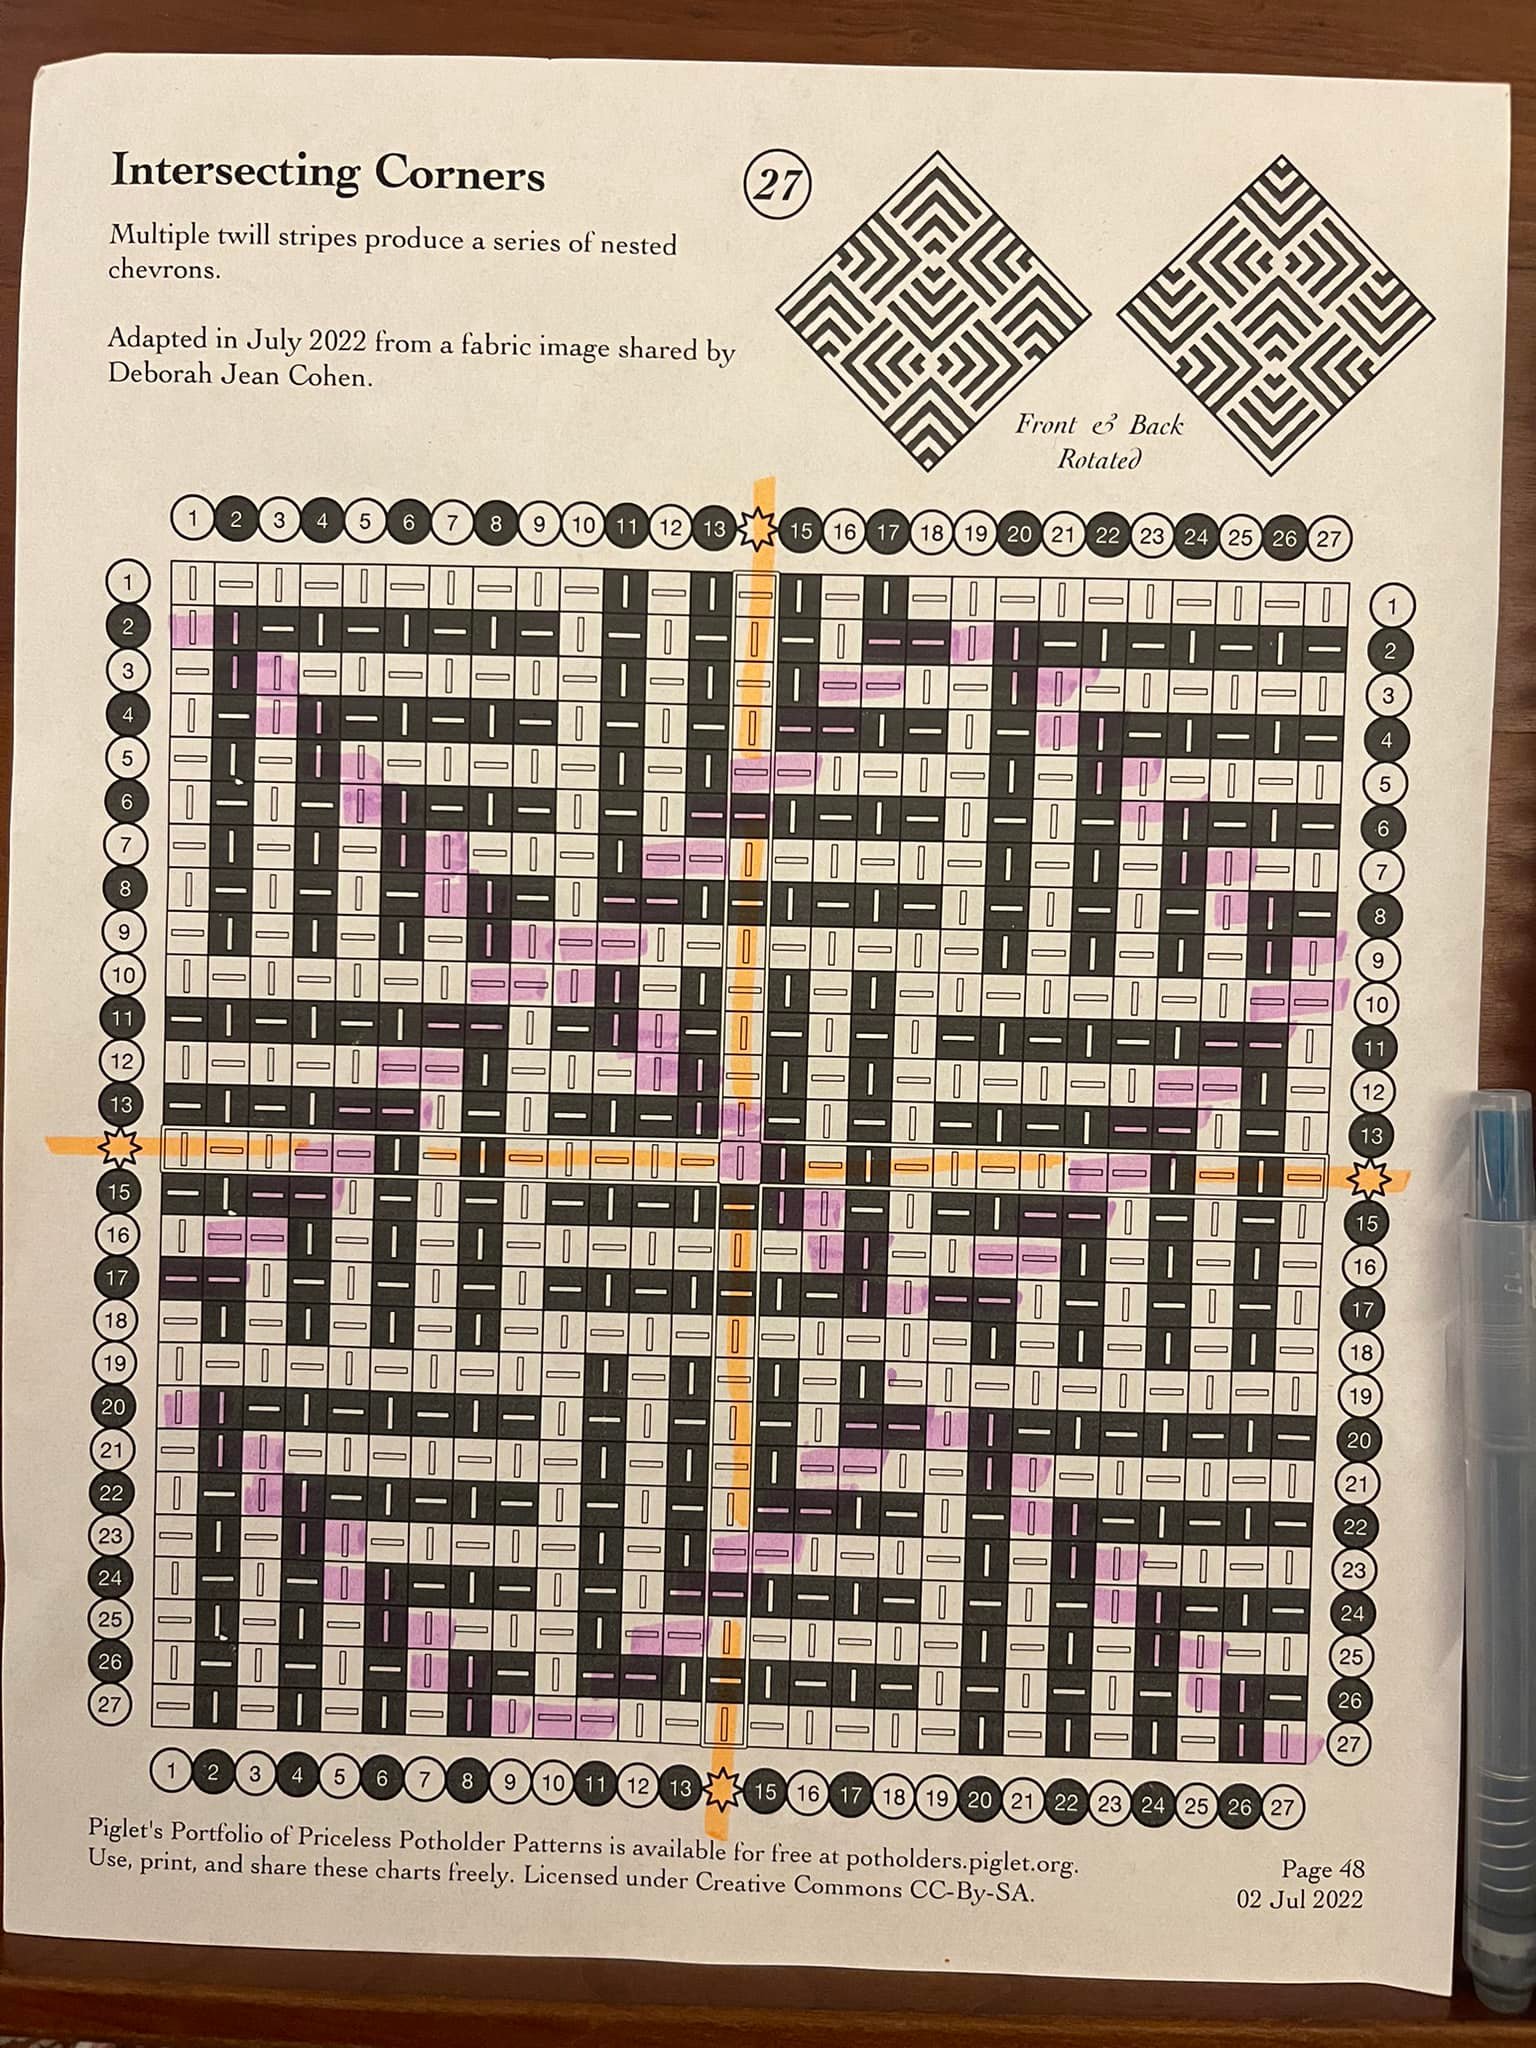
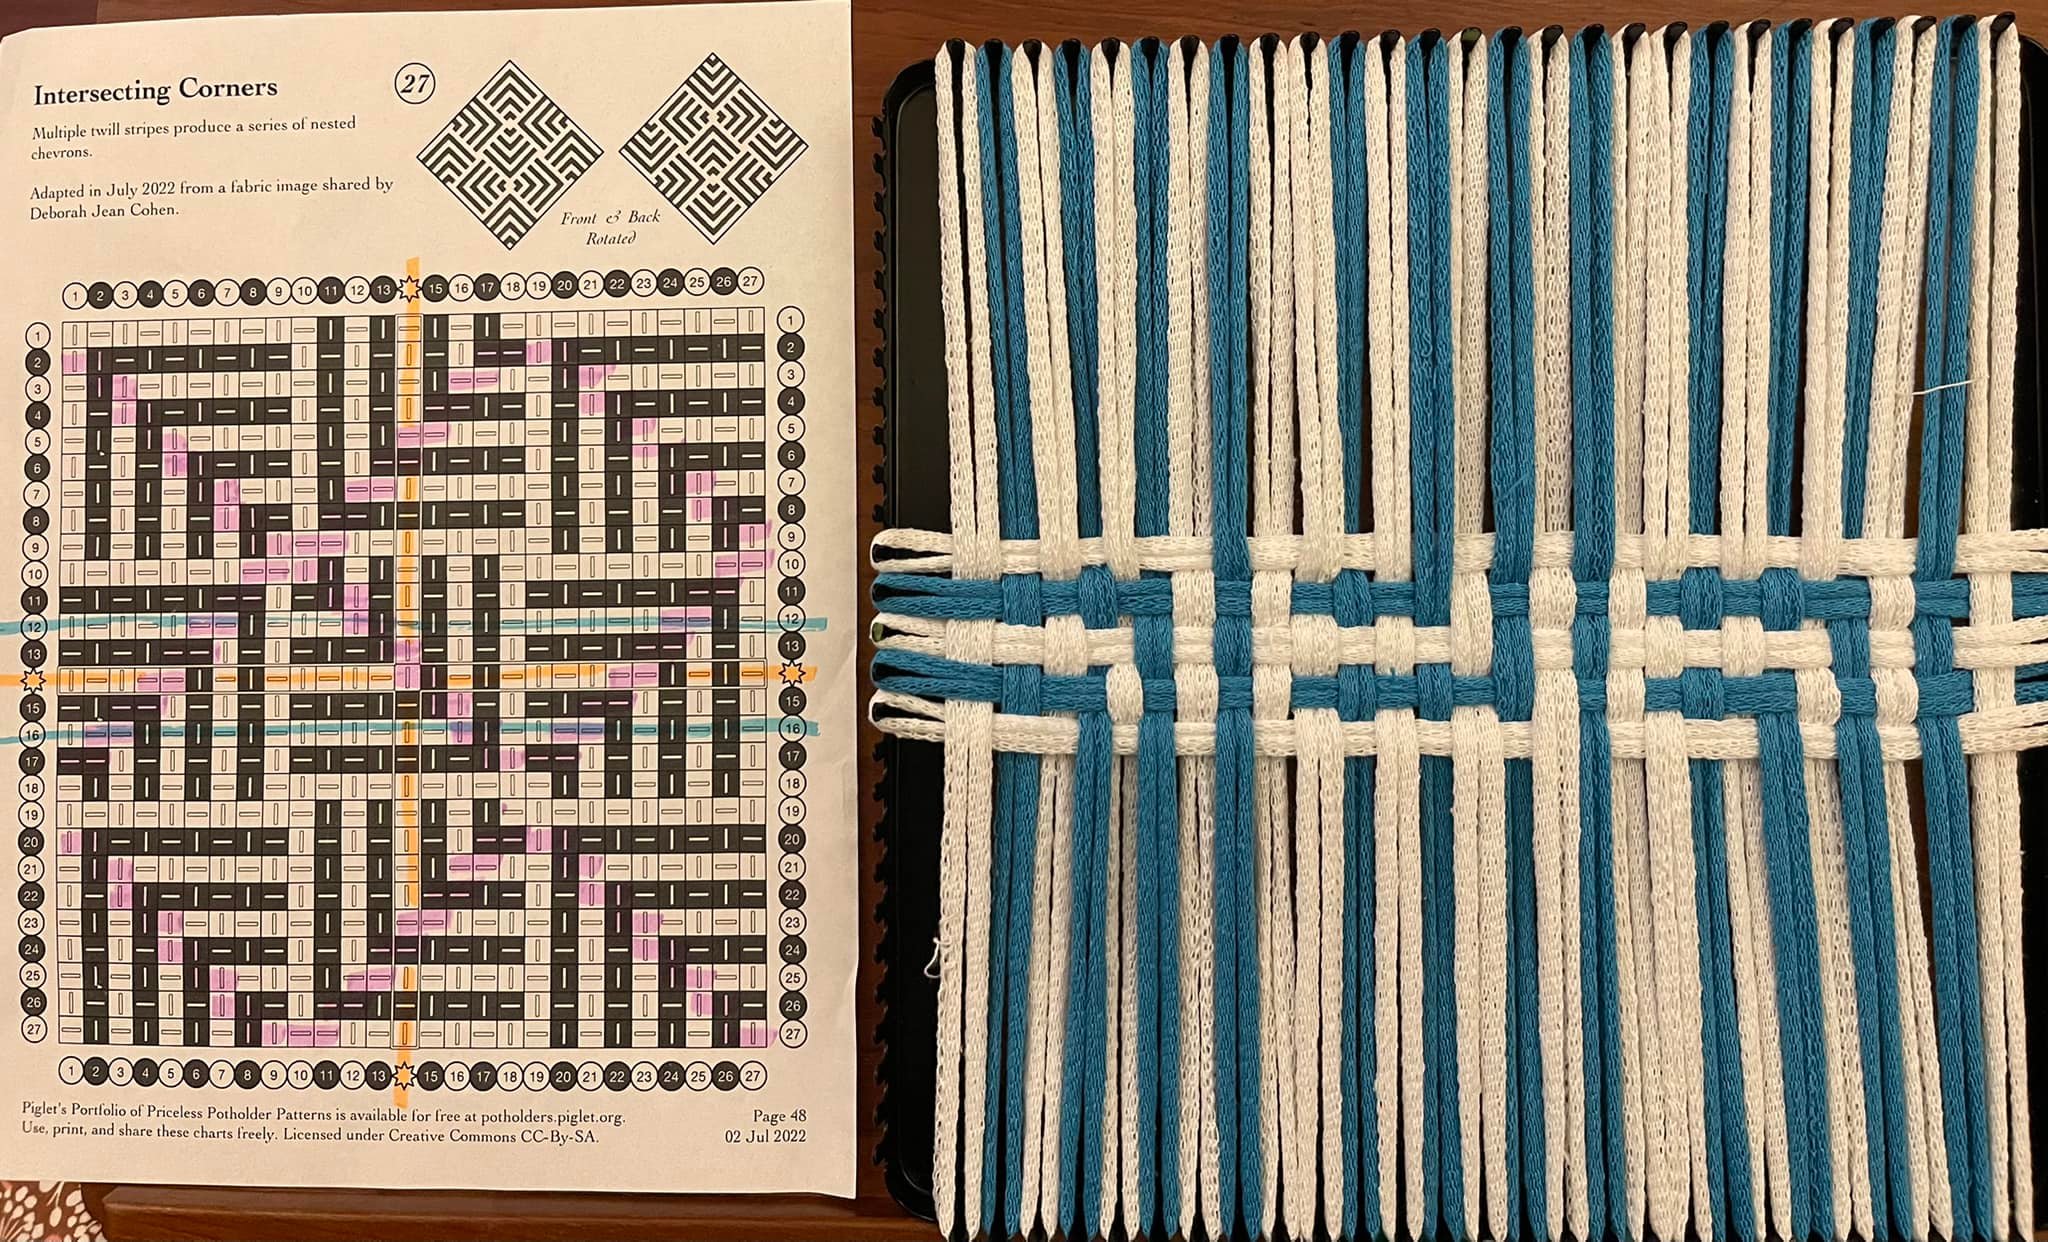
Highlighting the over(under)-2s before beginning to weave reveals the diagonal pattern of twill lines, in 3 alternating zig-zags. The potholder will bias around those lines, so it flexes in many directions.
The first 3 rows lock in the pattern.
5 rows….
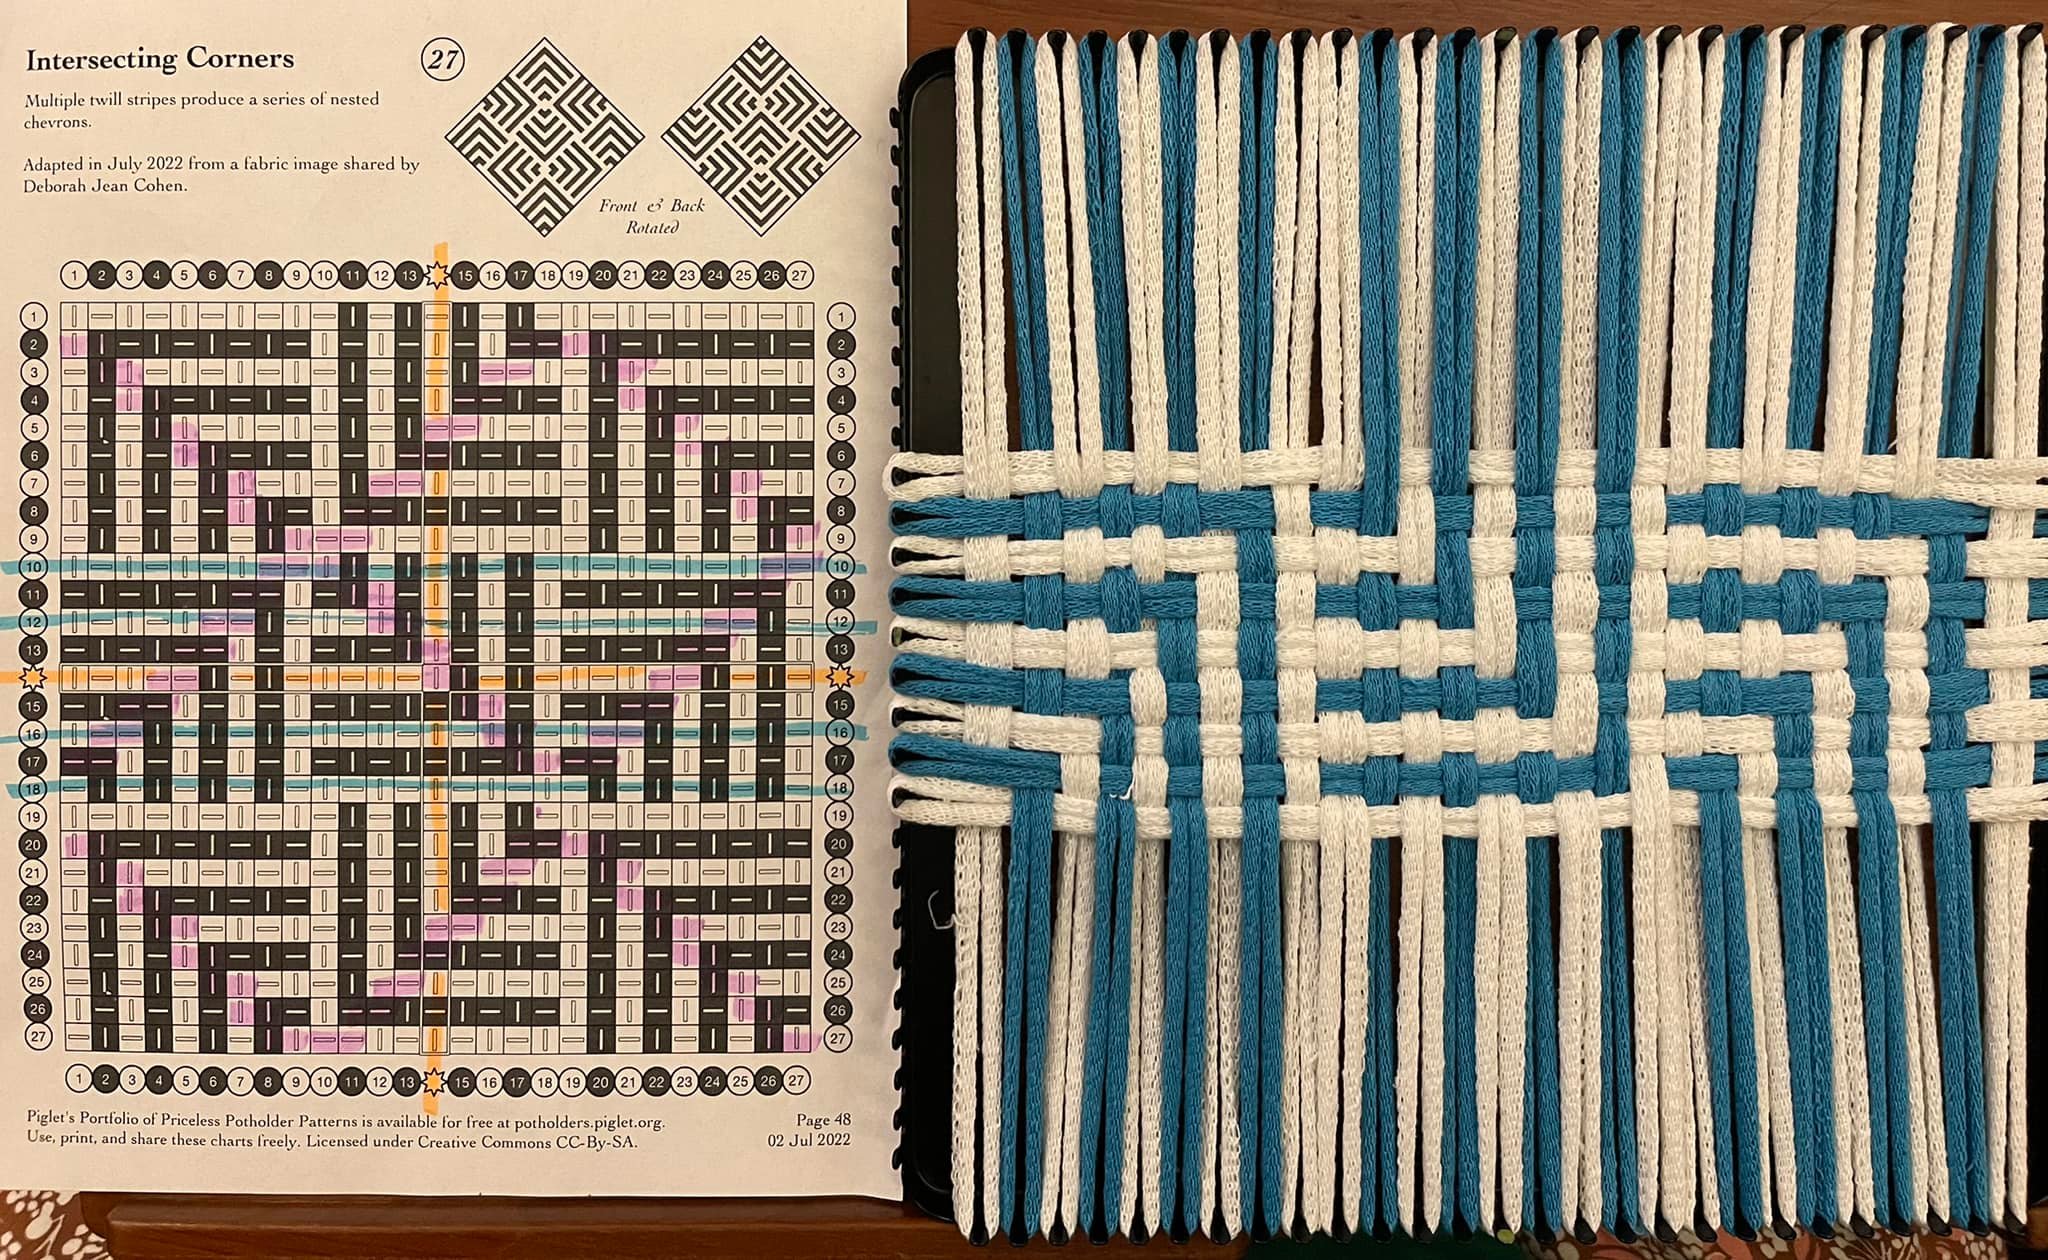
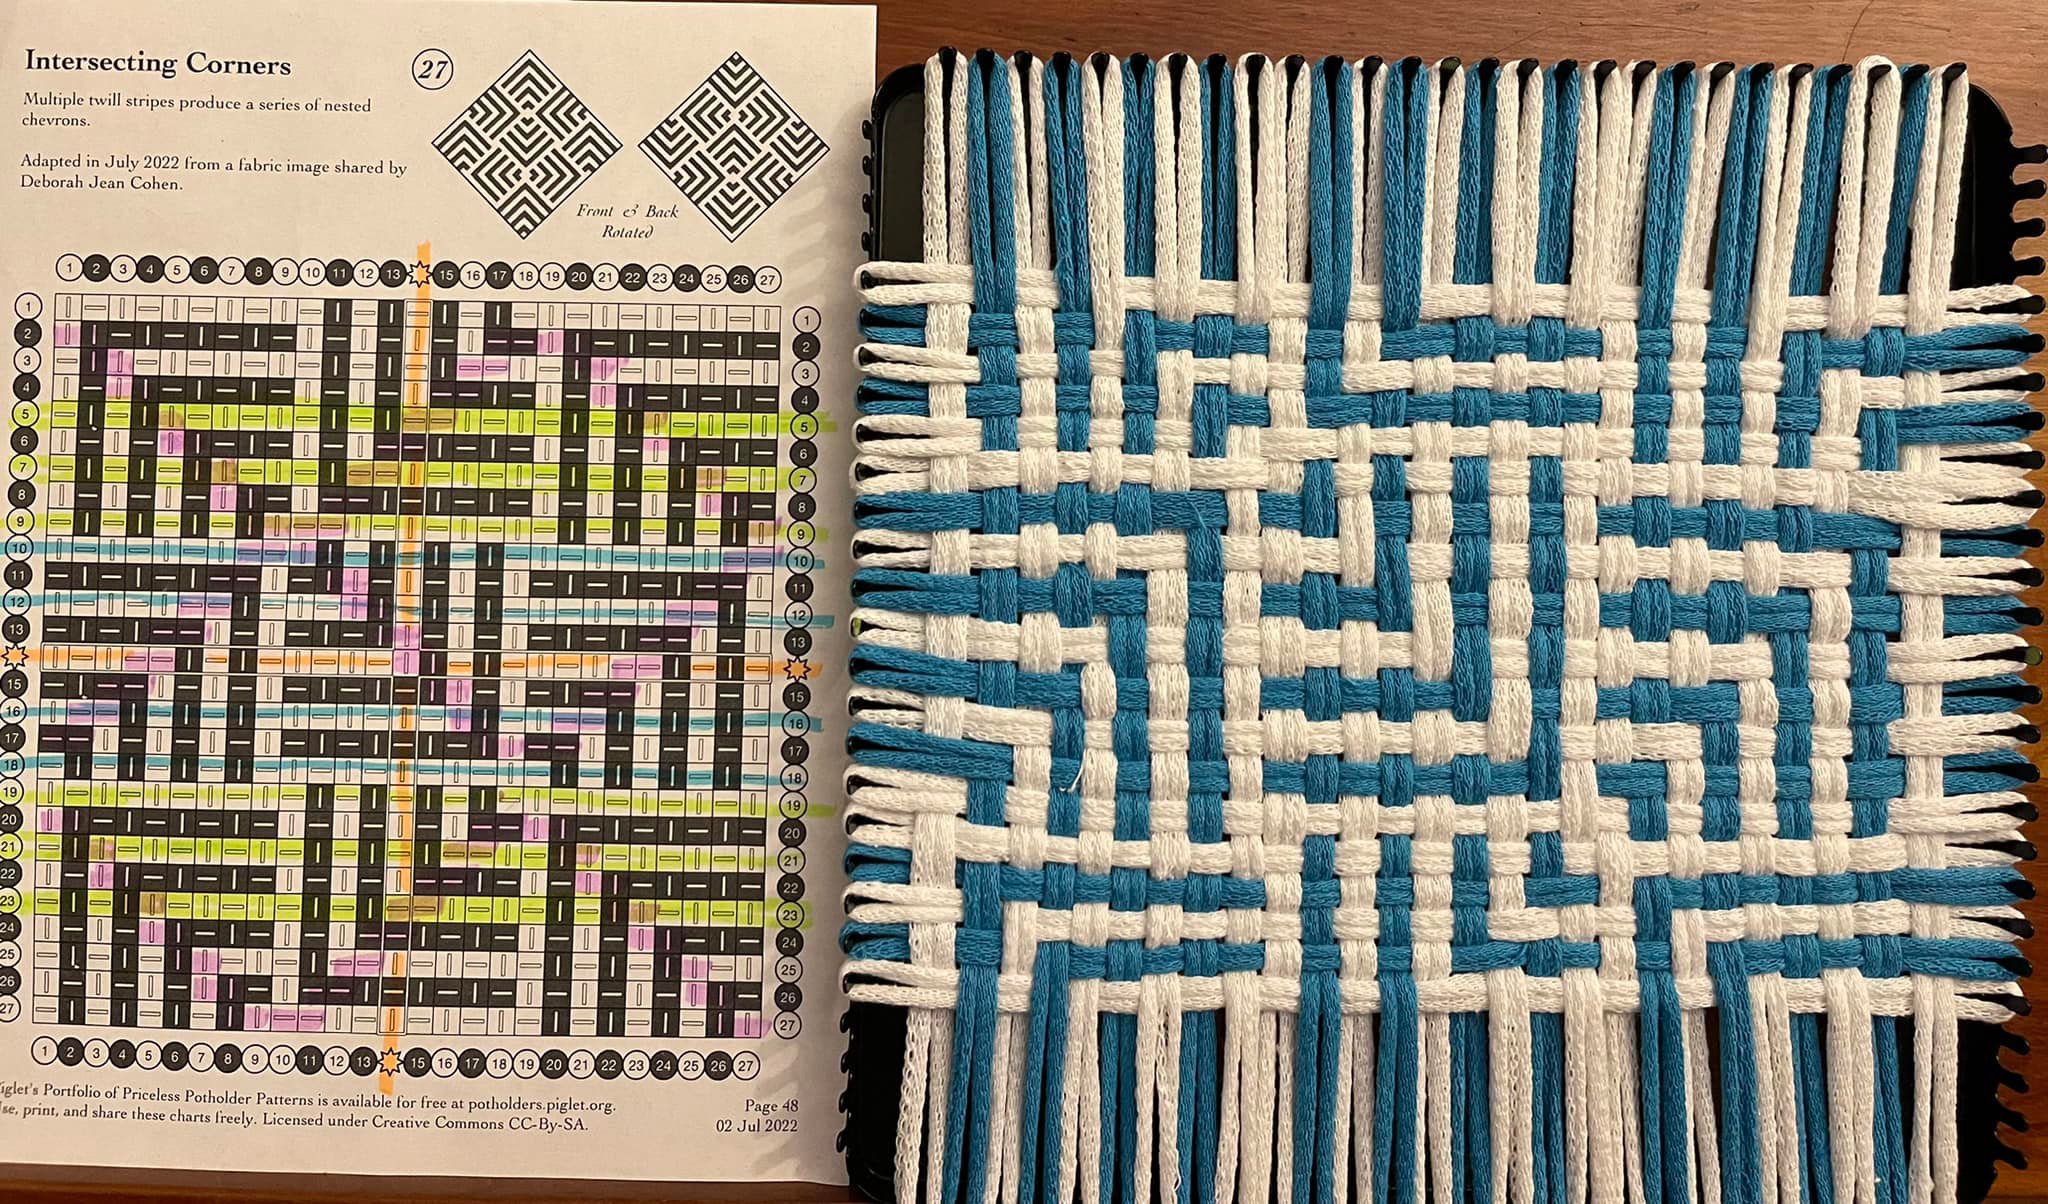
This chart is complicated enough that I mark my progress as I weave to help my eye track on the correct row.
7 rows…
9 rows and the chart-in-progress.
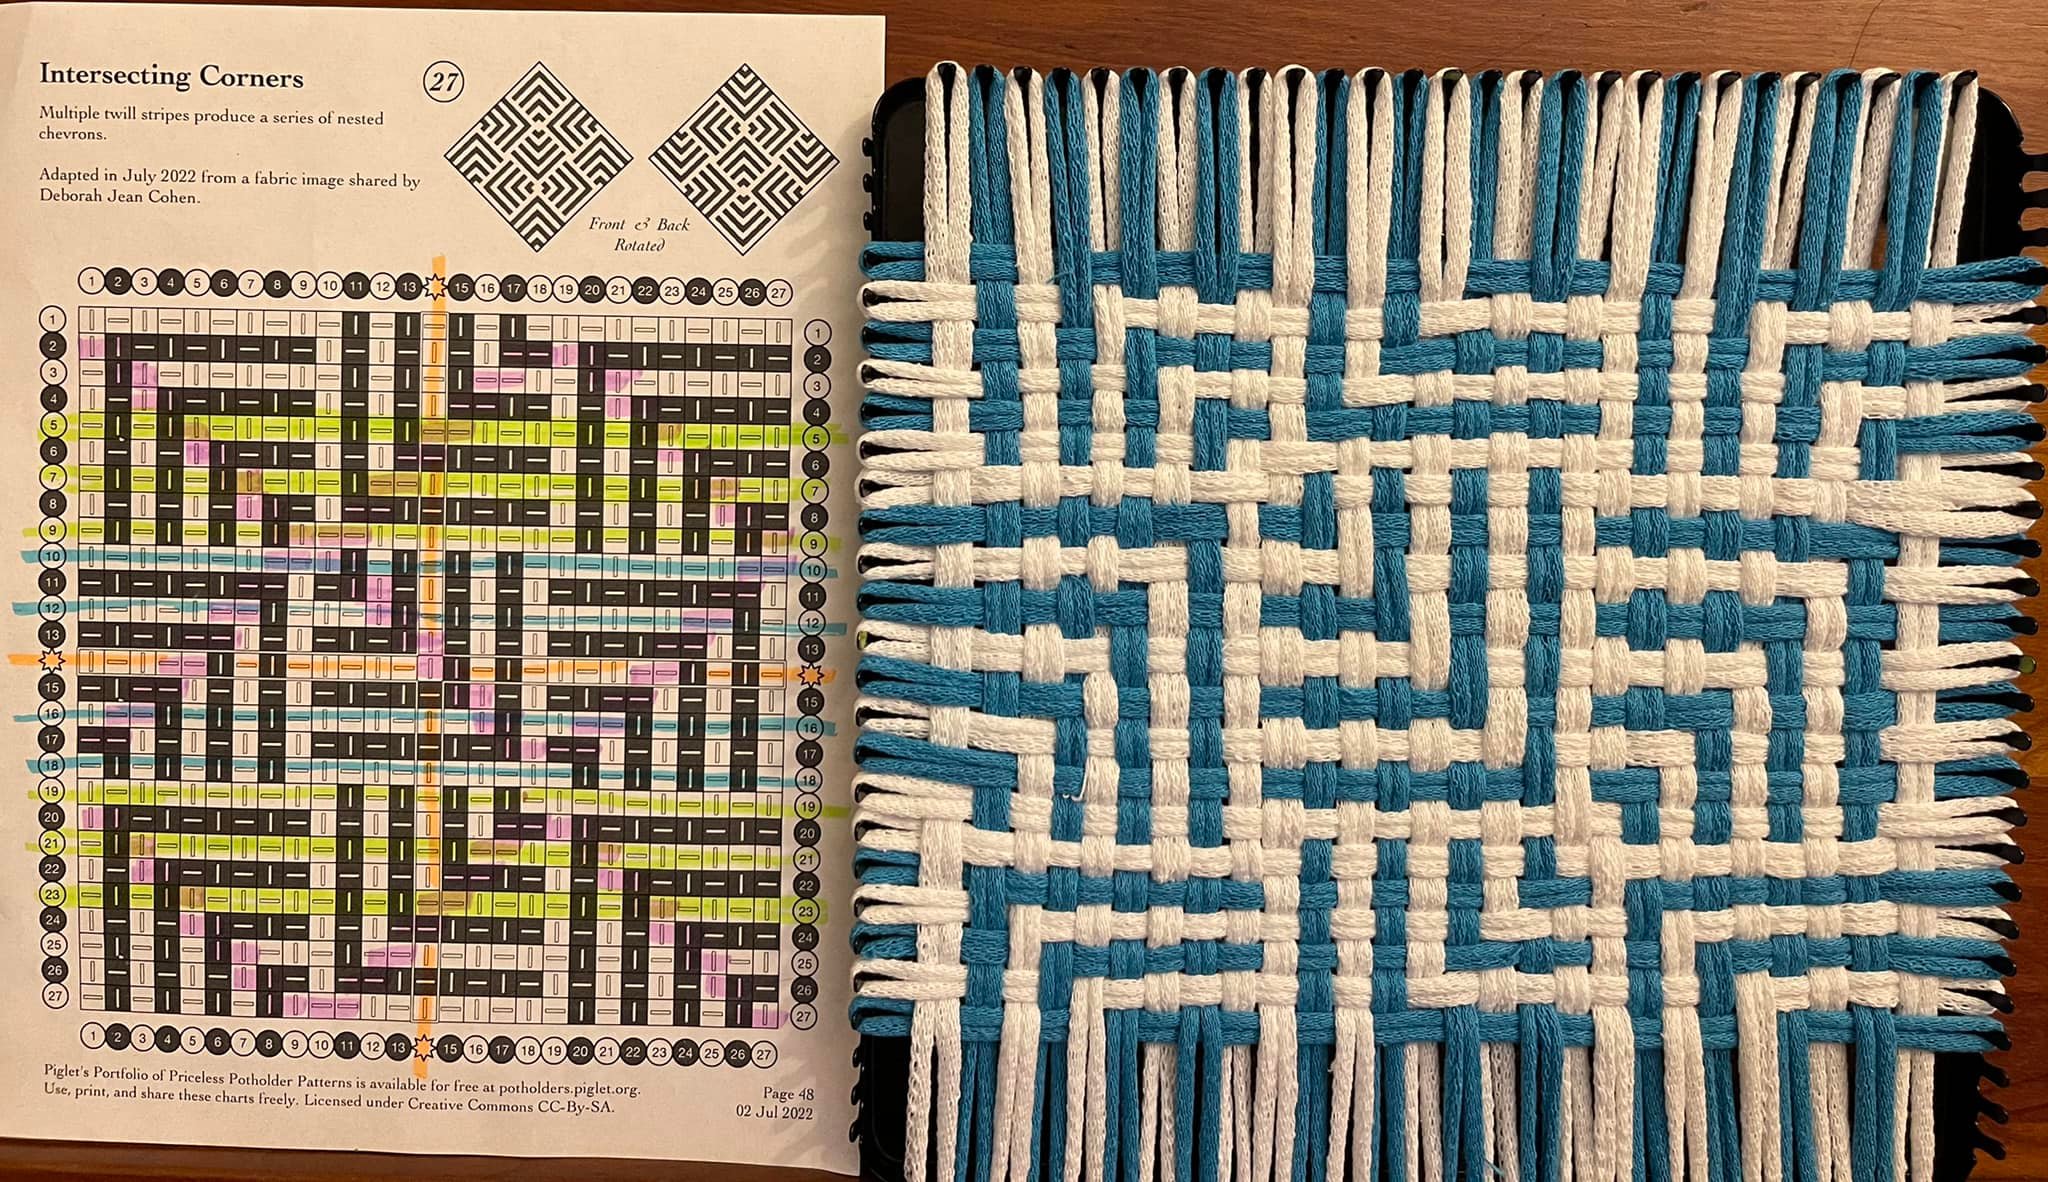
13 rows (and the chart)…
17 rows (+ chart)…
19 rows…
21…
23…
27…
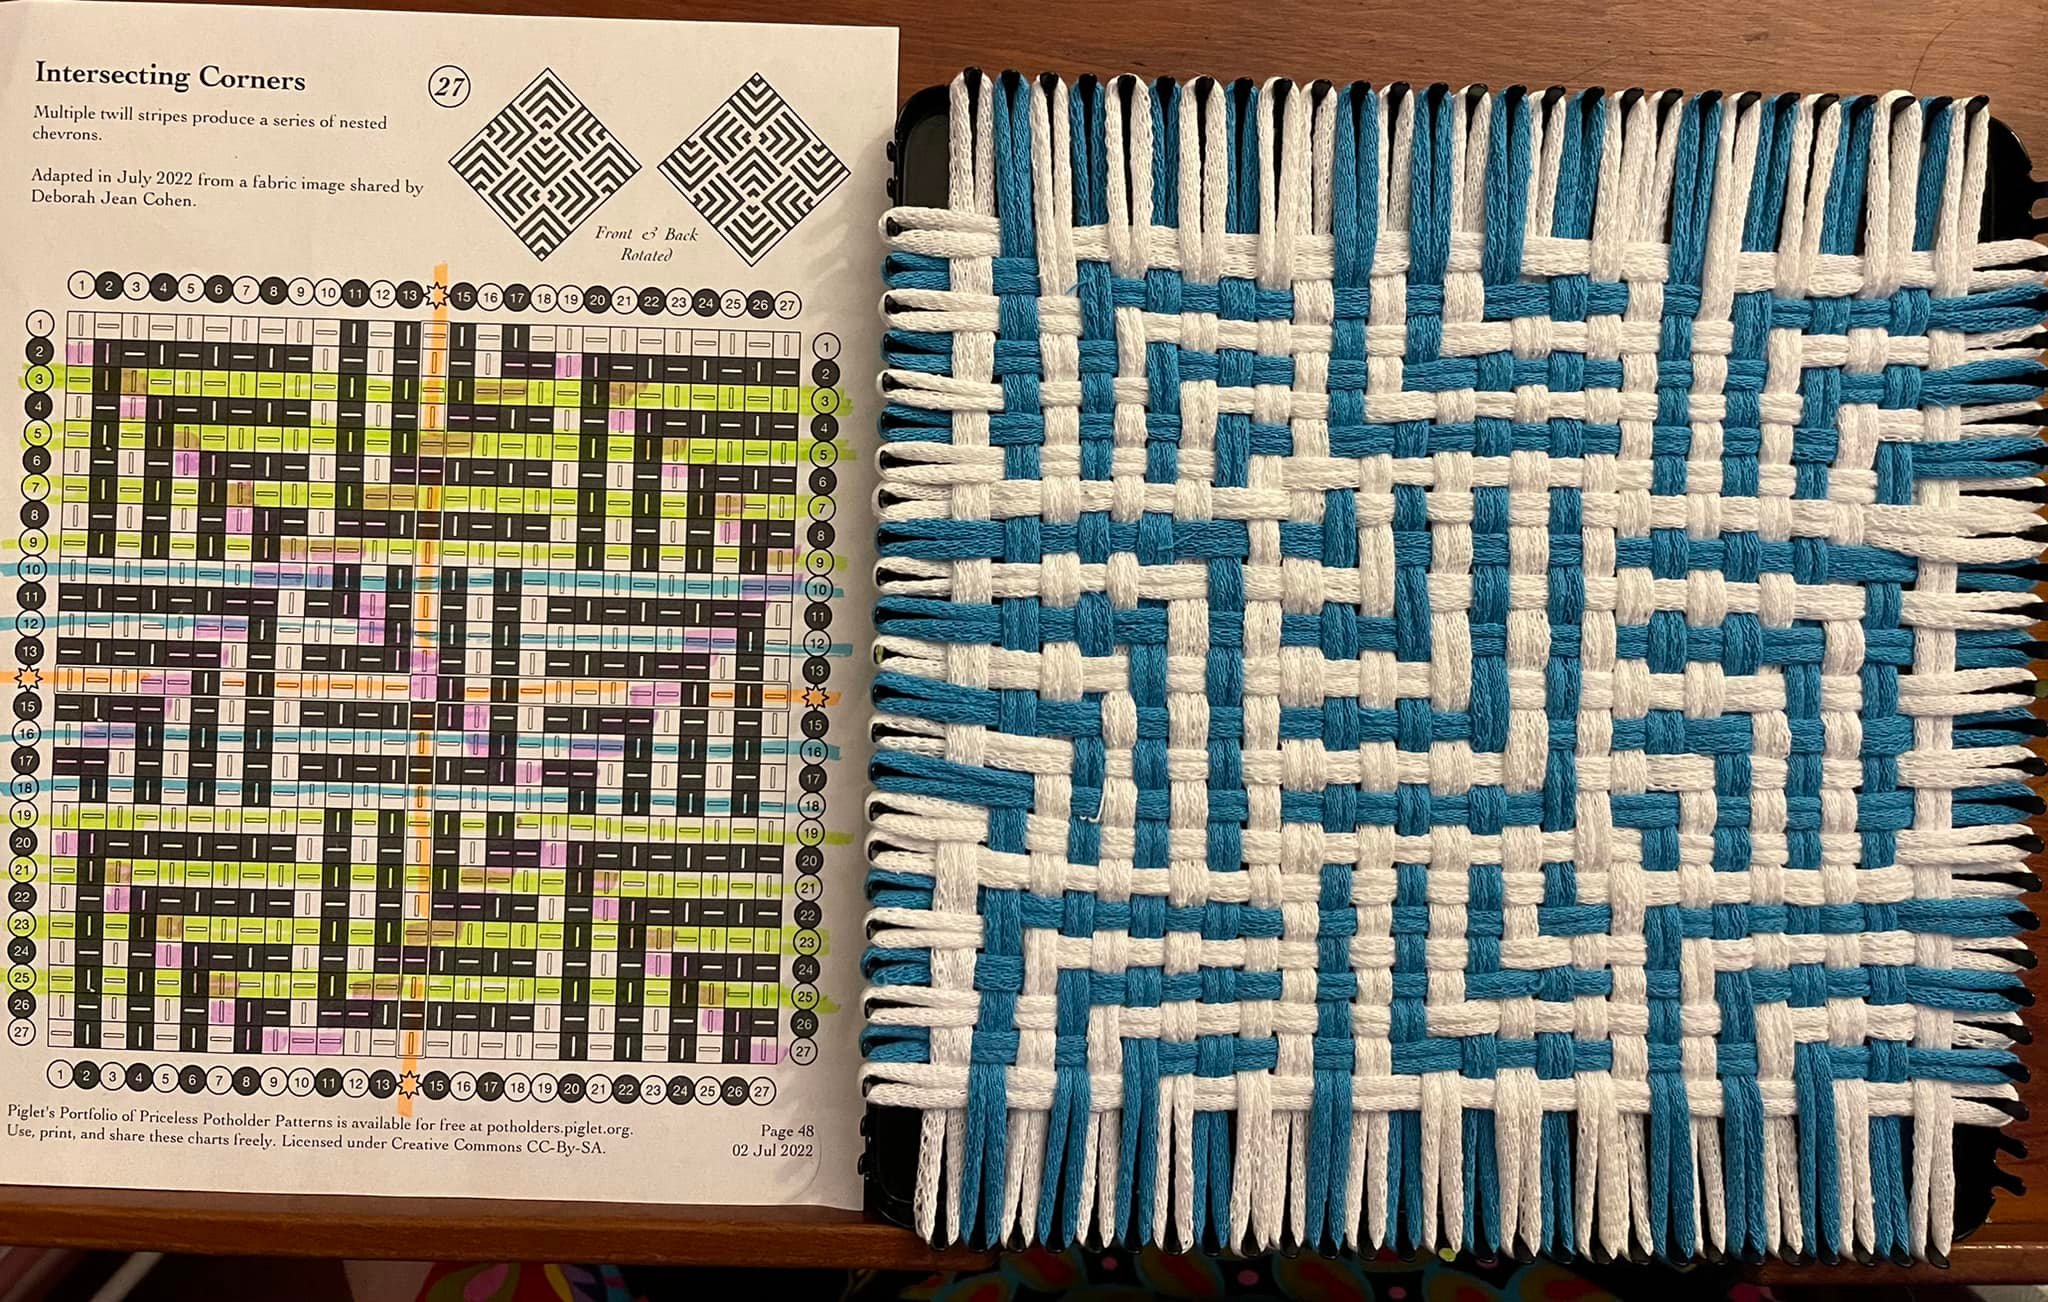
Finished, still on the loom.
Completed chart, showing all of the highlighting accumulated along the way.
And here’s a clean chart you can download and print:
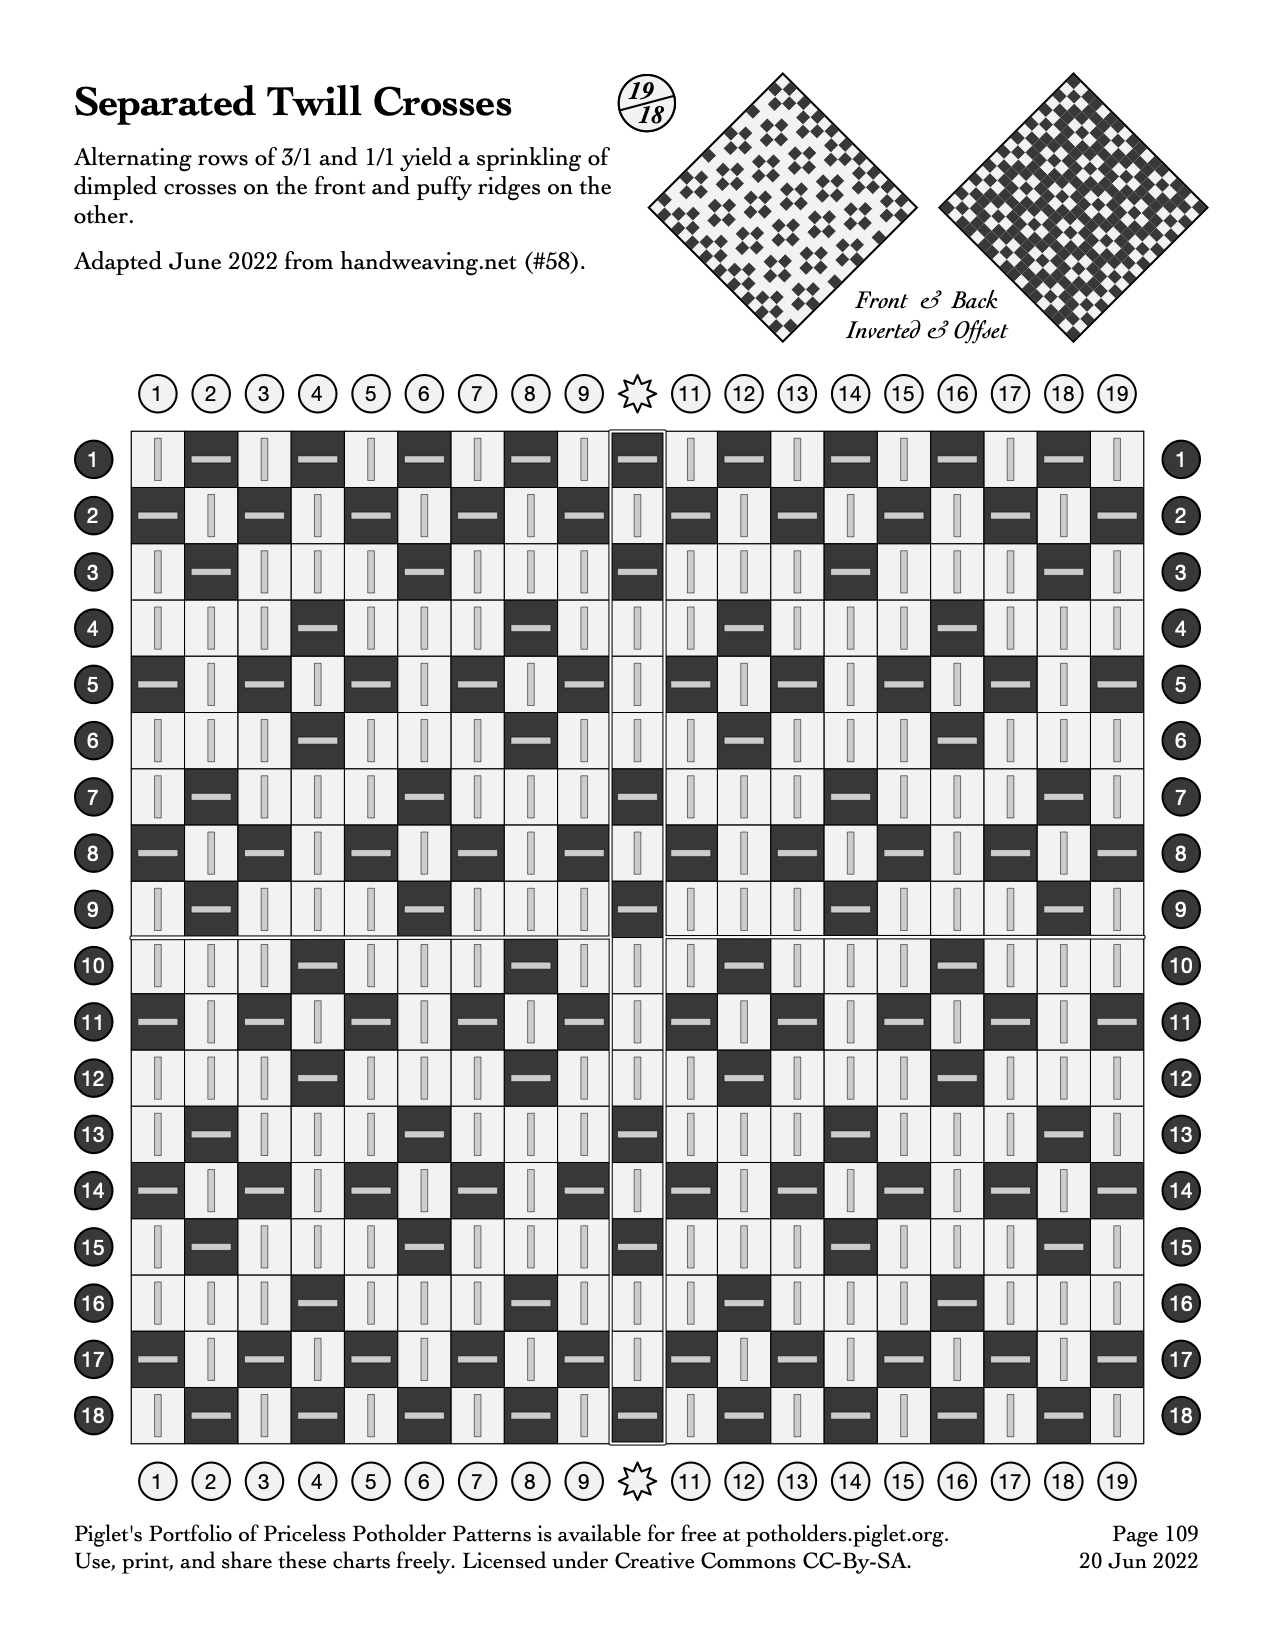
Adventures in twill continued! Wherein we discover that the back of draft pattern “Separated Twill Crosses” is really the front! This is an astounding fabric that feels very different on each side, and looks on one side nothing like you would expect from the chart.
As I wove this one, I made several changes to the chart that will be reflected in the published version.
Here I have warped the loom with white columns.
Running out of traditional loops! Trying to choose colors for the weft. This pattern can be neatly divided across its width, so I opted for 12 purple and 6 green.
Testing my purple and green combinations, do I want green stripes?
…a green center?
… or green edges?
Green stripes are the most appealing, so I lay out my row loops in order, 3 purple, 3 green, 6 purple, 3 green, 3 purple. For pattern consistency, I have added a 19th column to my loom. You can see that I folded the 27-peg chart at 19 columns, 18 rows, where the pattern of crosses comes out complete. We have 6 rows of crosses in the pattern, alternating 5 or 4 crosses across each row. The vertical repeat is 3 rows; the horizontal repeat is 4 columns (minus one at the end).
Row 9. You can see how I am handling the 19th column, by hooking it on the pegs for 18, and simply weaving into it as I get there. The work spreads out as I go.
Row 10. Notice how the 3/1 twills center over each other. This pattern is very easy to weave because of the consistency.
Rows 8 and 11 are tabby (over / under across the row).
Rows 7 and 12.
Now we begin the green sections, which I have highlighted in green to remind me where to change colors (my loops are also in order; this is a cross-check).
Rows 6 and 13.
Rows 5 and 14 are tabby, again.
Rows 4 and 15 finish our green stripes.
Rows 3 and 16.
Rows 2 and 17, tabby.
And we finish the chart as drafted with rows 1 and 18, both in 3/1 twill.
Will I prefer the edge if I switch that last row to tabby? There is only one way to find out; experiment. So I switch the bottom row (18) to tabby, leaving the first row as twills.
As you might expect, the two edges behave very differently, on the front…
And on the back….
The “back” side has a distinct diagonal raised pattern in the white floats.
The “front” side has a longitudinal raised pattern.
Updated use the tabby edge on both ends.
Almost 5.5″ along the short side.
6″ at the long tabby edges, a bit narrower in the center.
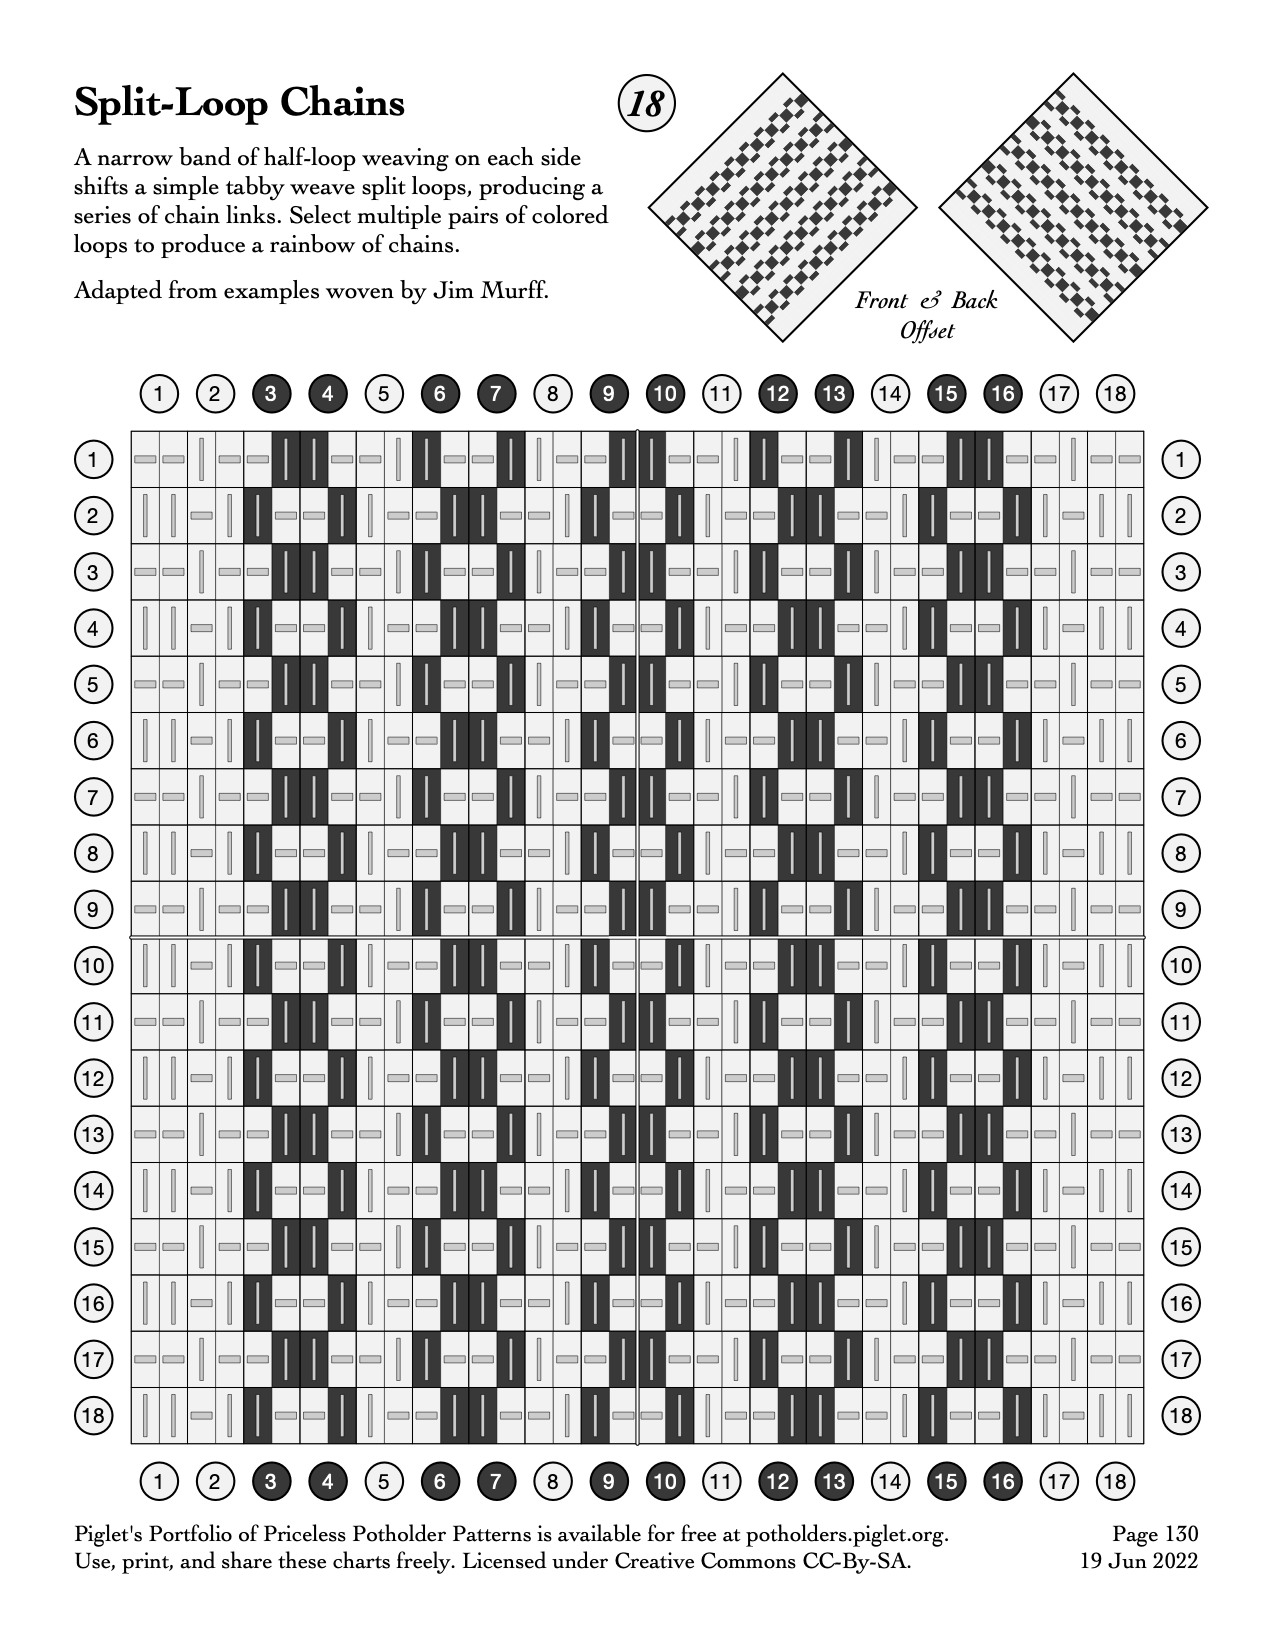
Our first foray into charting split loops, Split-Loop Chains.
Here we have a simple chain, formed by threading and 2 half-floats (crossing a single strand instead of both strands of the same loop). The outmost columns, with no splits, feel like the expected tabby (over/under across the row) fabric. Between the half-floats, you are weaving strands from neighboring loops, which changes the fabric and the tension for the body of the potholder. The columns are harder to bind off because the weave is tighter. The texture is interestingly bumpy and the drape is extremely flexible with no floppiness.
It is very easy to weave, as you can see from the way I highlighted the chart. I marked the half-float columns on either side with purple. Then I marked my starting row (I like to start in the center; you can start wherever you prefer) in yellow. Once I had my first row in place, all neighboring rows can be woven by doing all crossings the other way. The strands are a bit wiggly until you have at least 2 rows locking them in place, so be extra careful at the start.
I’d love to see this in rainbow chains, and I think it would also be very effective as a sub-pattern, maybe as a border along the sides with a plainweave middle, to match the common kitchen towel pattern with side stripes?
Front view of Half-Loop Chains. The irregular appearance of the chains comes down to minor variations in tension. They should settle in as the potholder ages. You can help distribute any puffiness by “finger-blocking” the potholder, stretching it into shape by tugging very hard in both directions, but it will never be geometrically precise.
Rear view of the Half-Loop Chains potholder, in Harrisville traditional orange and white.
The split-loop chart shows both strands of every column, so there are two smaller rectangles in each row/column square of the chart. Rows are woven over – or under | each column strand.
Half-Loop Chains fully woven, still tensioned on the loom.
Here is a closeup of the texture variation between the plainweave white edges, and the split loops of the inner body.
Often people worry about binding off when there is more than one loop on the same side of your last row.
Here’s a series of shots of how to just do it, one loop at a time, and why it works.
Pick up our green column….
And then our flax column….
Now we pick up another green….
…and the next flax, from the same side as the last green. You’ll notice the flax row has a double float on the edge now.
But that’s okay! As soon as we pull the next green loop over the last flax loop, it locks it solidly in place, just like when they alternate. It’s not going anywhere.
To keep the tension until the whole potholder is bound off, I hook loops back onto the loom after binding them off. It stretches them out a bit, as you can see here…
And the stretched loops are still visible right after taking it off the loom.
So we go to the base of each stretched loop, grab it by the short side, and tuuuuuug it to even the distortion.
After tugging, the stretched loops settle back into place.
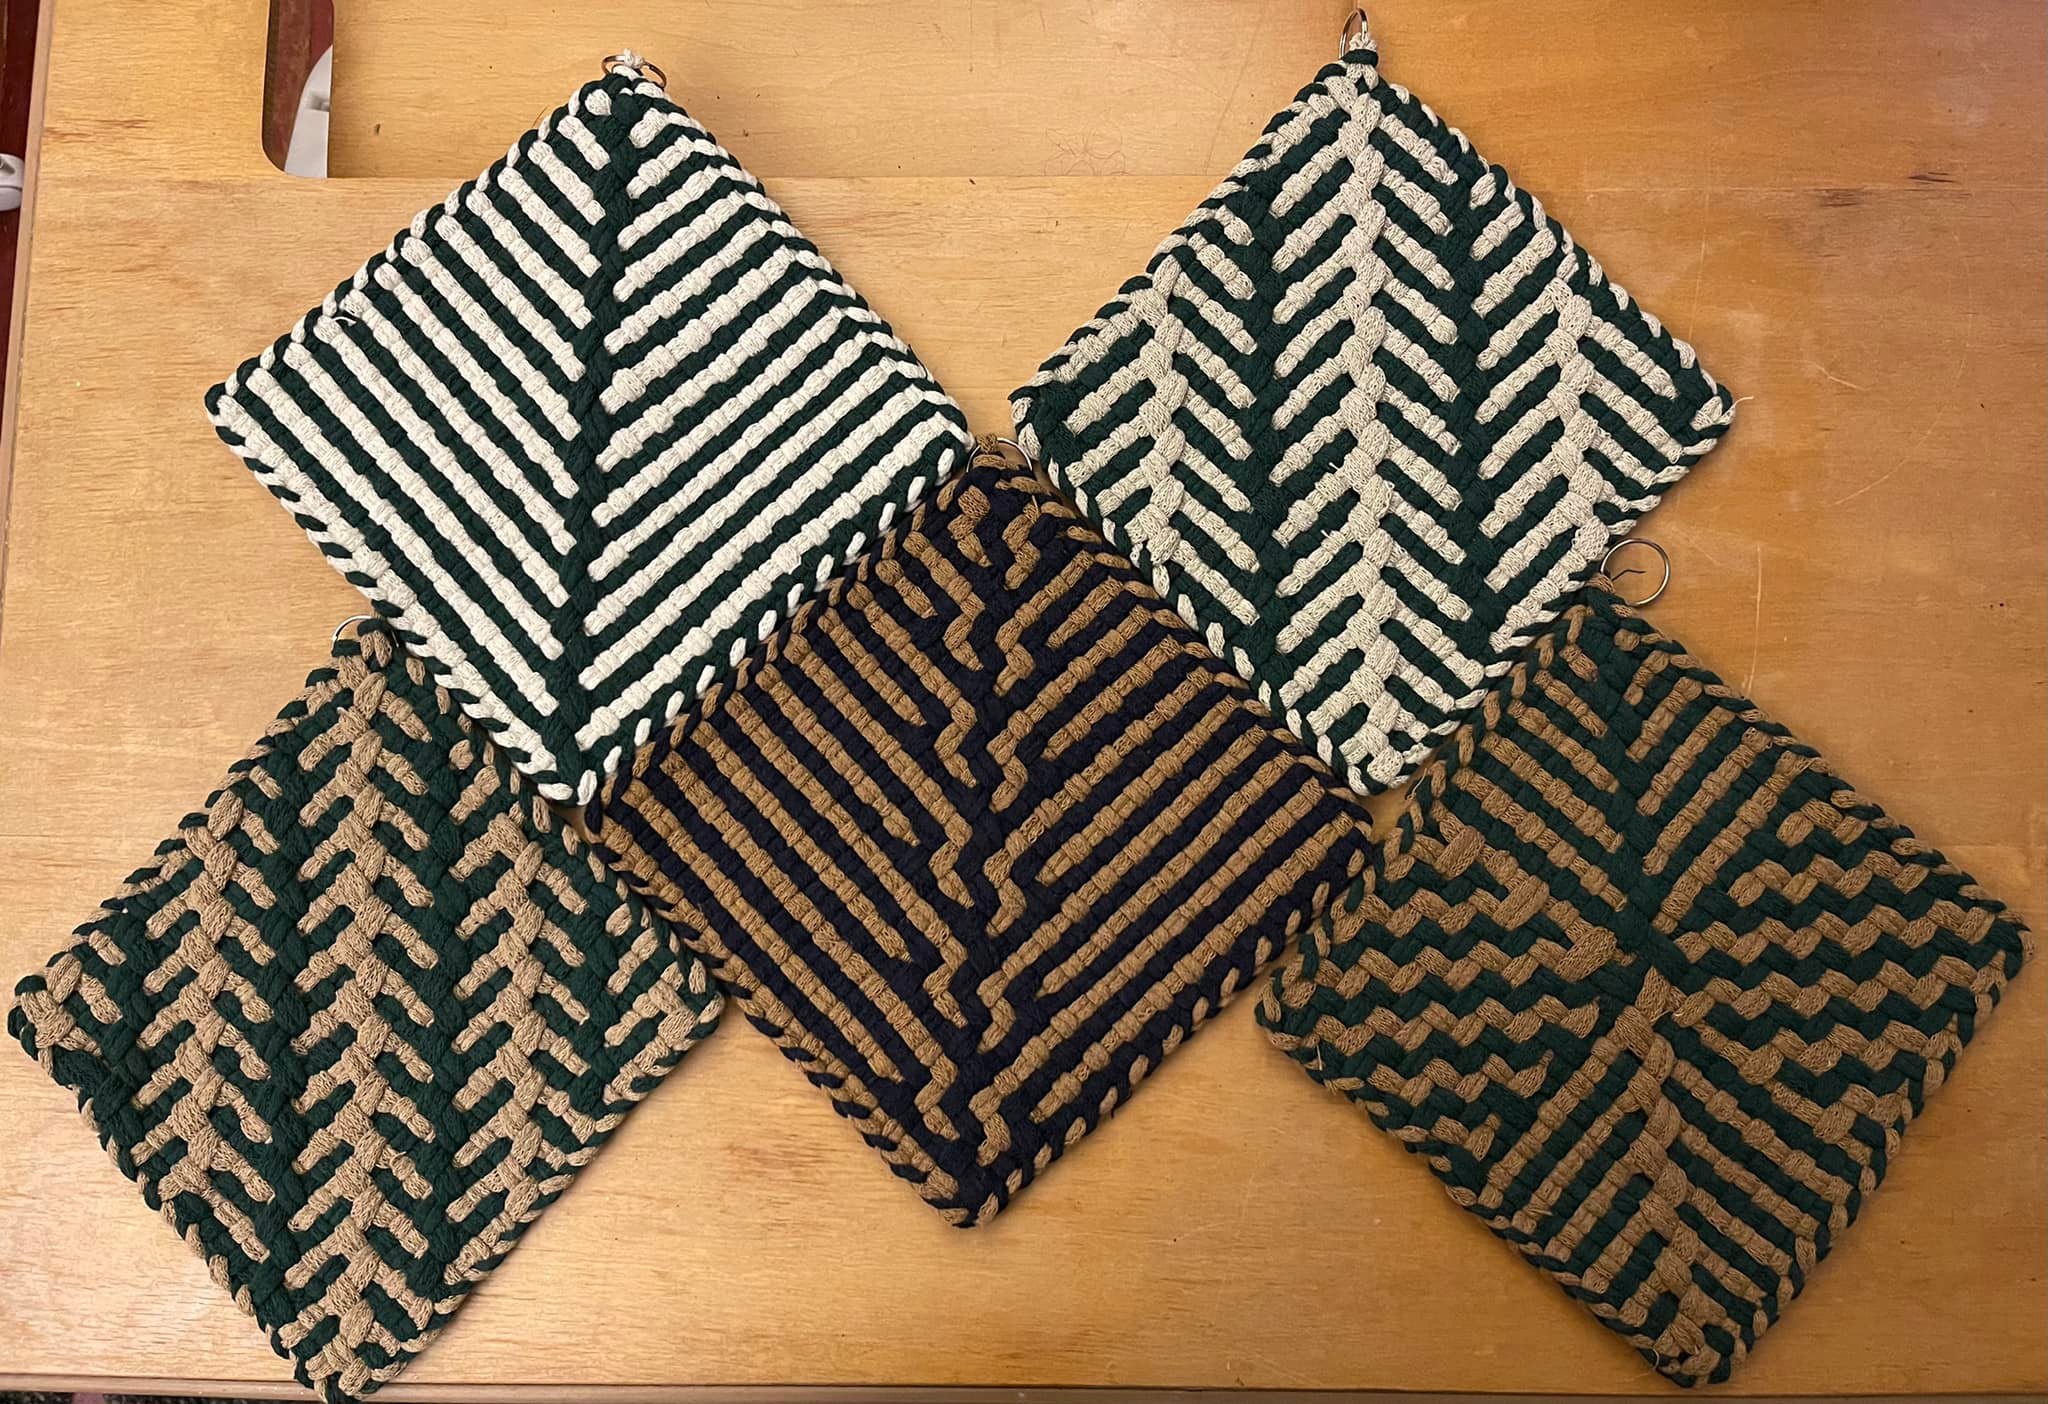
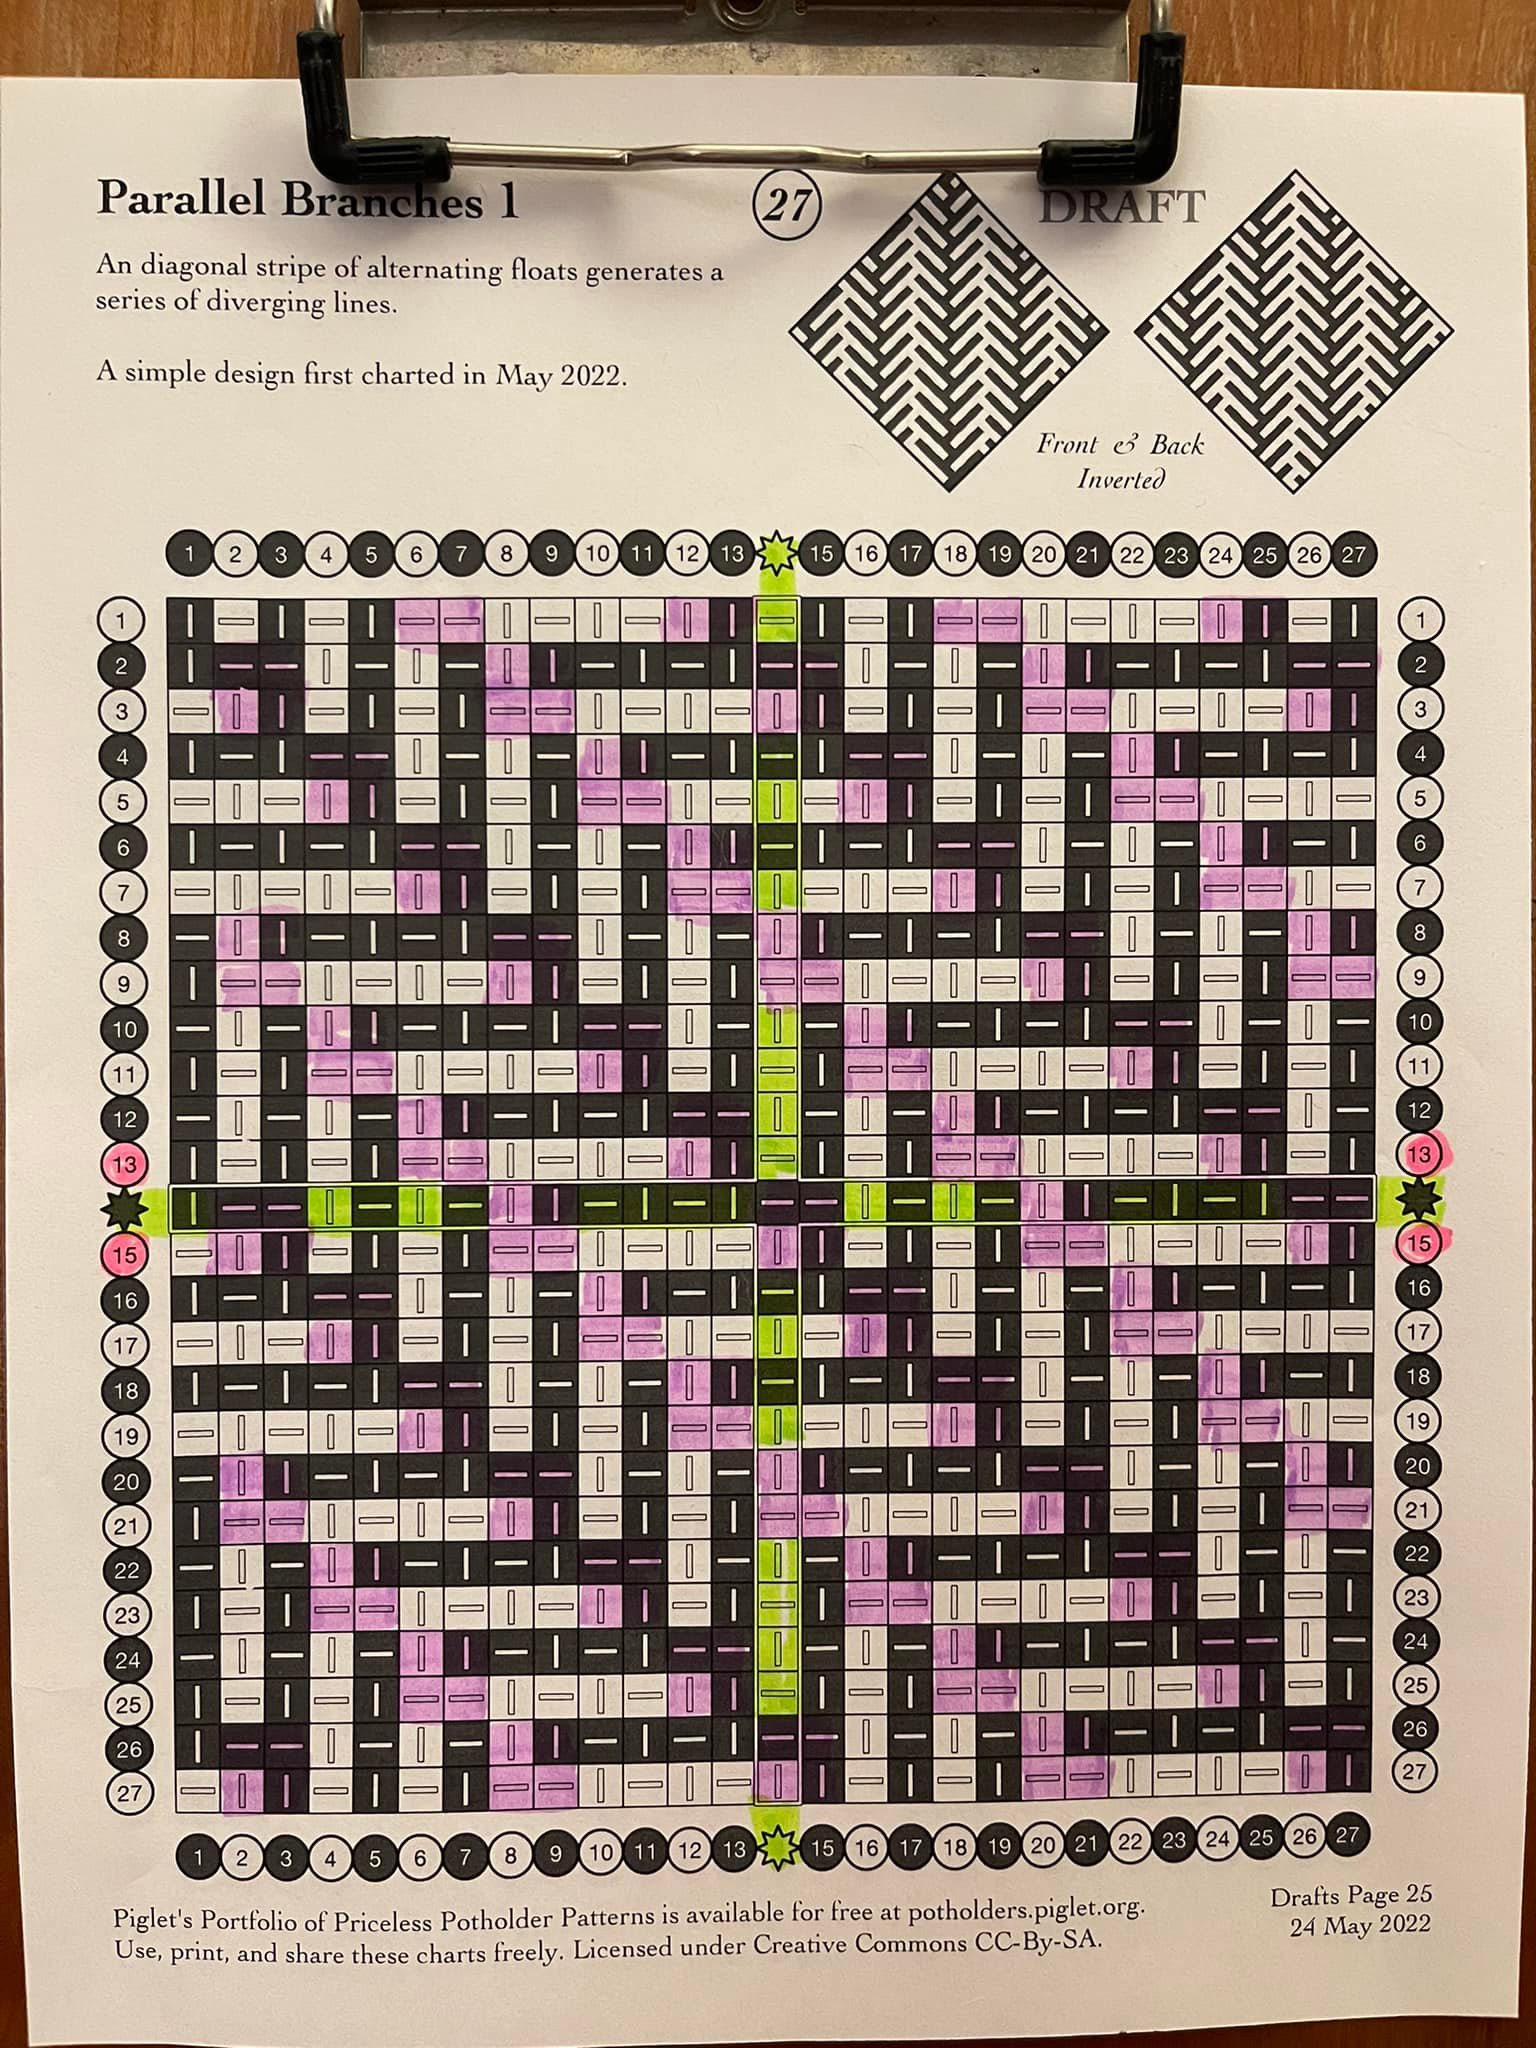
Exploring the stacked diagonal twills of Branch with variations, we have 4 good patterns and one that’s okay.
Clockwise from top left, we have Branch in pine and winter white, Parallel Branches 1 in pine and flax, Branch and Root in pine and ochre, Forked Branch in navy and ochre, and Parallel Branches 2 in pine and autumn.
All 5 related patterns, right side up.
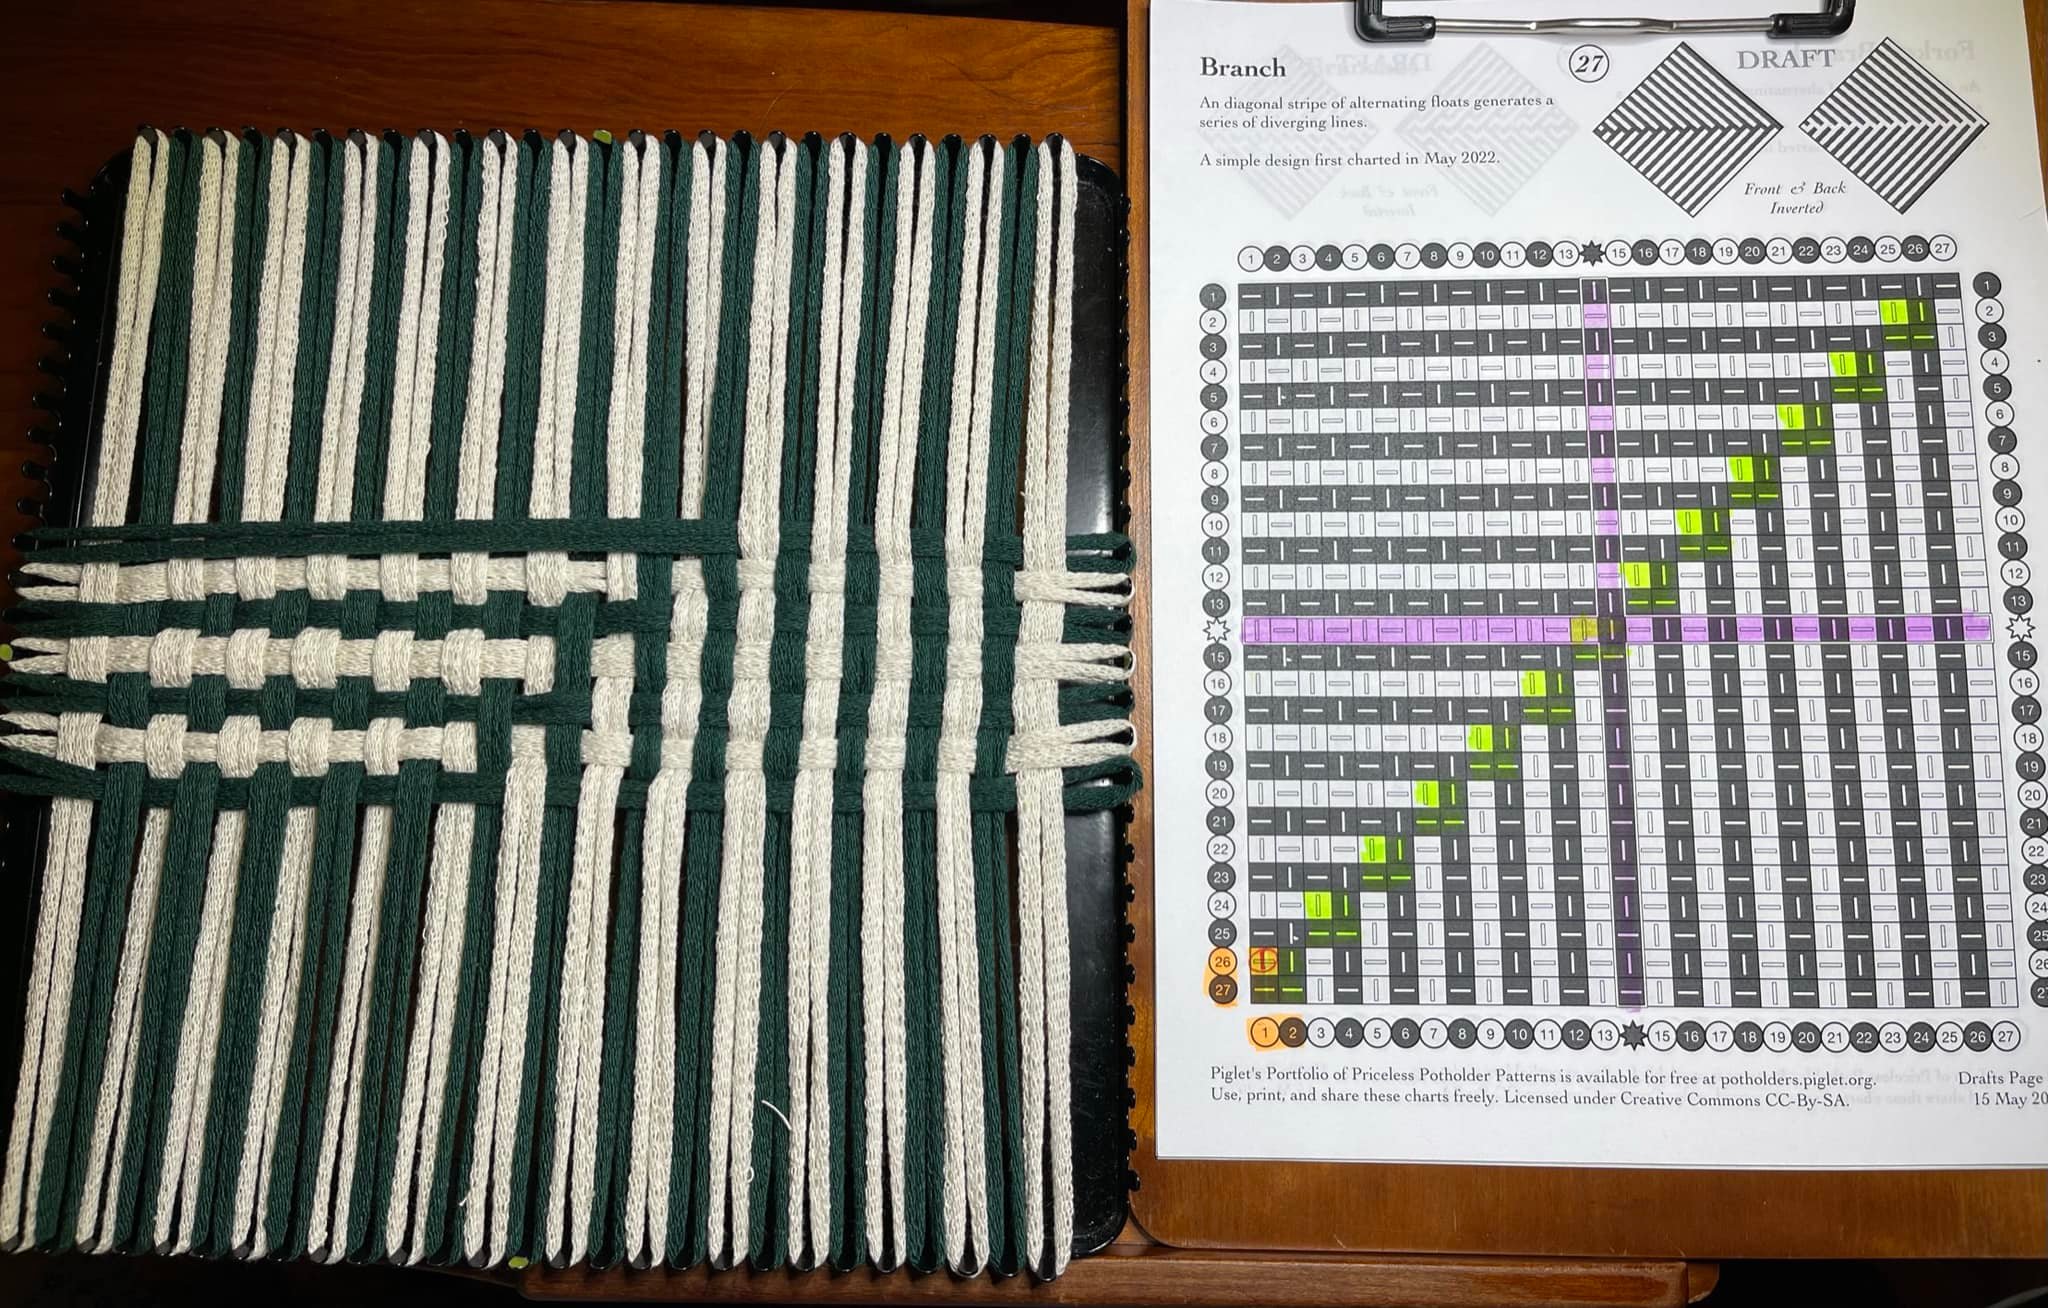
Branch
Branch is mostly tabby (over/under across the row), and makes a very flat fabric with a raised center seam on both sides.
Branch begins. Here I have highlighted the center row and column (purple), and the stacked twills on the diagonal. (The orange highlighting marks an error in the draft, now corrected in the published pattern.) The pattern is simple enough that I don’t need to track my progress through the weaving, and can mostly work without referring to the chart.
1/3 of the way through, the pattern is clear.
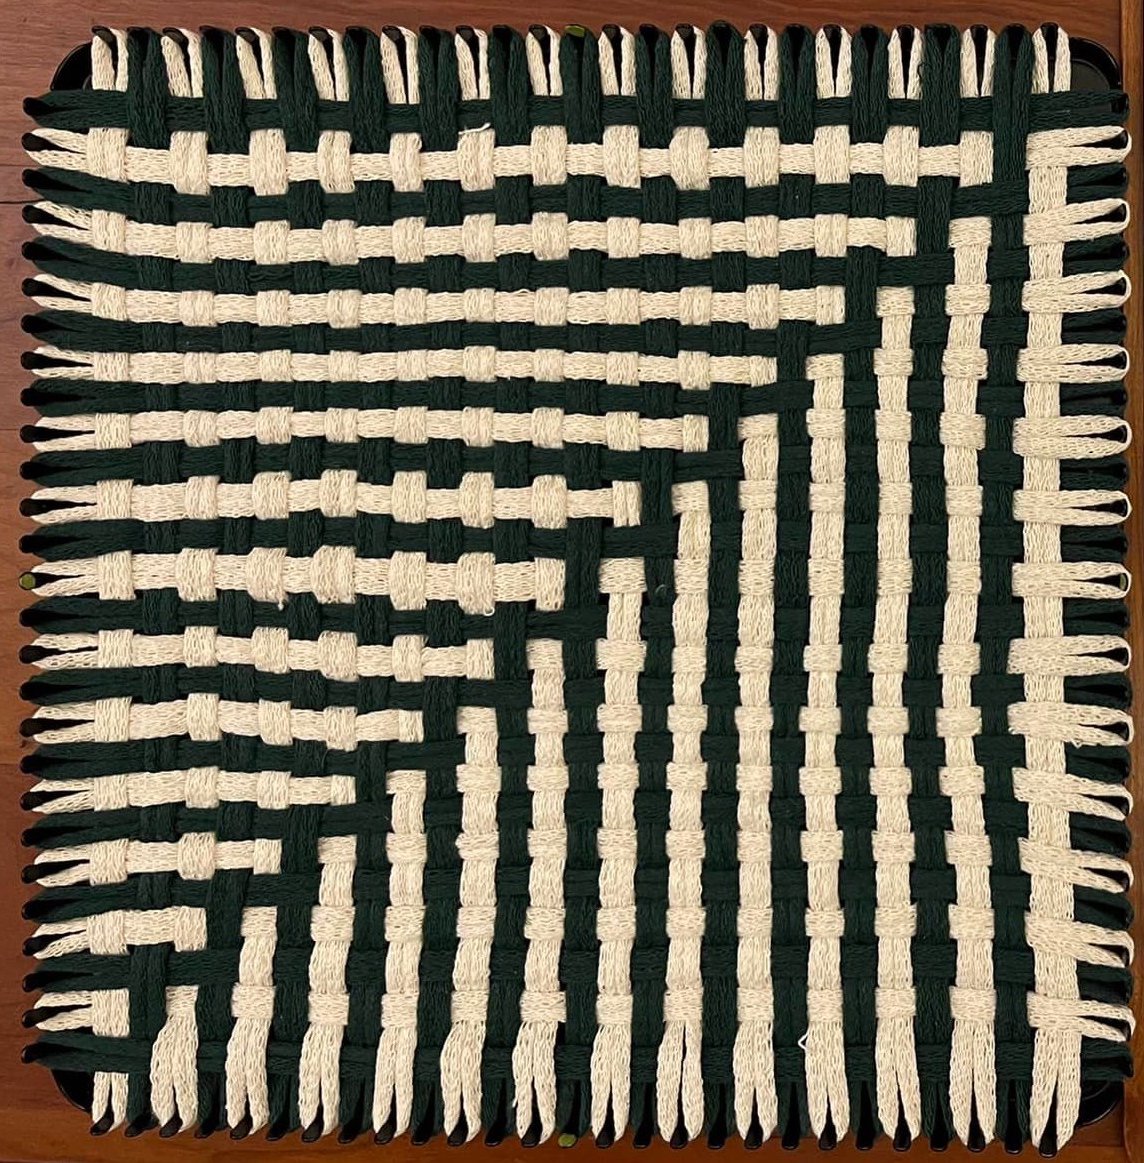
Completed Branch on the loom.
Reviewing the hanging options, I chose the the one that looked more like a growing stem.
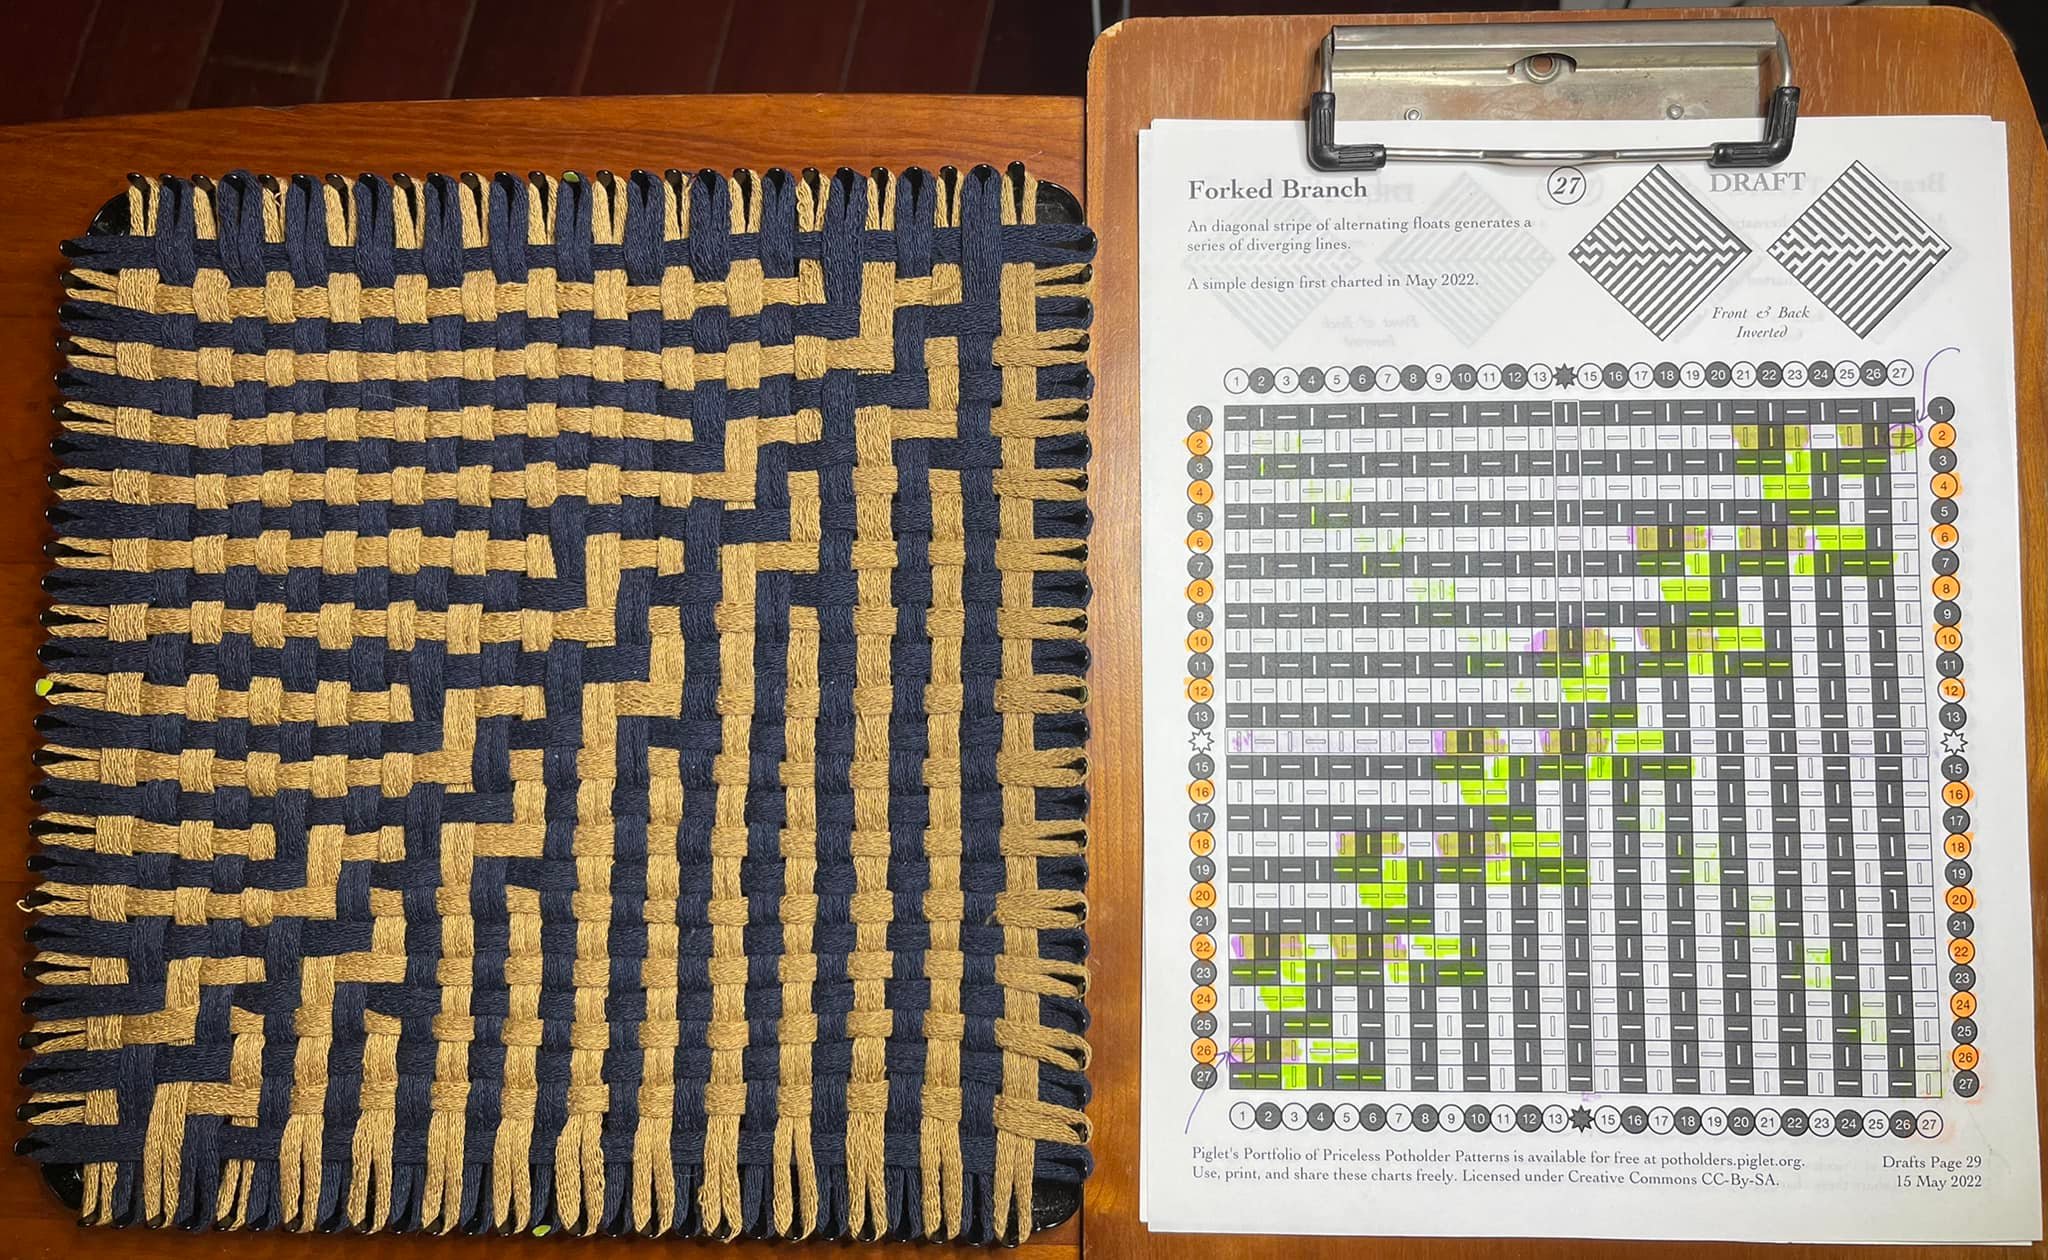
Forked Branch
Forked Branch is an exploration of what happens when you break up the stacked diagonal twills by inserting pattern directional changes. Without the strong center seam, the fabric remains more tabby-like overall, flatter and more even throughout. (More explorations of forked branch forthcoming!)
One good way to tackle a new chart is to highlight the floats, so you can see how the weaving might proceed.
Forked Branch was complicated enough that I needed to track which row I was working, but didn’t need to mark the whole row, since only a small section of each row has floats (crosses more than one column).
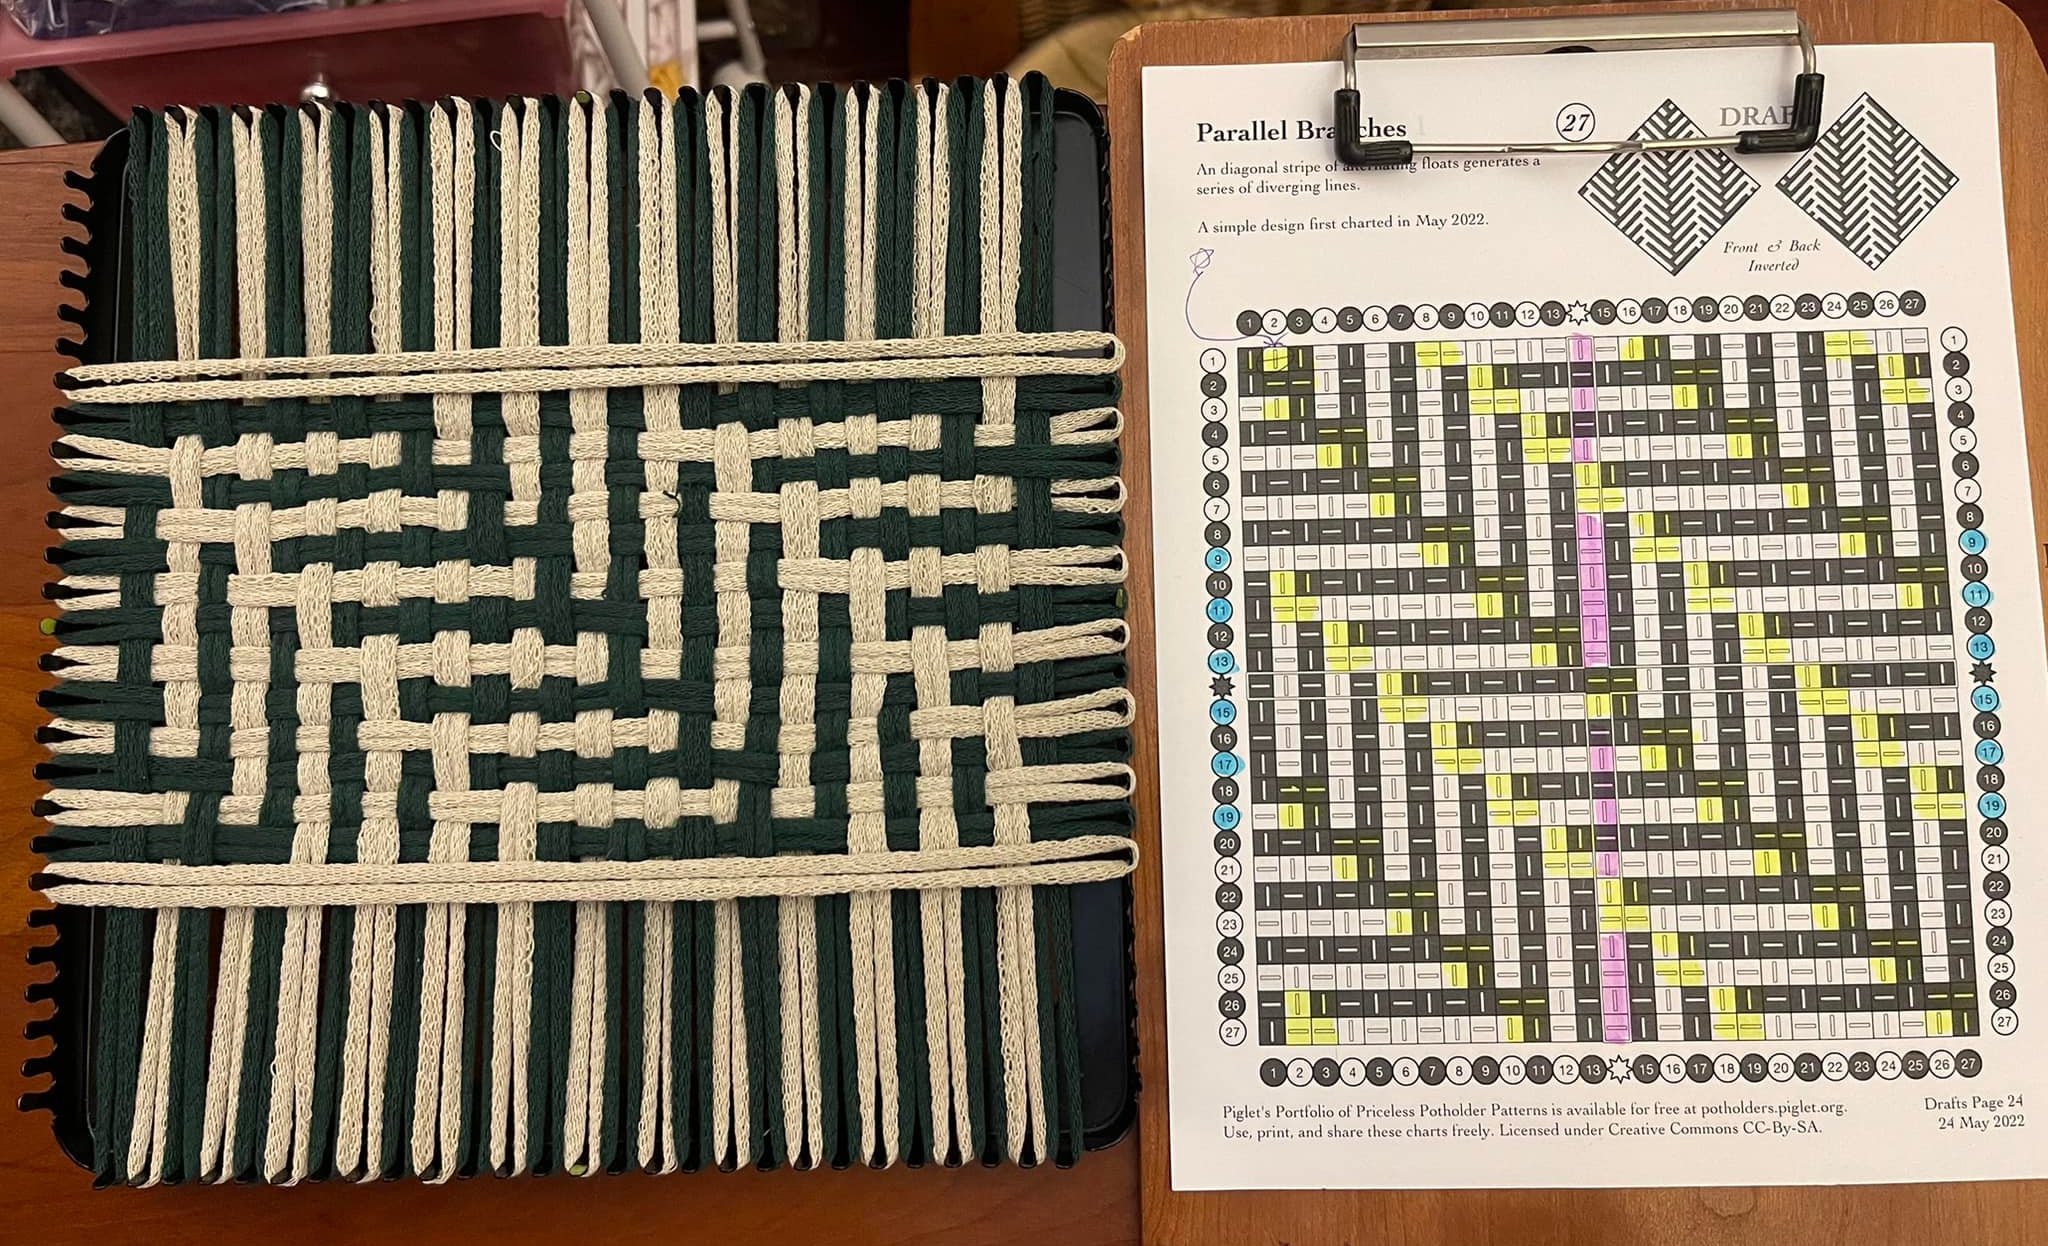
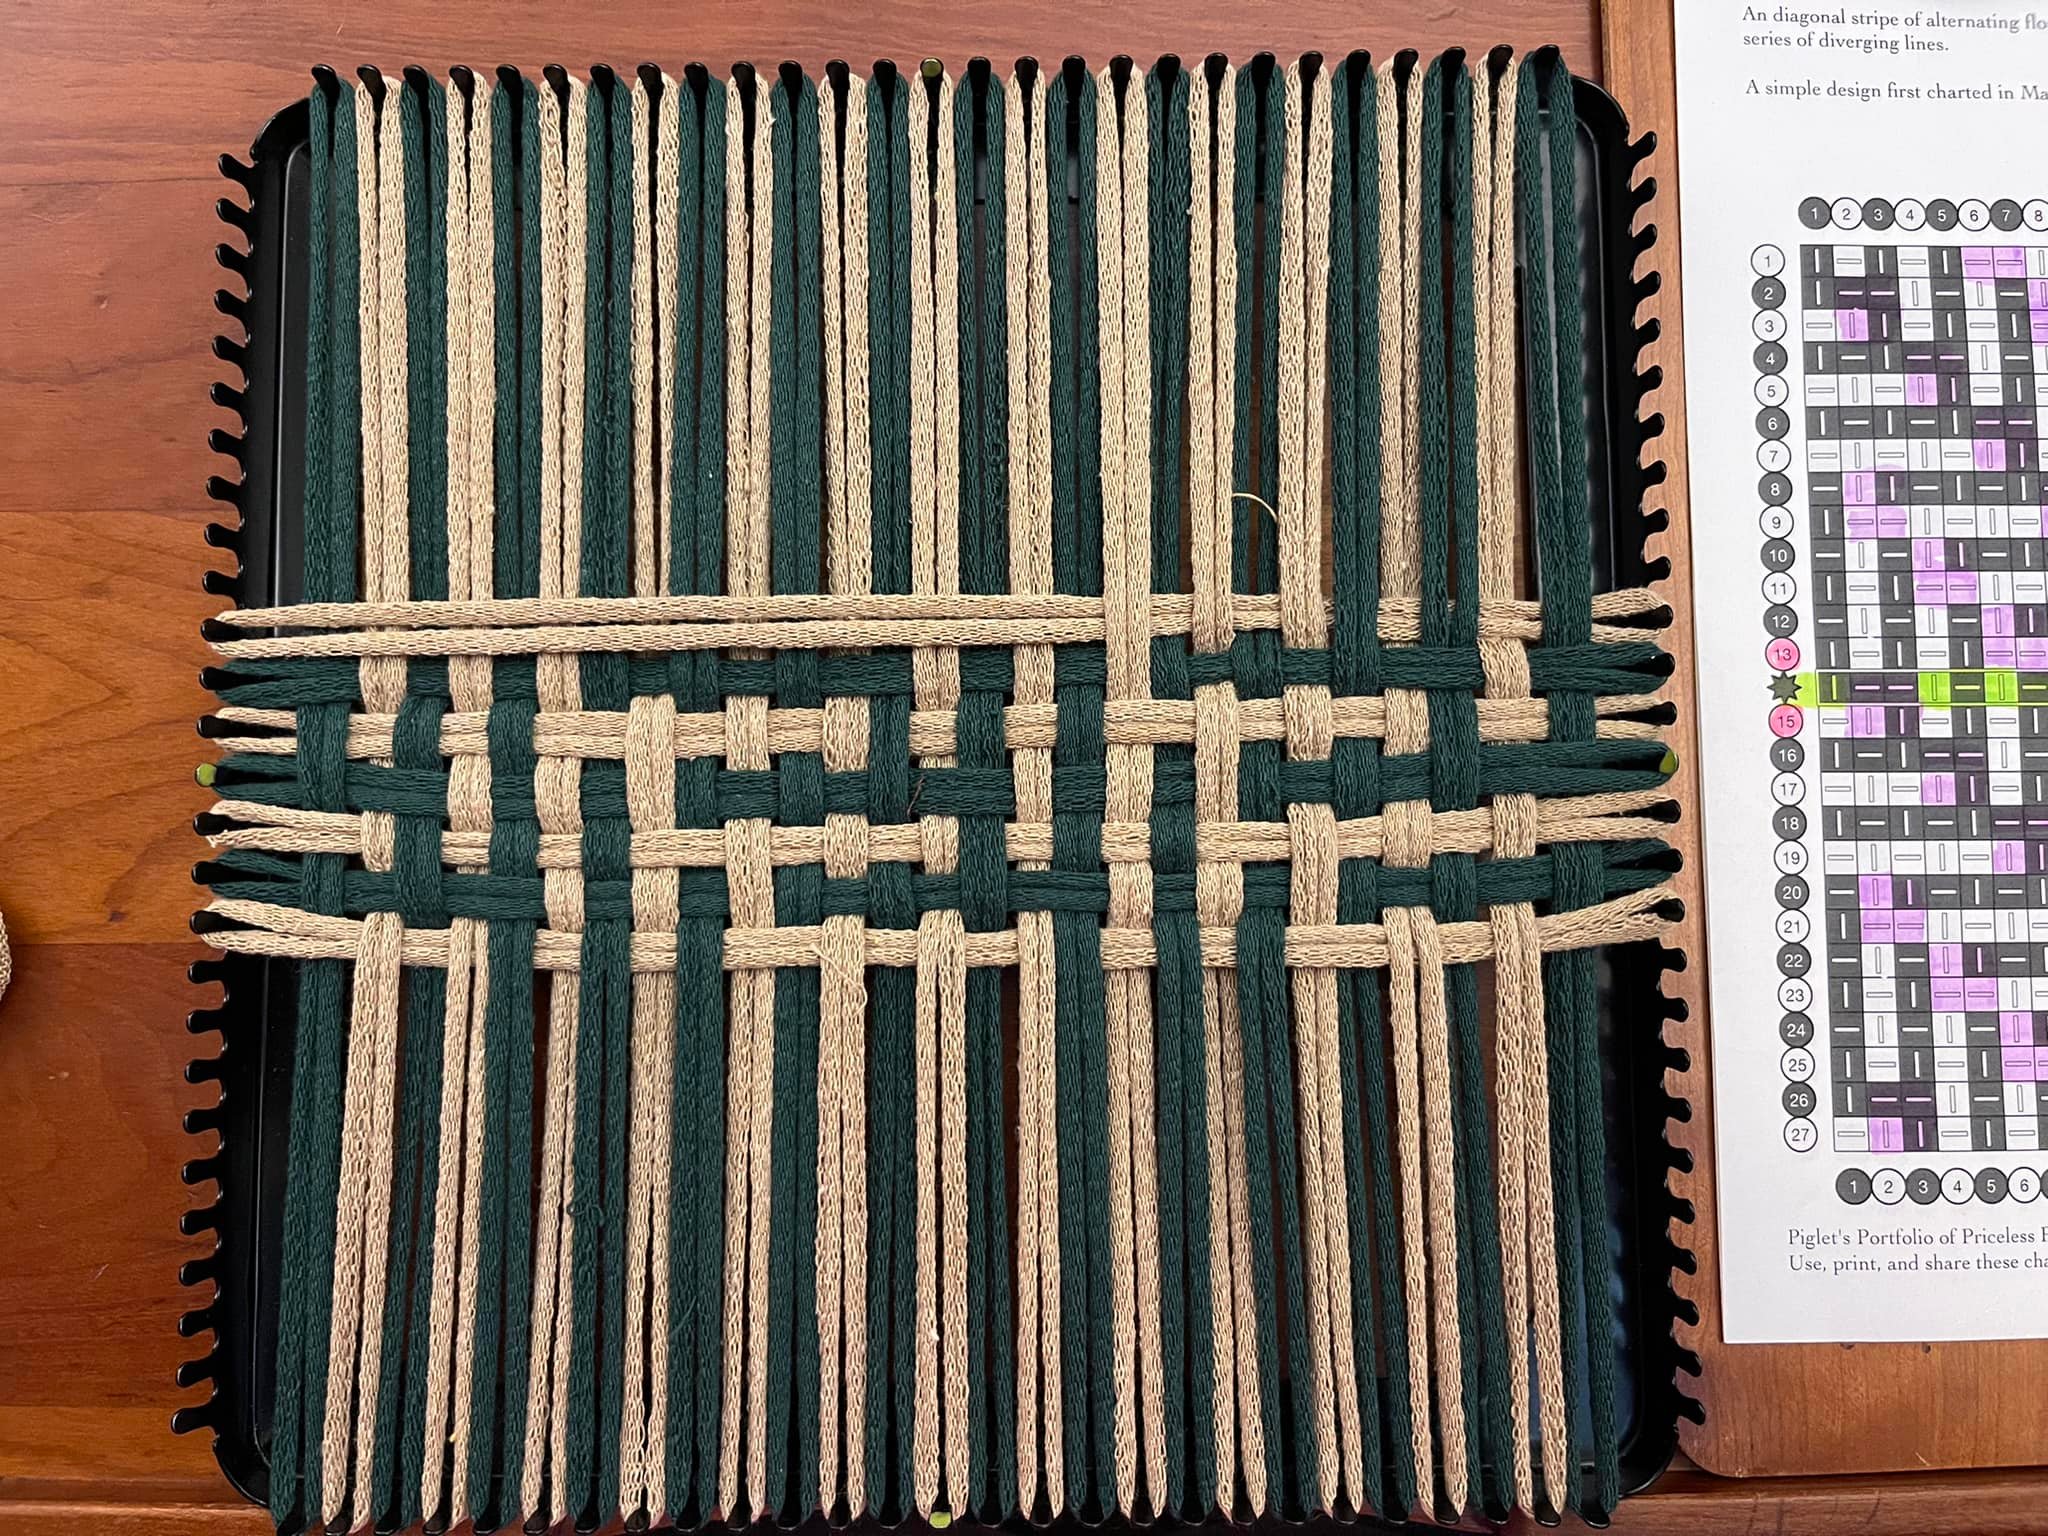
Parallel Branches
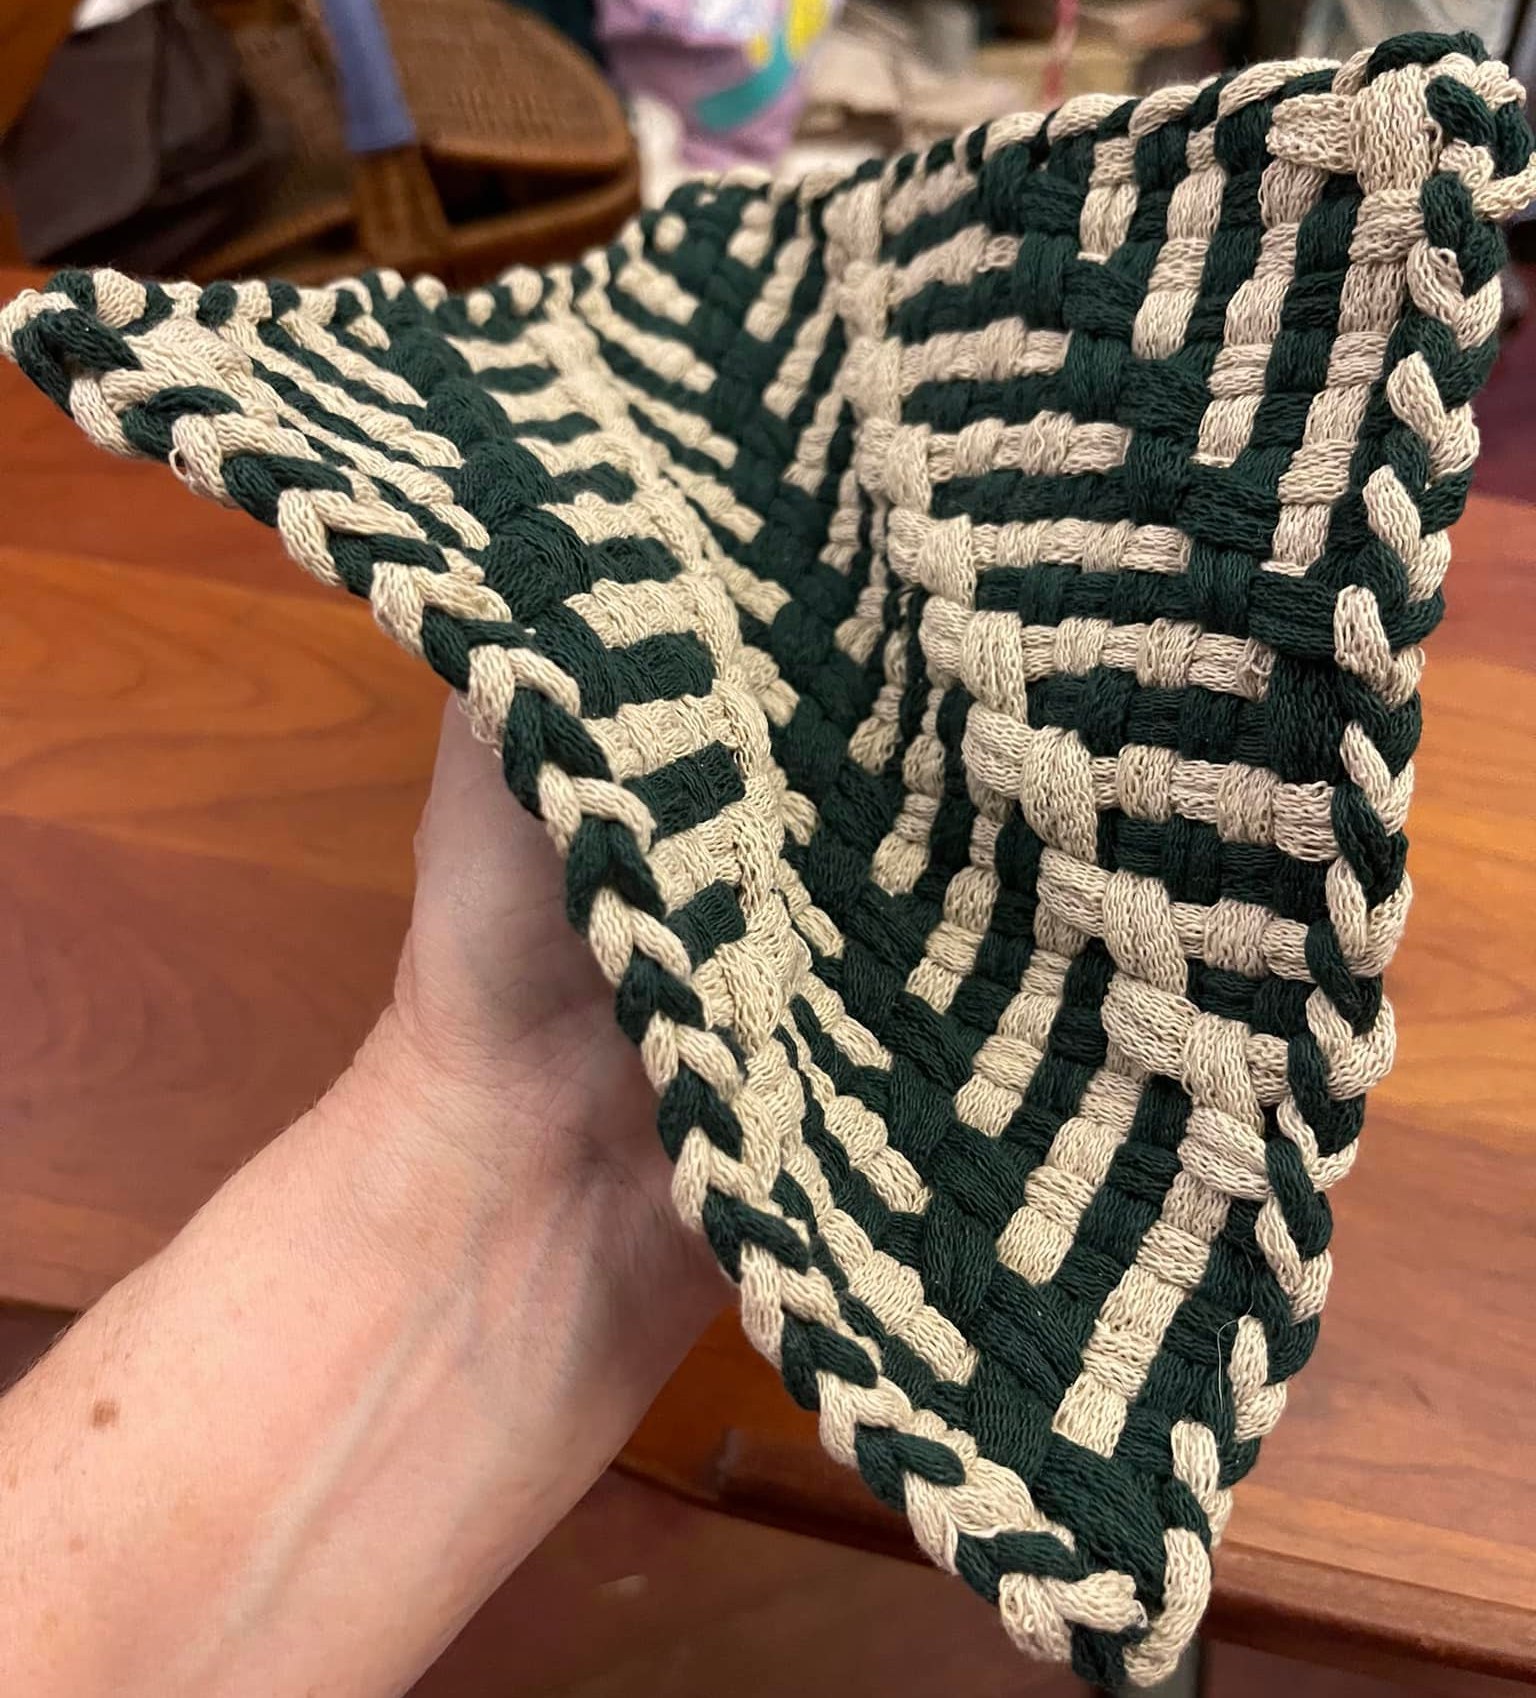
Splitting into multiple branches, you get two versions of Parallel Branches. The additional seams form valleys in the fabric that encourage folding along the diagonal. They also draw up the fabric in one diagonal direction only, pulling it out of square into a diamond shape.
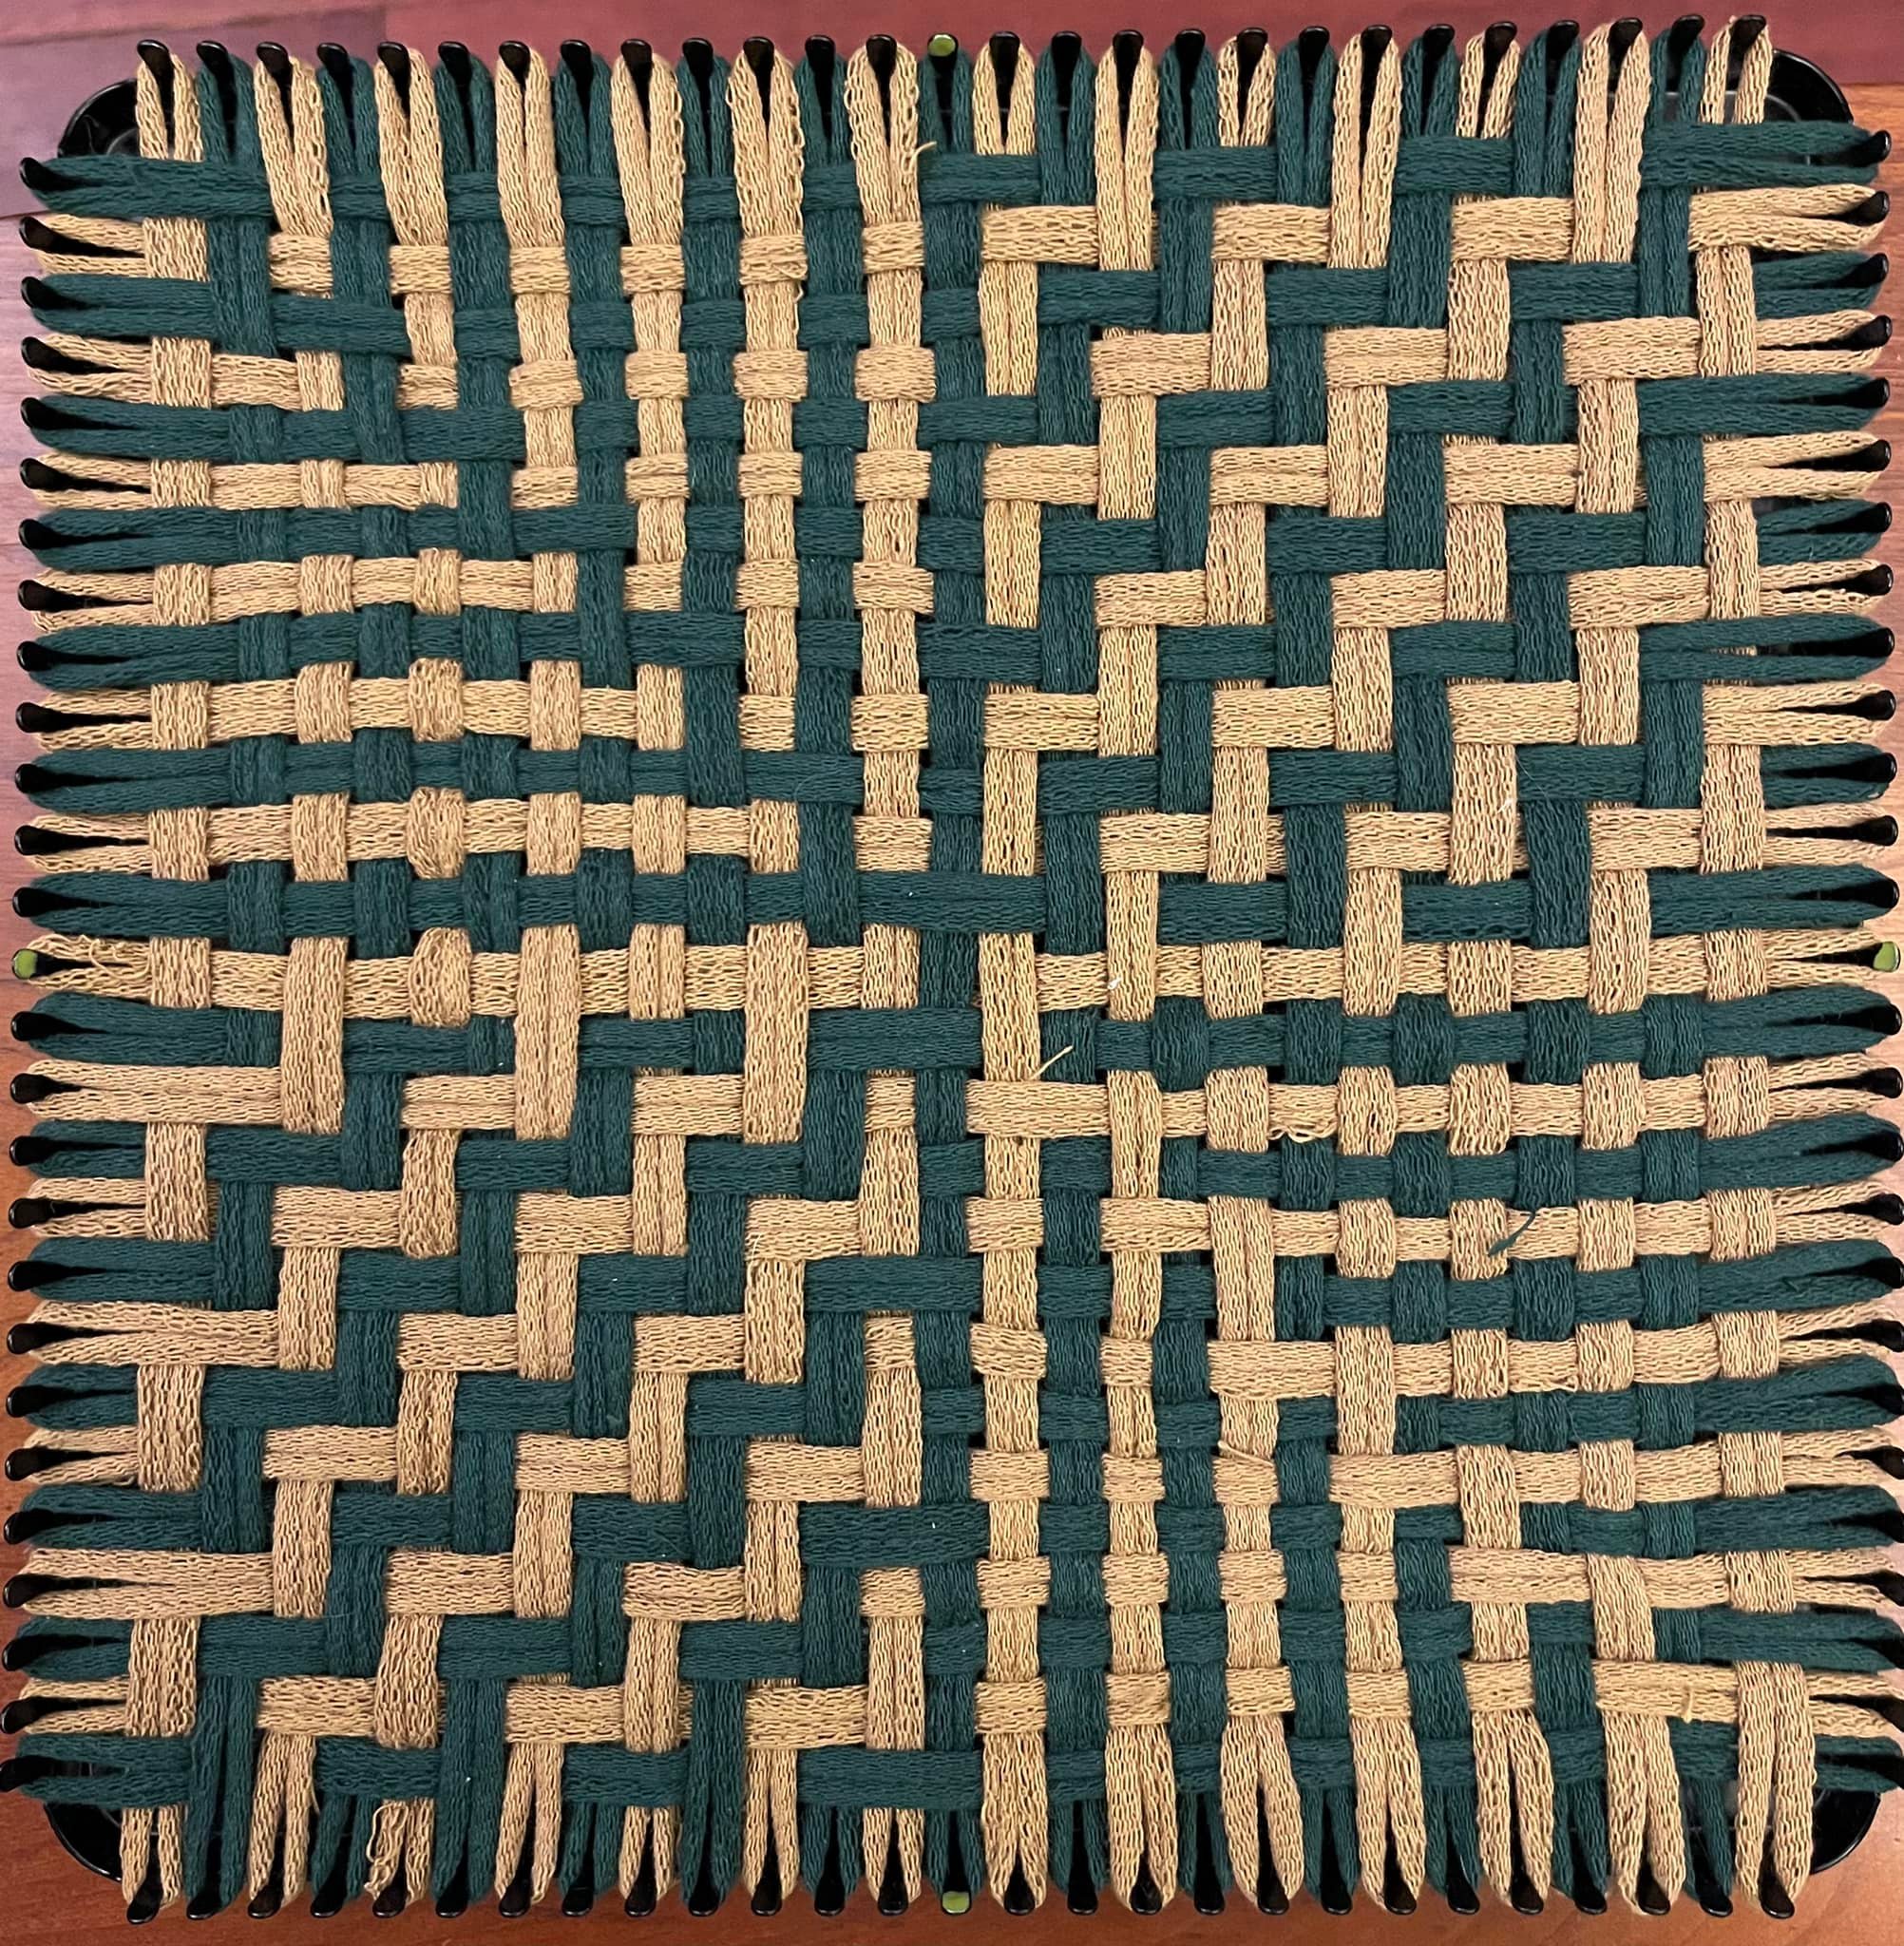
Parallel Branches has 3 major stems running in parallel. The stems have stacked twill diagonals, which is also how we create the ends of the needles between the stems. Each seam shows up raised (on both sides of the fabric), and pulls the fabric in across its width.
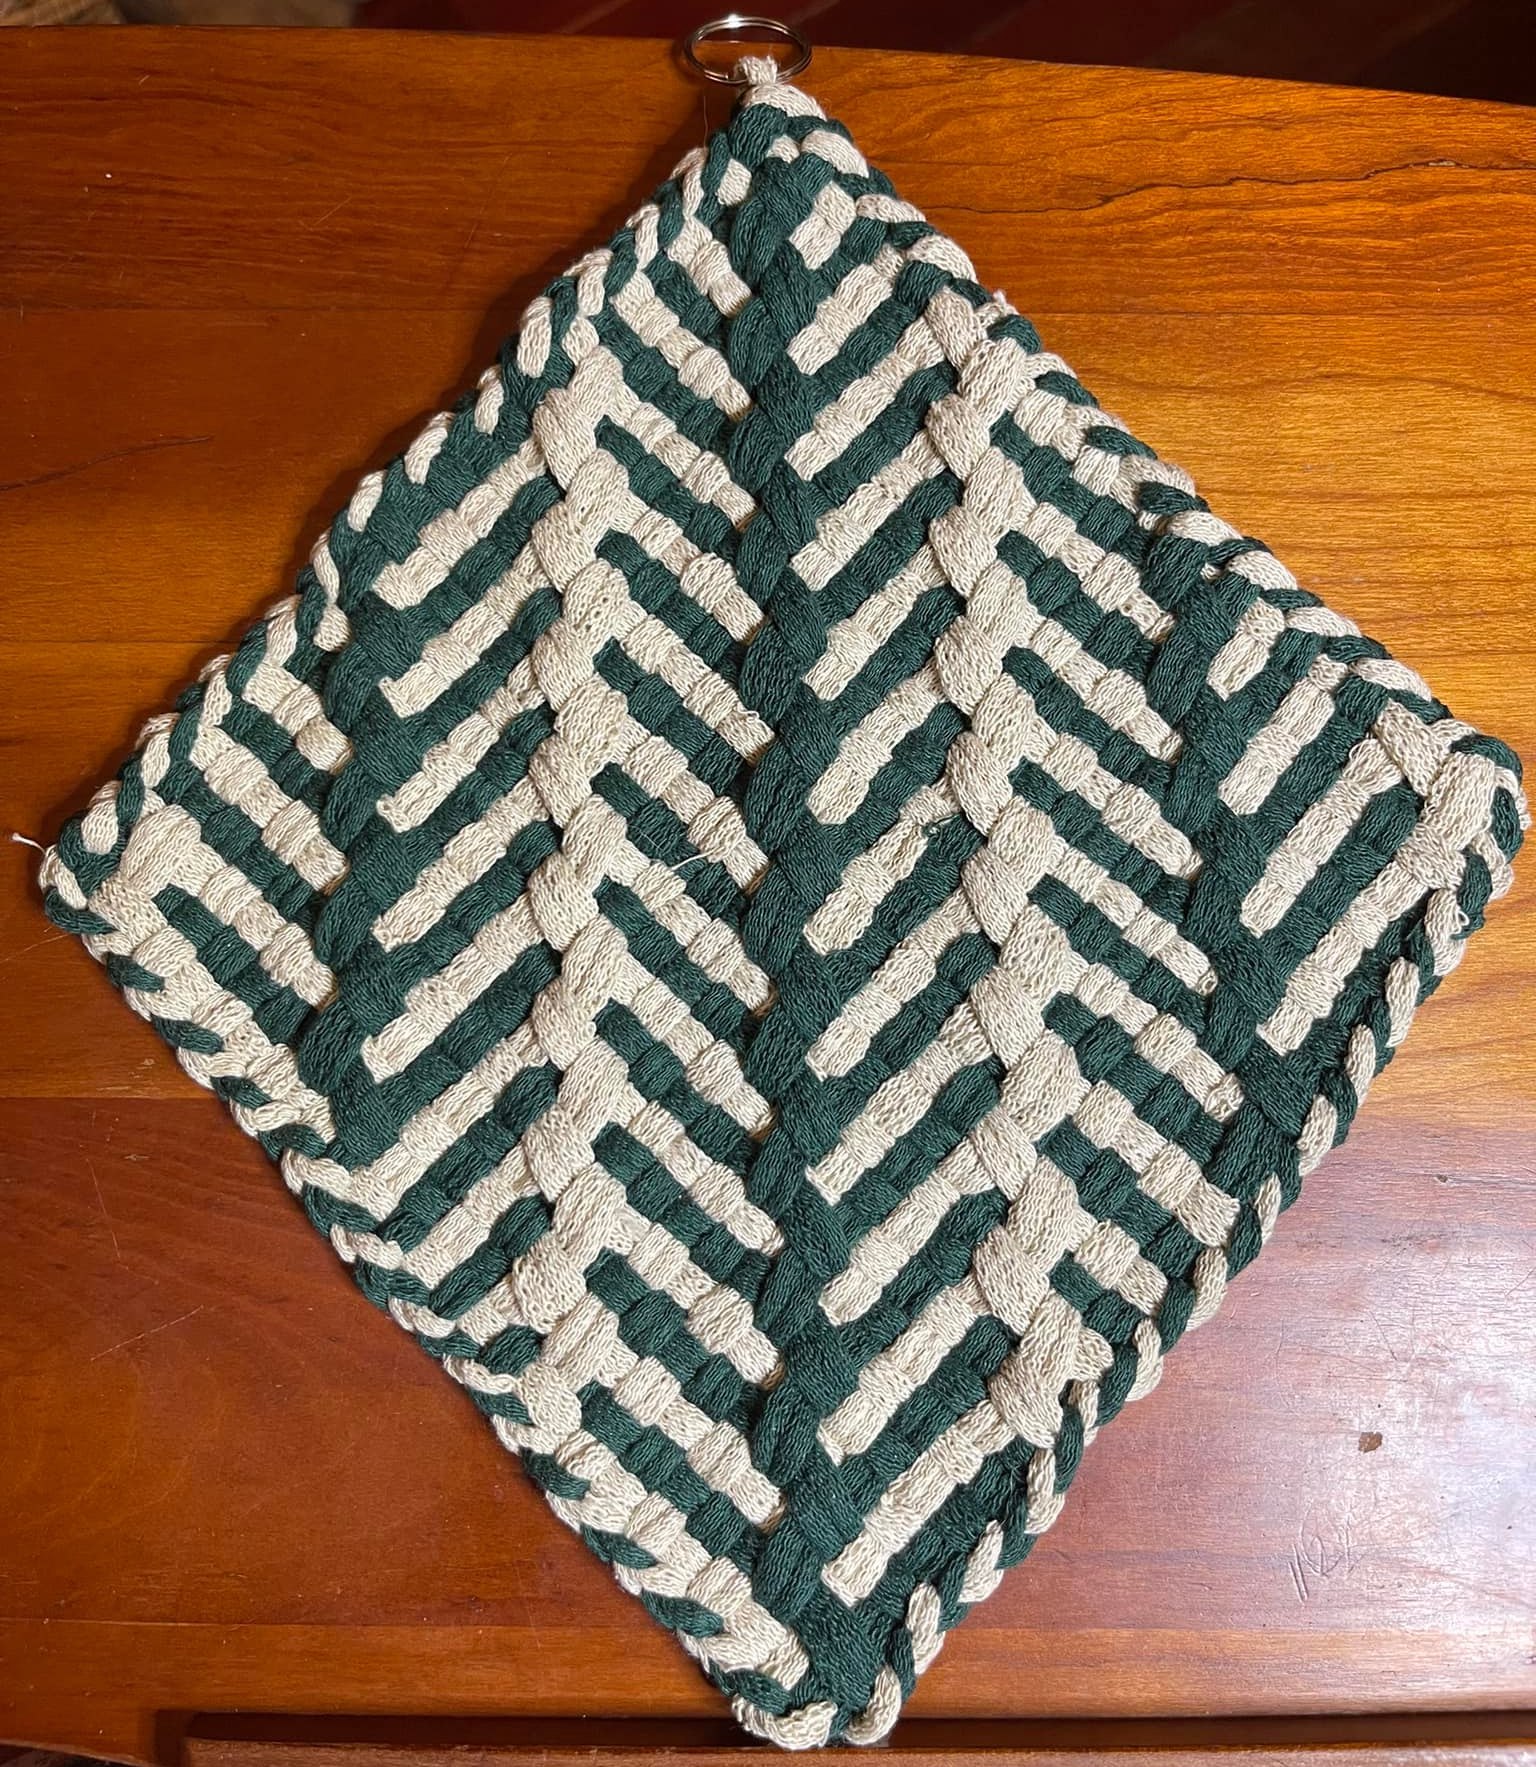
Closeup of Parallel Branches, fully woven.
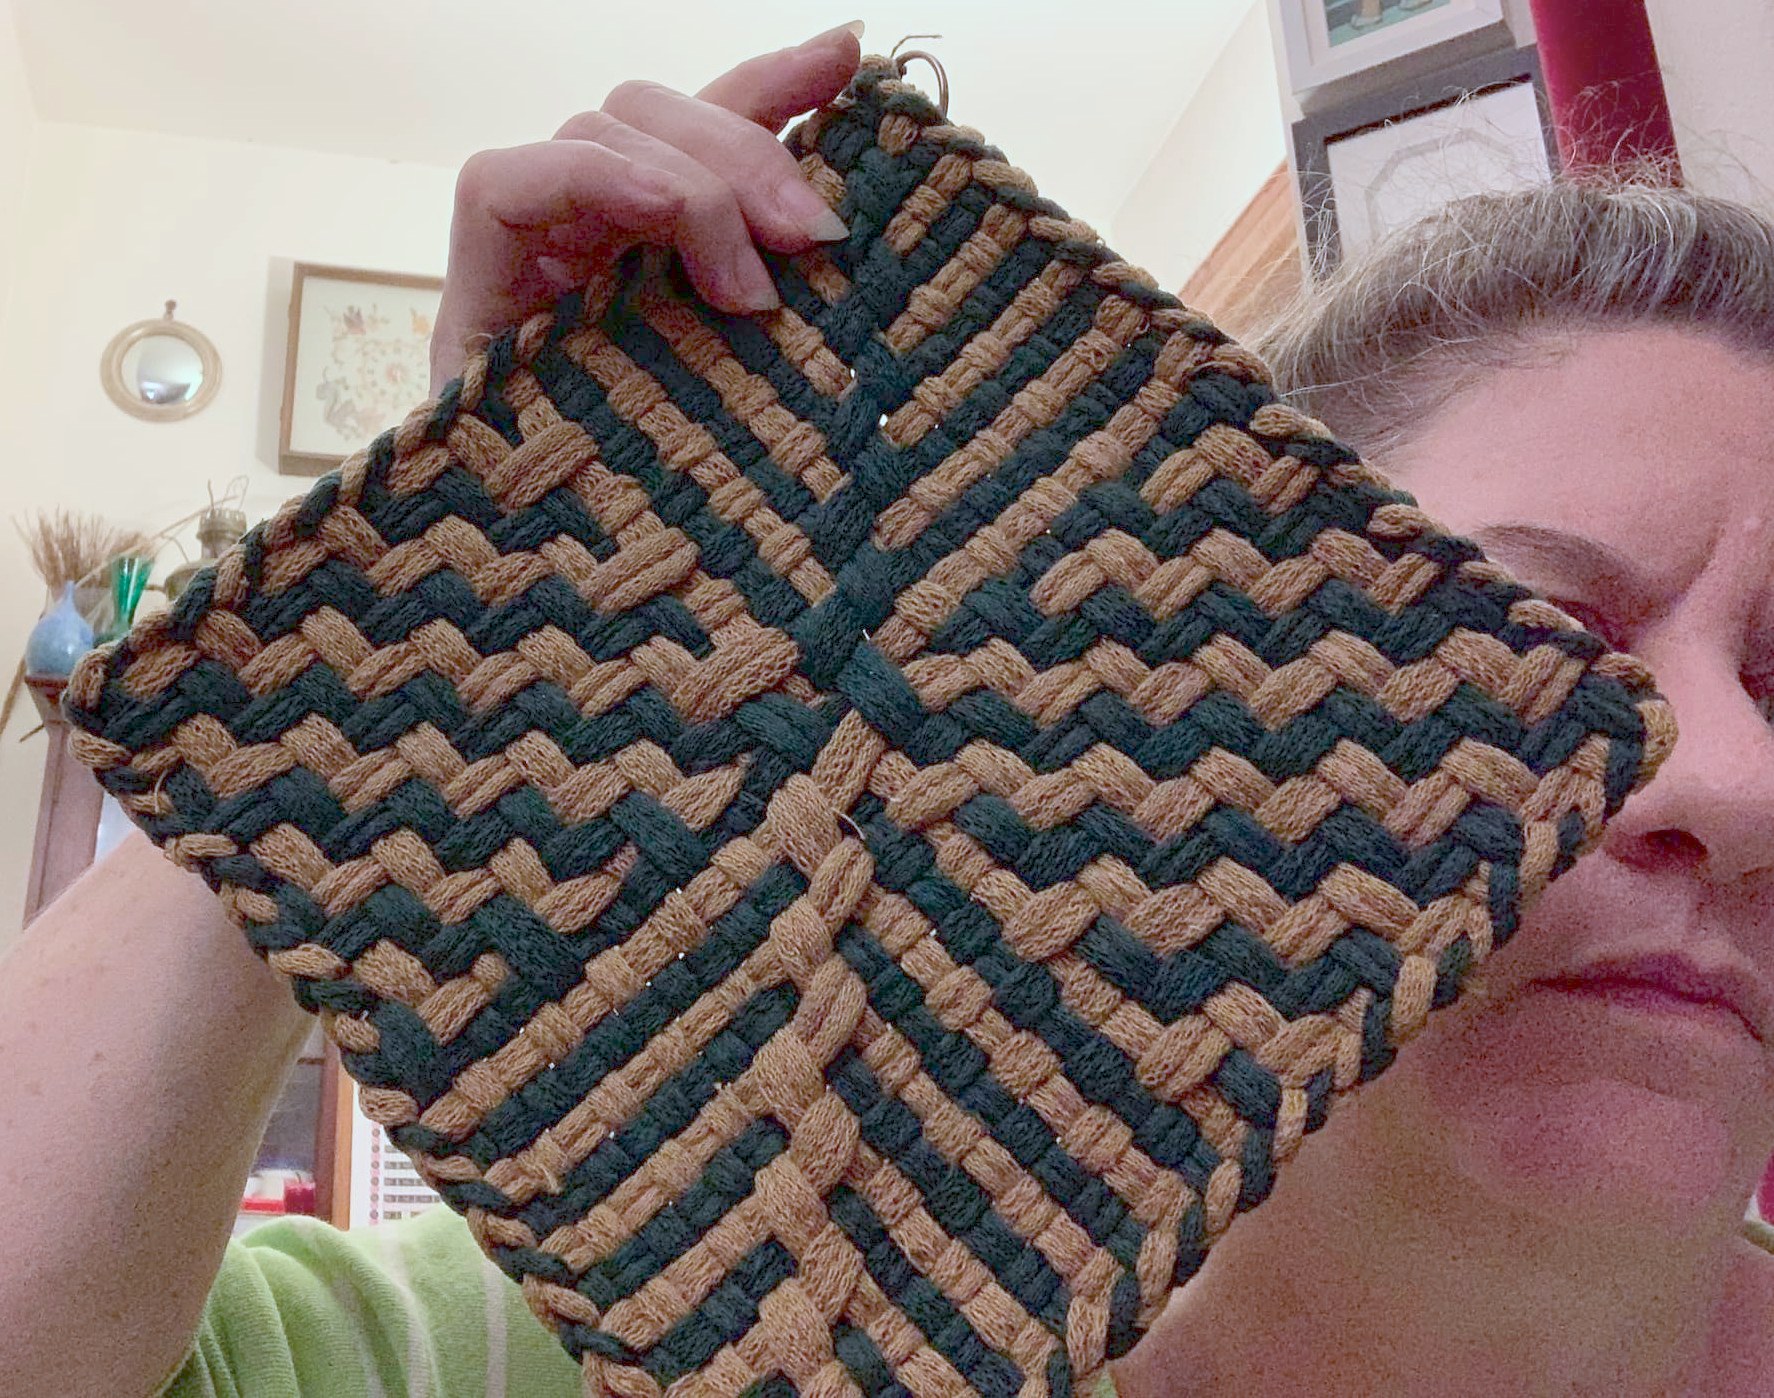
Hanging from the top corner, the off-kilter distortion from square into diamond is not so obvious.
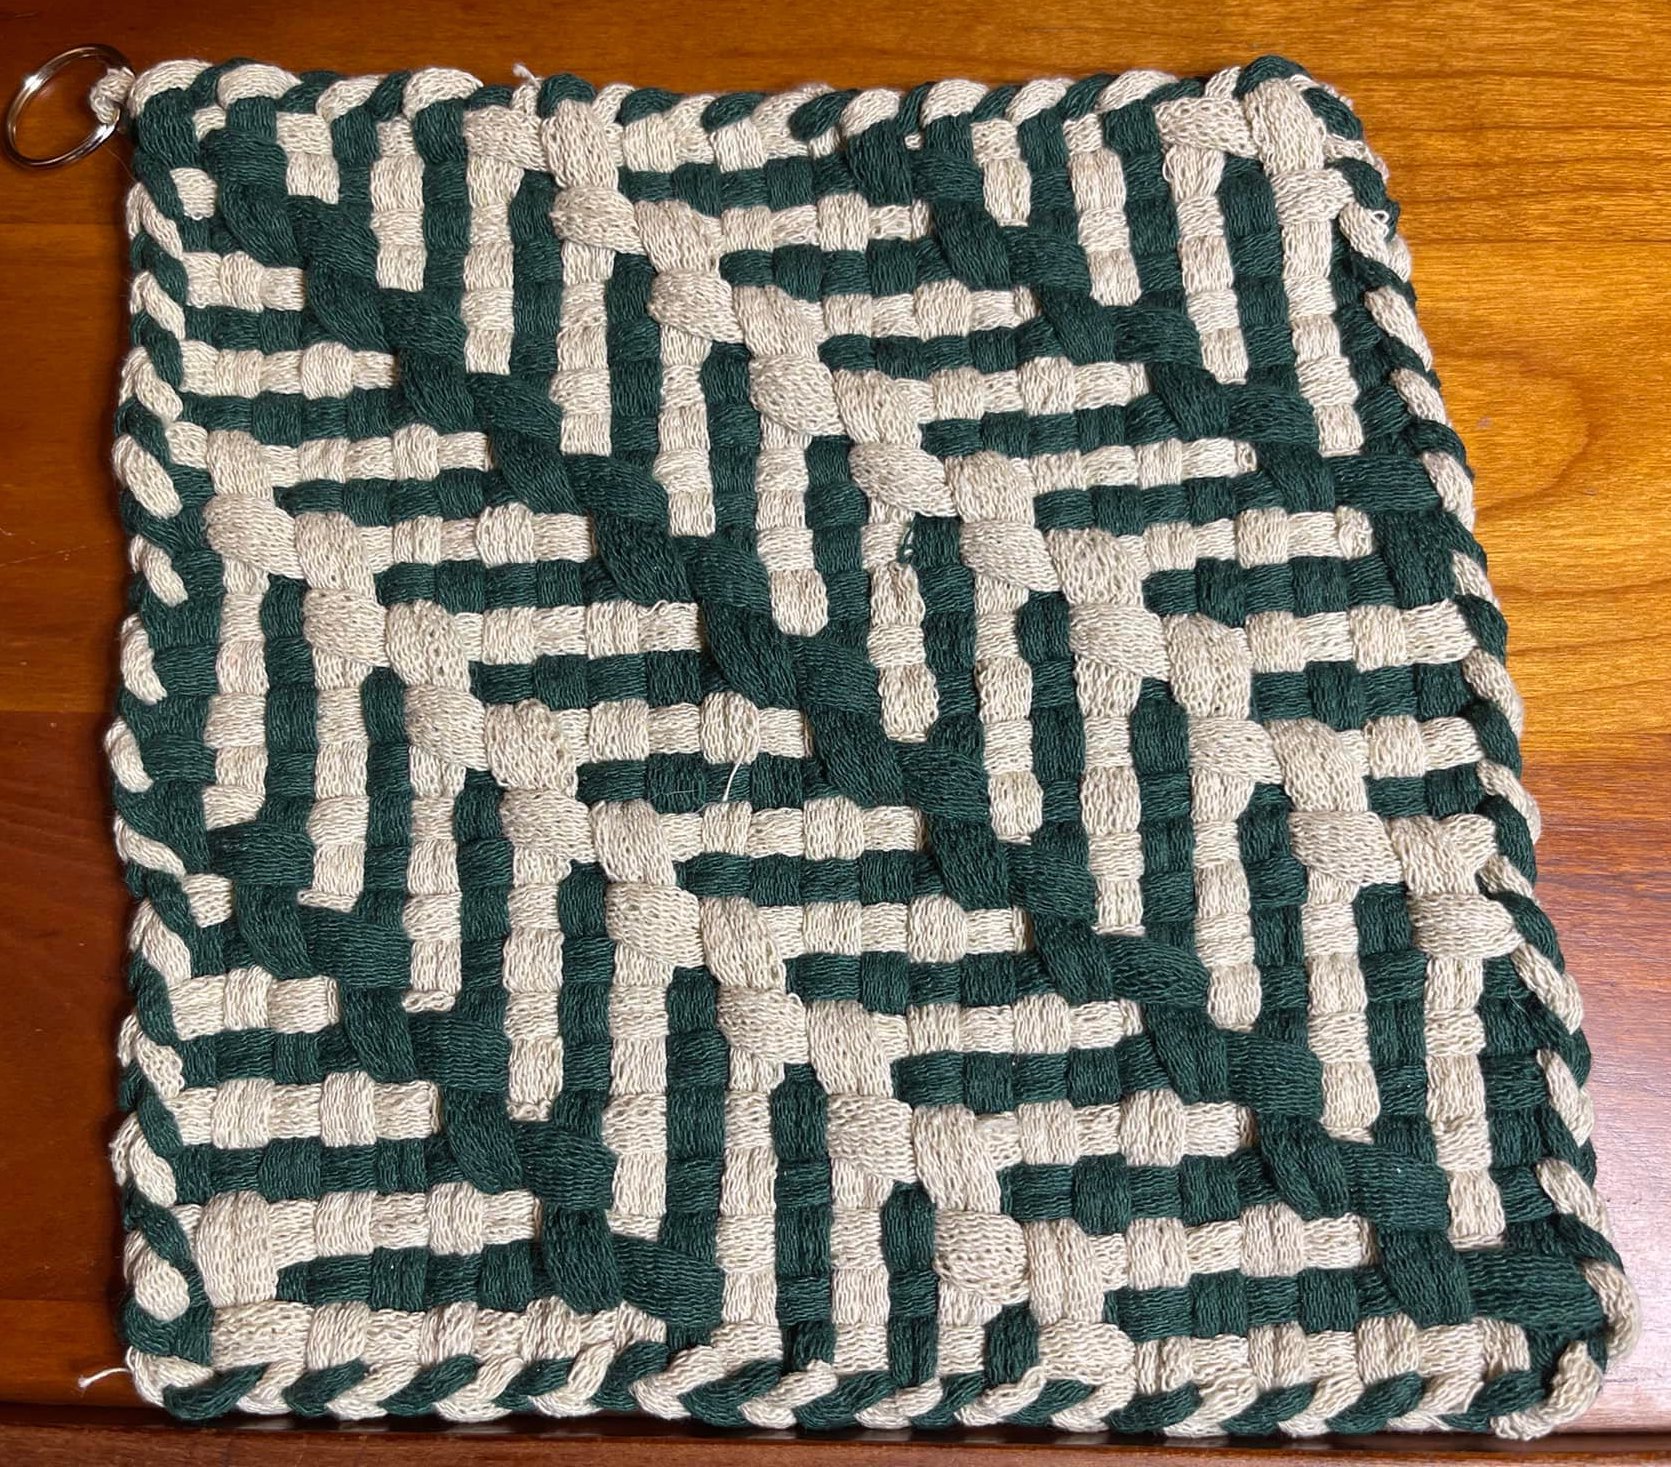
Once you turn the potholder to “square”, however, you can clearly see it no longer is.
A large central valley forms naturally, suitable for long pot handles.
We can also break branches into smaller widths, with 5 stems in view here.
Part way through, the pattern is beginning to form. Because of the shortness of the distance between pattern segments, this one turned out to be the easiest to weave, somewhat surprisingly.
Fully woven, on the loom.
And a closeup of the highlighted chart, in which I marked the stacked twills in purple, the center row and column in green, and started tracking my progress in pink.
Branch and Root
Working the branch both up and down from the center, with 2/2 twill side sections, you get a very interesting garden effect we called Branch and Root, with a muddled middle (this is the pattern that is just okay). If we can fix the center, this pattern will improve.
The 2/2 twill side variations (instead of the plain tabby of the original Branch pattern) make for a softer fabric overall, slightly thicker, with a bit more drape. The potholder appears more square, as well, because the fabric in the twill side sections draw up on themselves, evening out the disparity from the center vertical seam.
Marking up the Branch and Root chart to show the twill patterns, we see immediately that the side sections will vary significantly from the plain-weave of Branch.
The blue highlighter marks 3-floats, of which 8 run in a column down the center. The stacked 3-floats in the very center aren’t effective; the outcome is a bit muddled there.
Fully tensioned and woven on the loom, it looks great….
But when you bind it off and release the tension, the middle sags. Still pretty, though, and worth continuing to develop, I think.