Skipping or Adding Loops

Standard potholder looms come with 18 or 27 pegs, but a bunch of our charts show patterns for 17 or 19 loops, or for 26 or 28 loops — what are you to do if you don’t have a loom with that exact number of pegs?

(As an aside, there are vendors who sell nice 19-peg and 28-peg looms, but those are still relatively rare.)

Smaller patterns are easy — just leave one peg free on each side when warping your loom, and then weave and bind off as you normally would. (You can skip the first peg or the last peg, or even one in the middle, whichever you’d like.) Any extra slack that was on one side or the other of your weave will quickly even itself out when you take the fabric off of your loom.

Weaving a larger pattern is a bit trickier, but like many techniques it’s only intimidating the first one or two times you try it, and then it quickly becomes second nature.

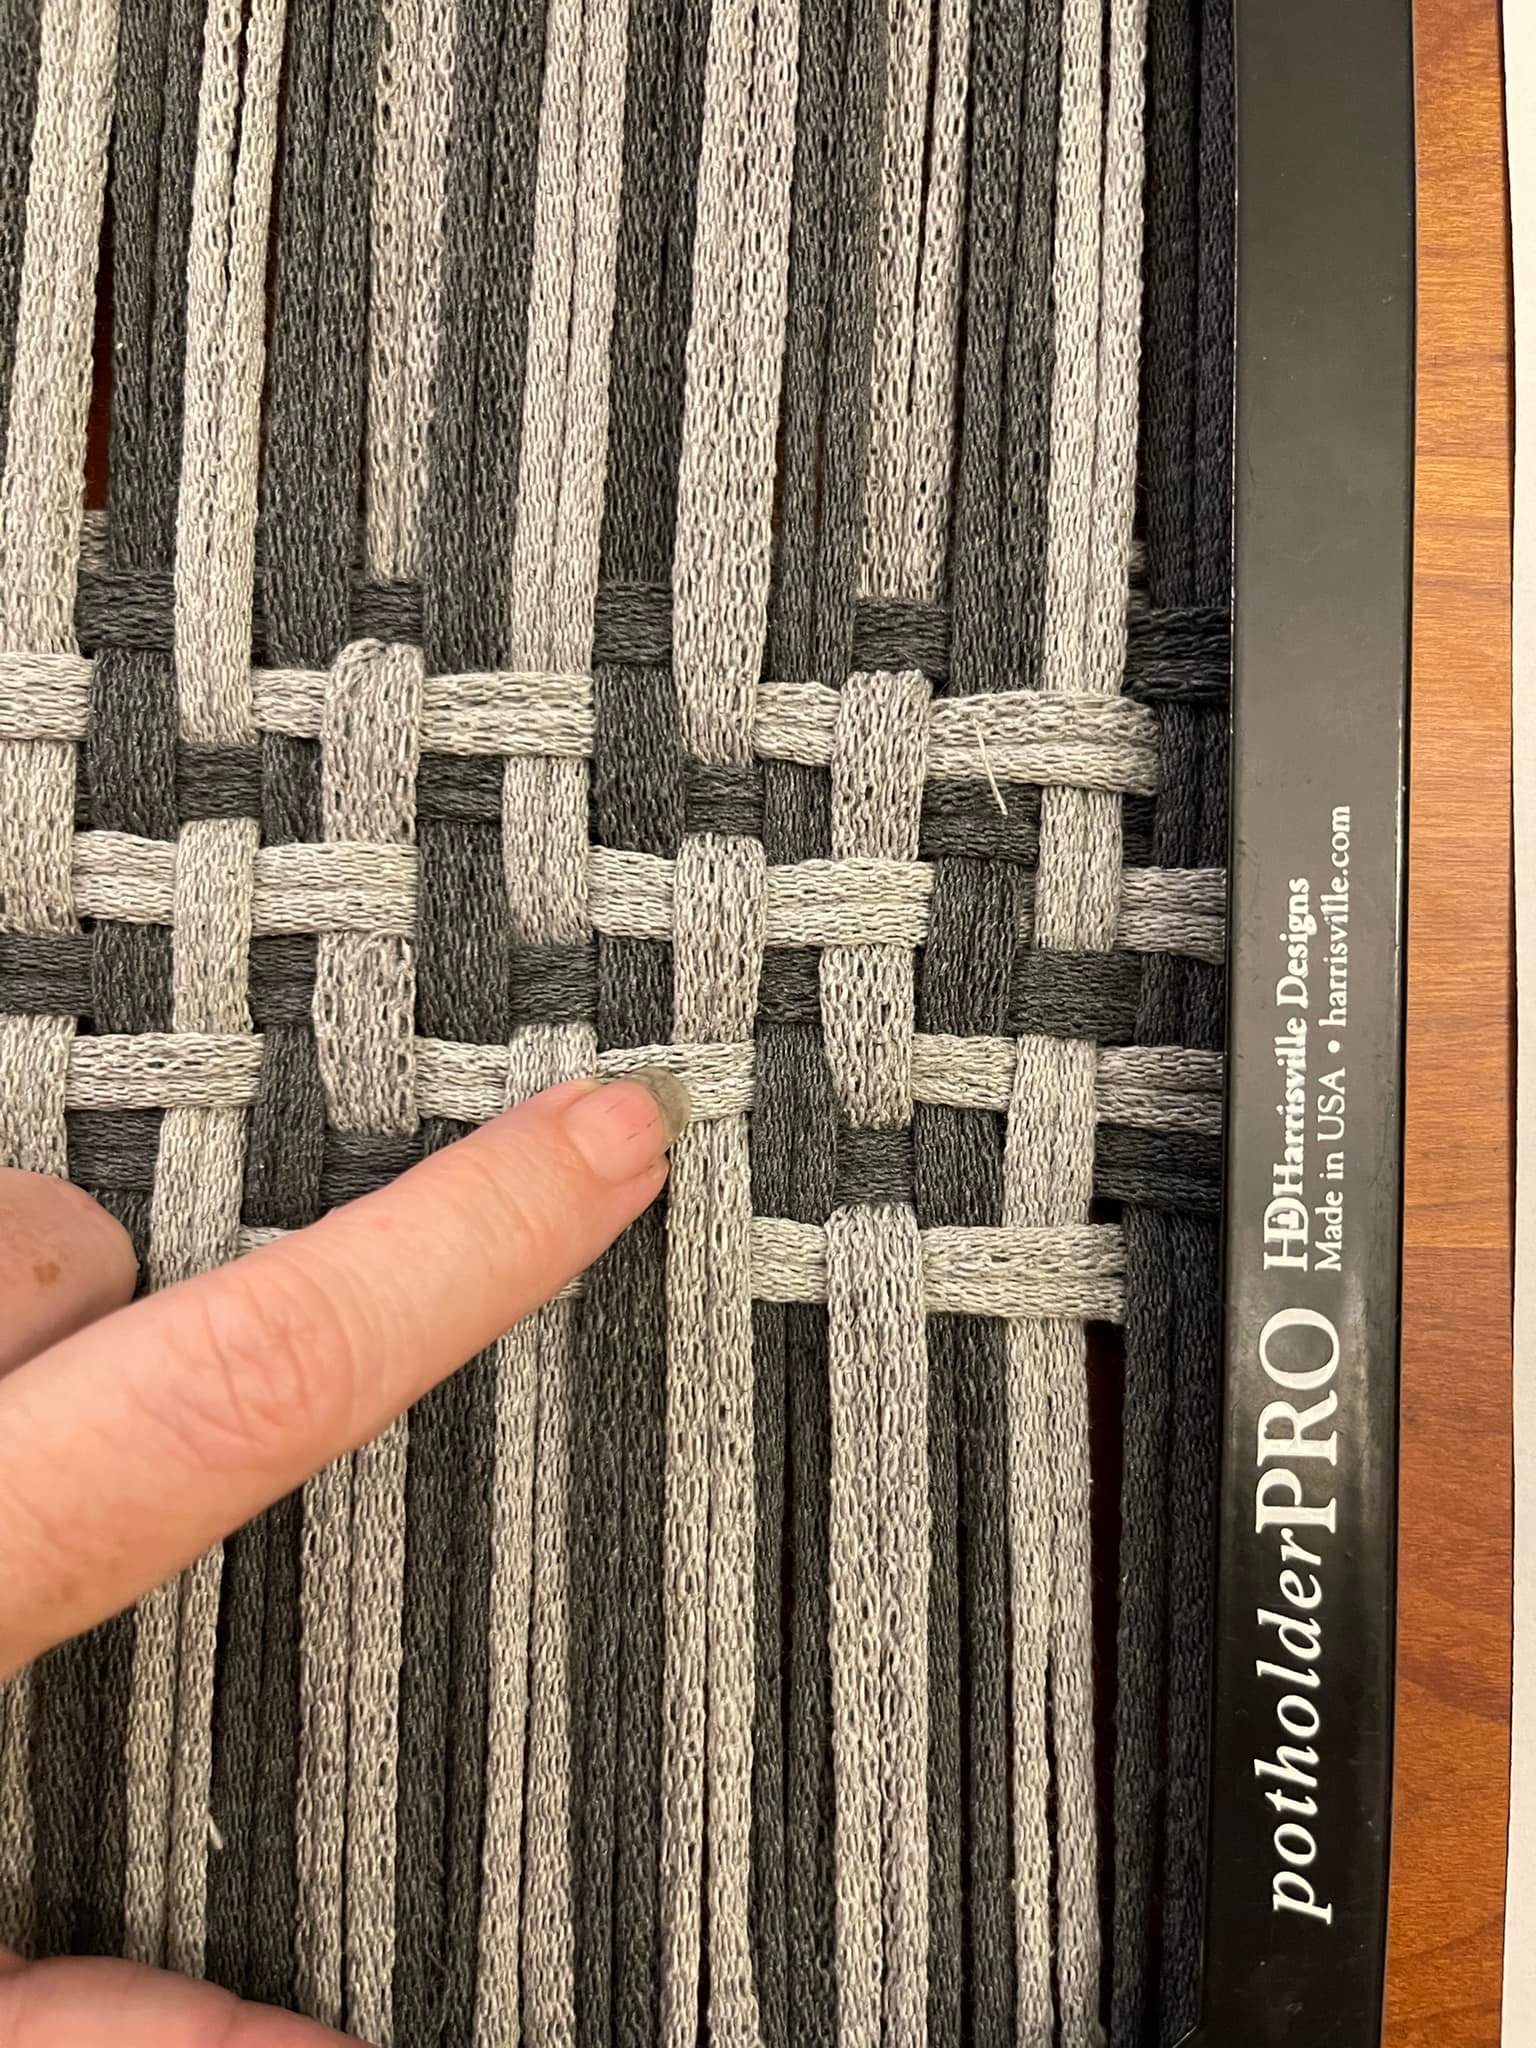
To squeeze in an extra loop while warping, choosing a spot where you’re going to double-up two loops on one peg to fit in the extra. Piglet does this in the middle of the loom, but I’ve seen other people do it at one edge or the other.

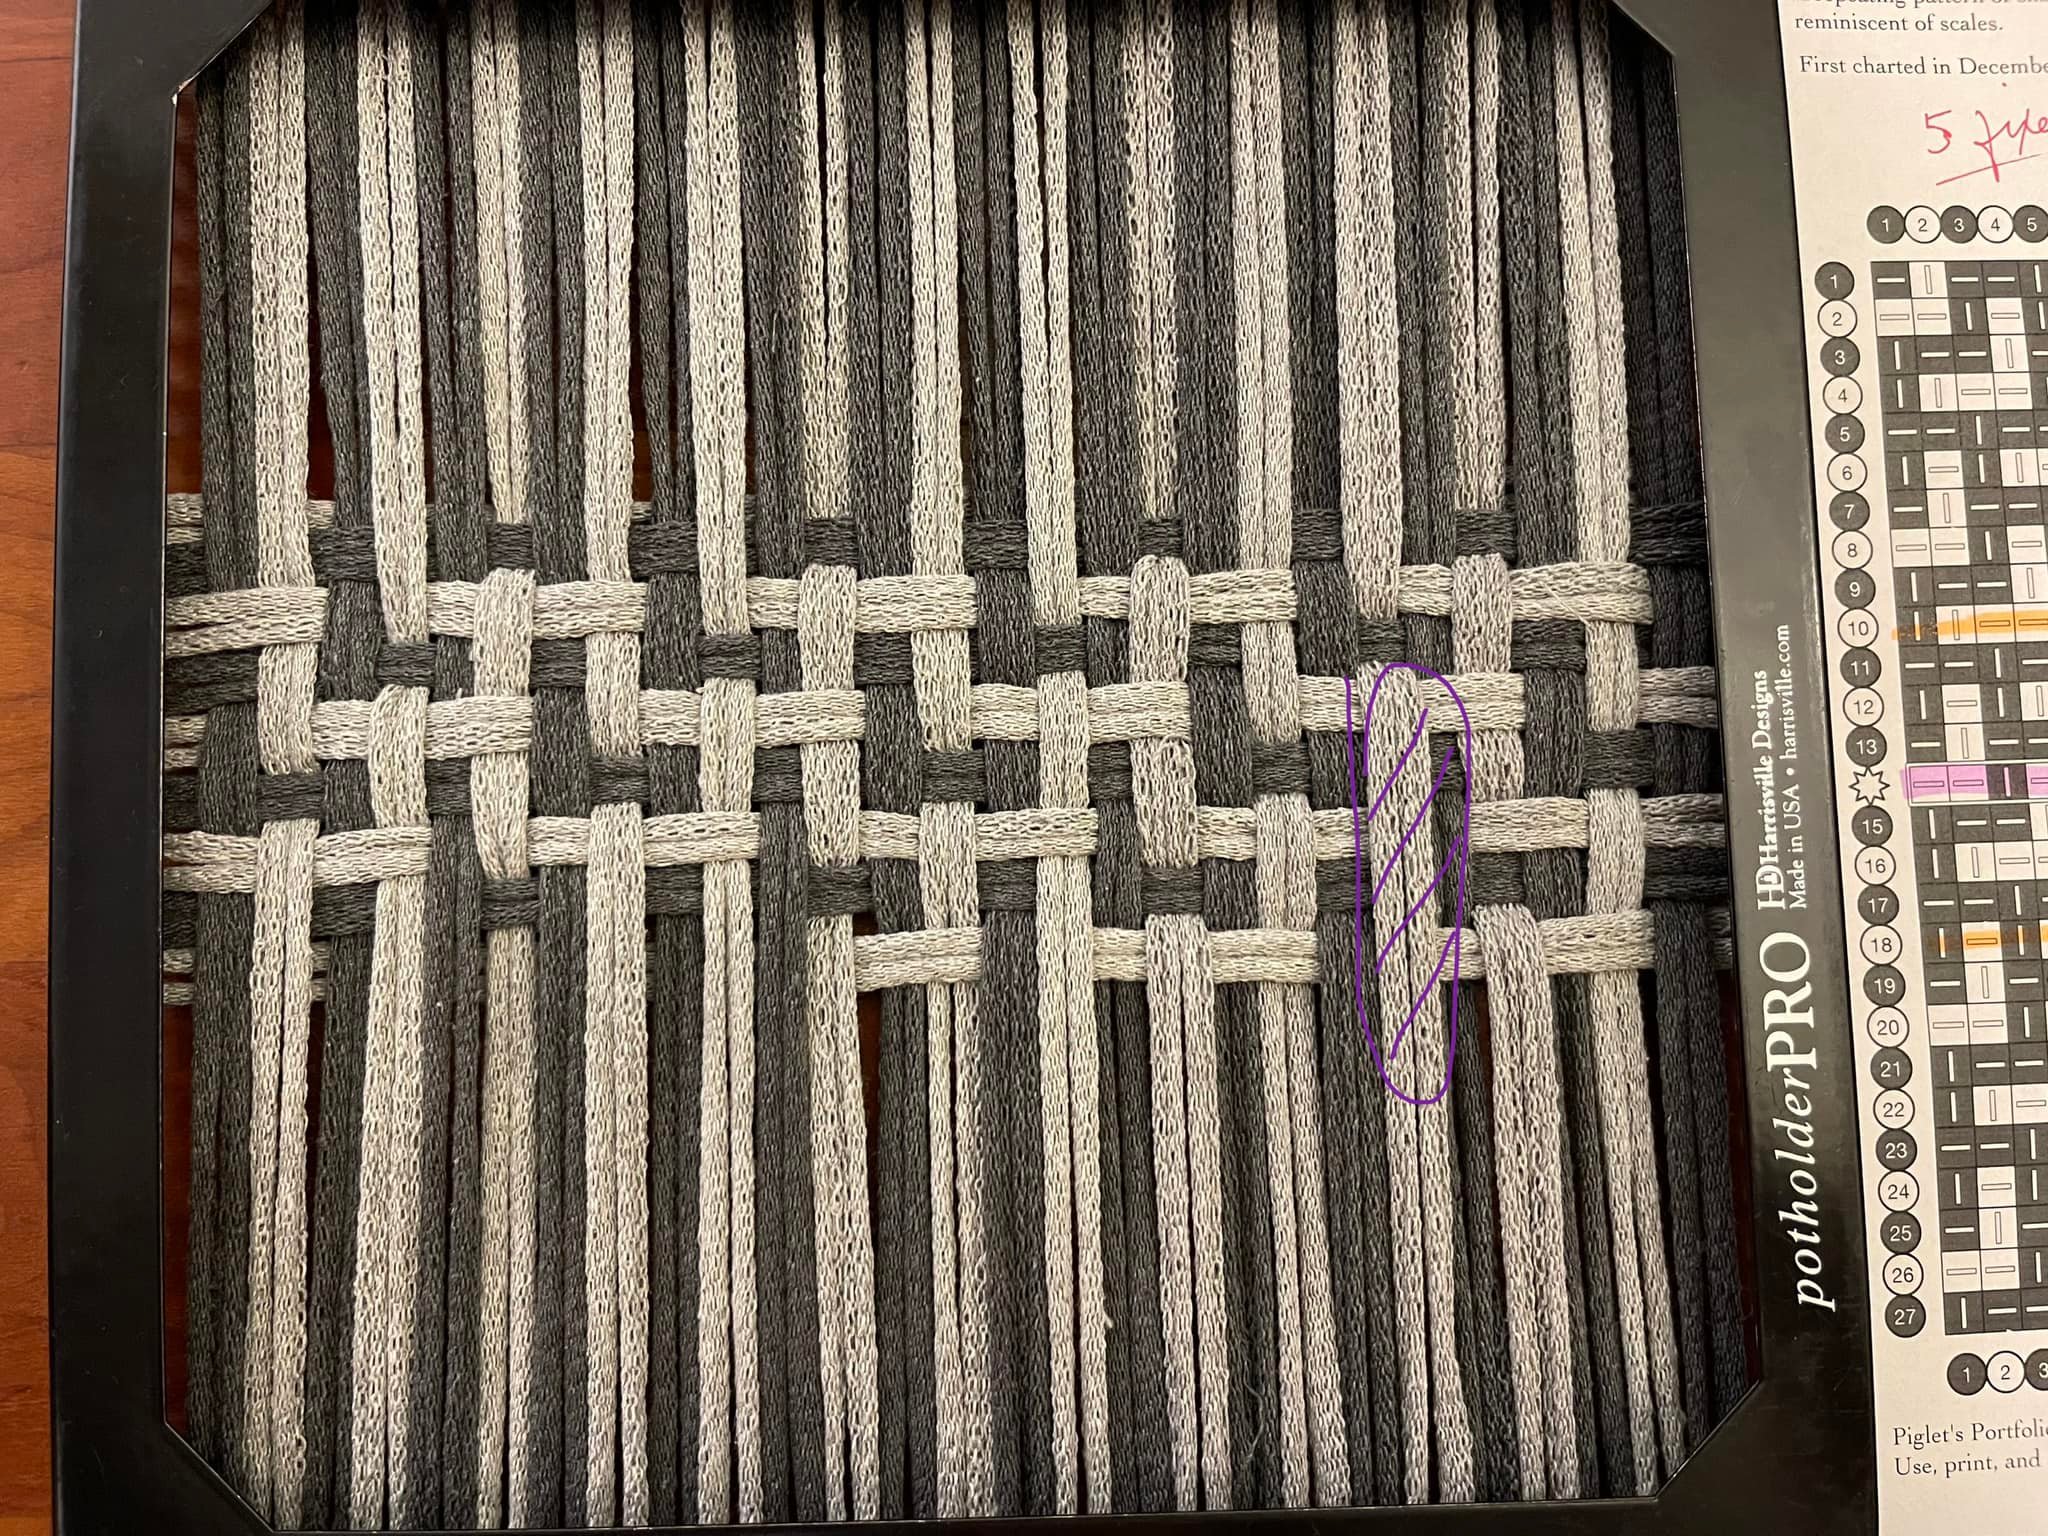
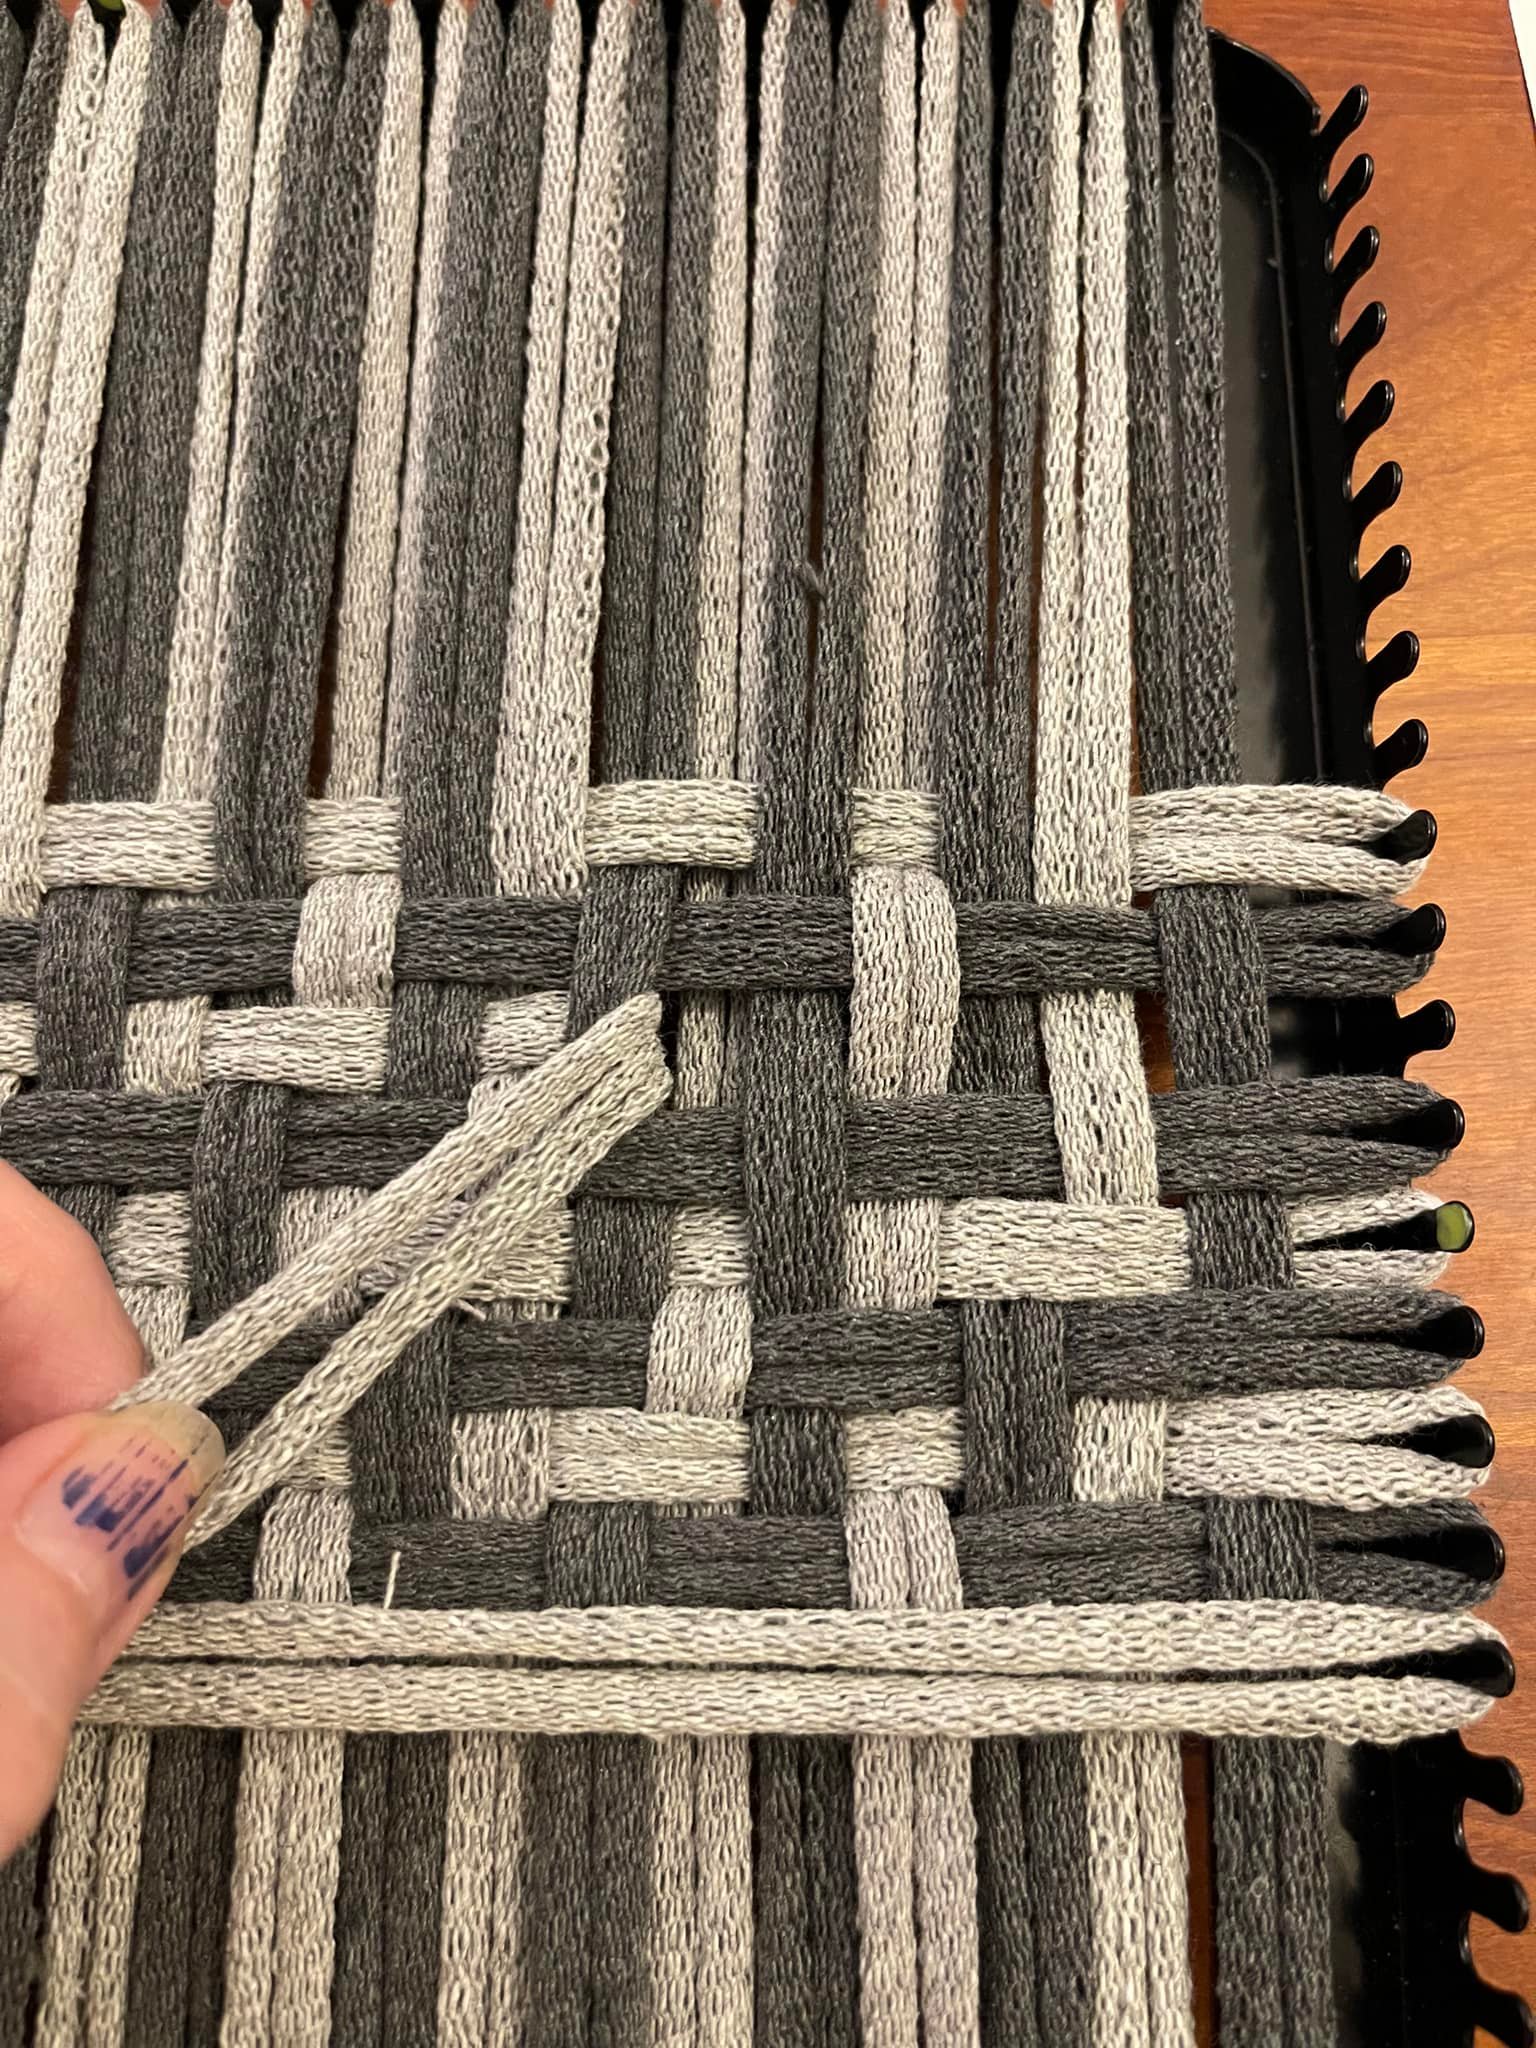
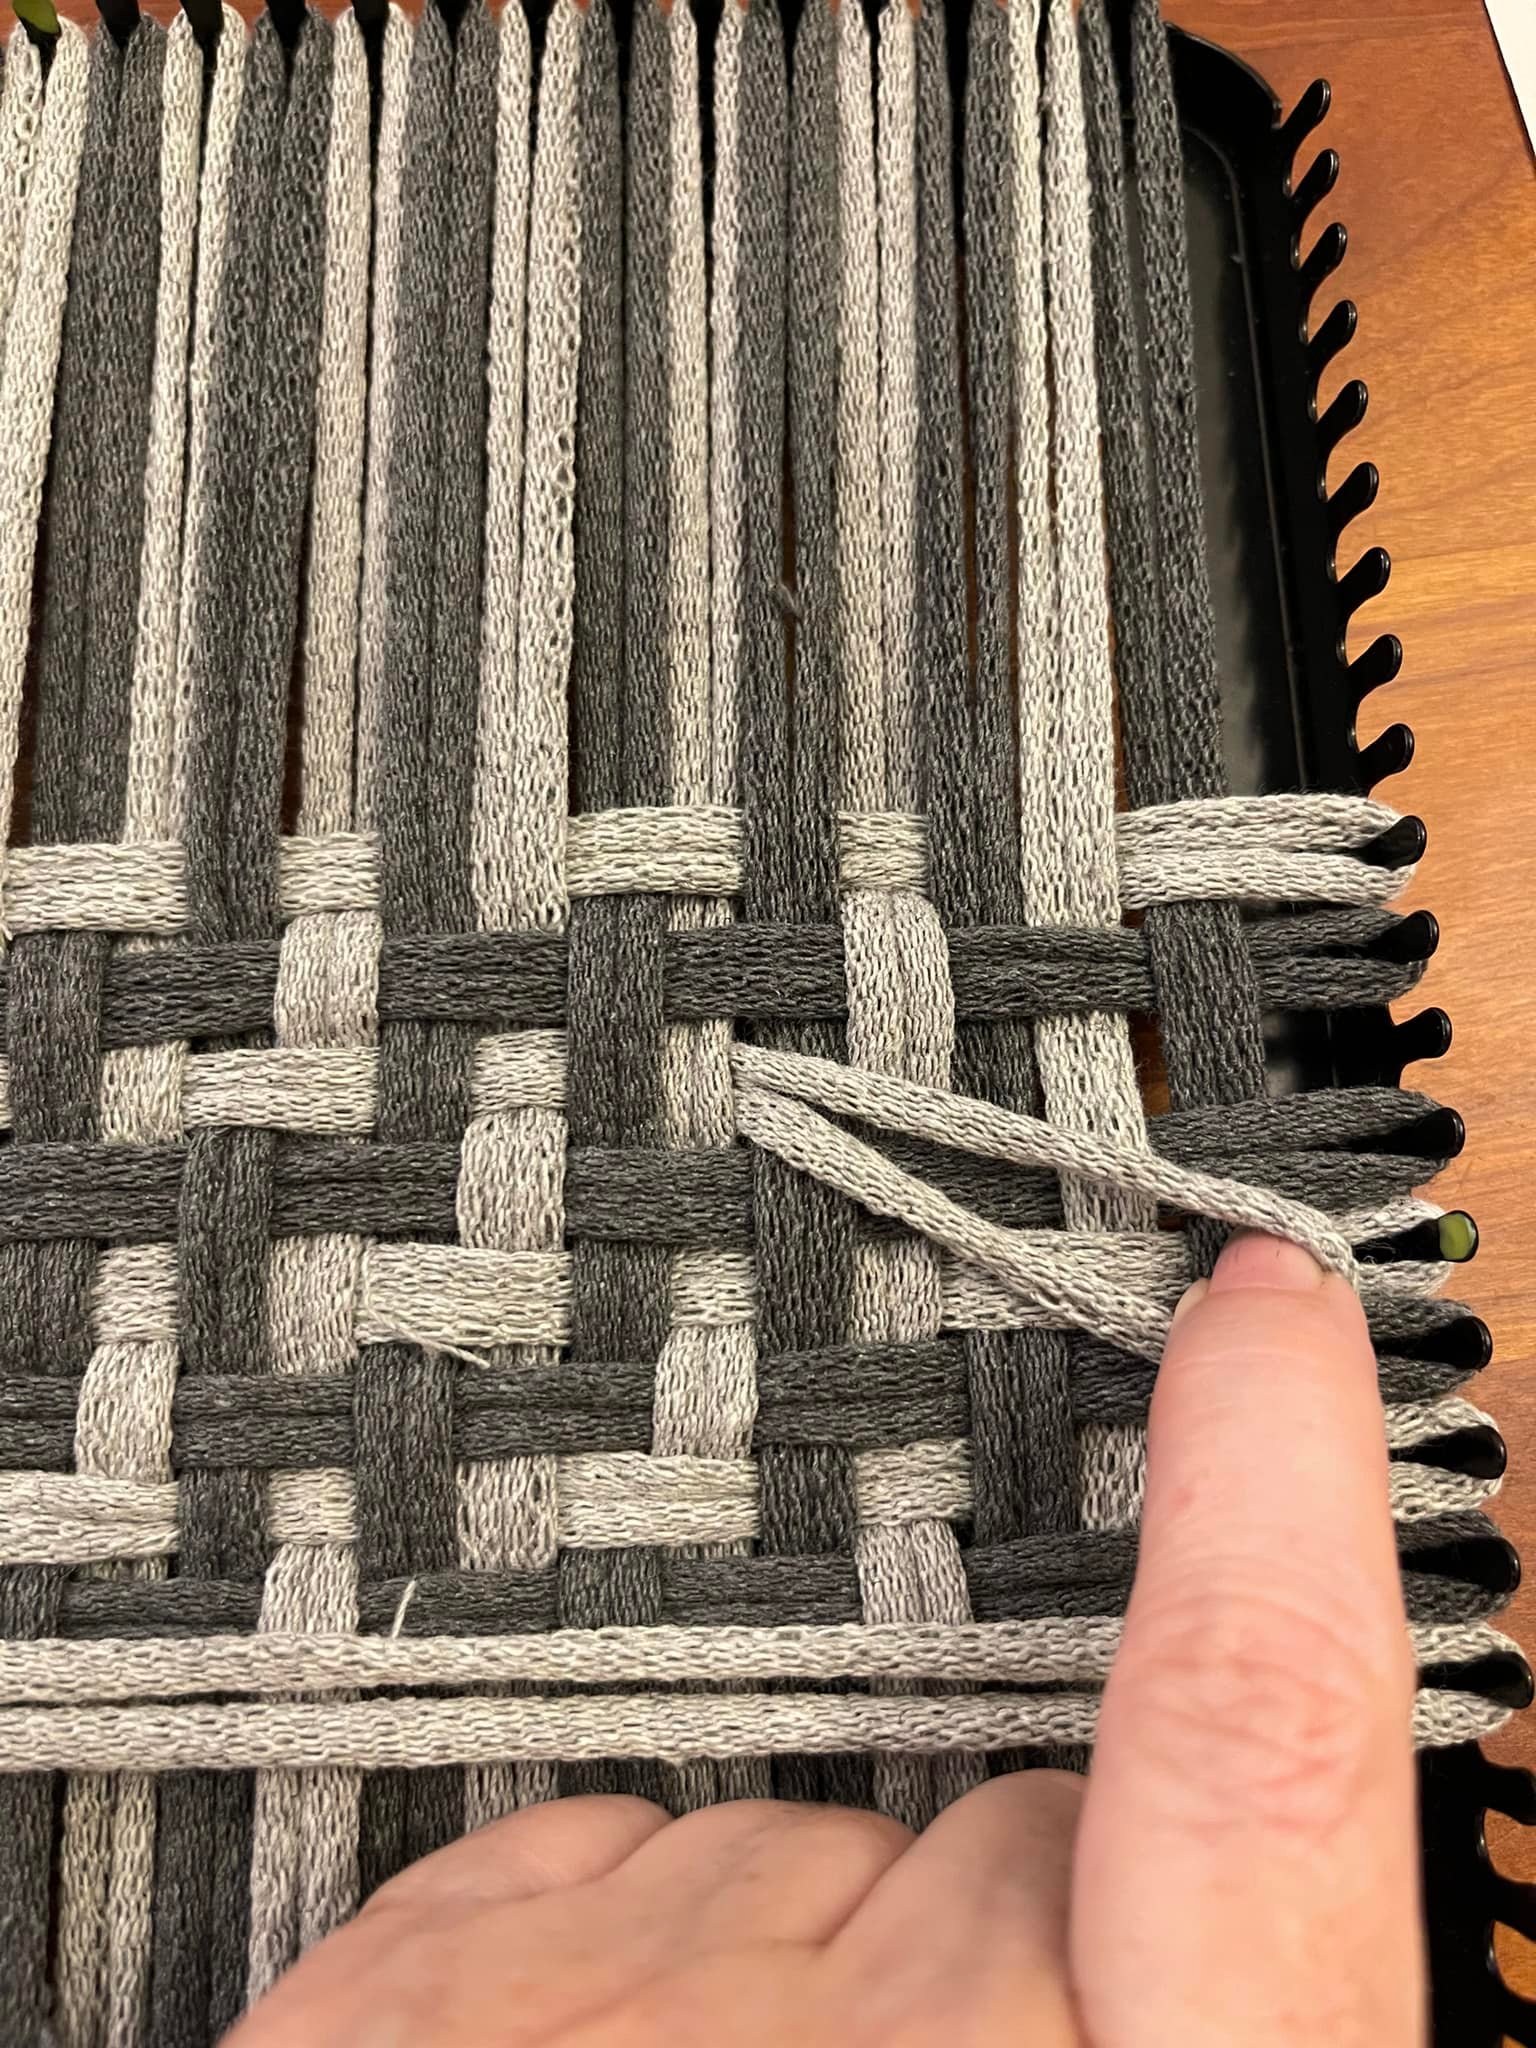
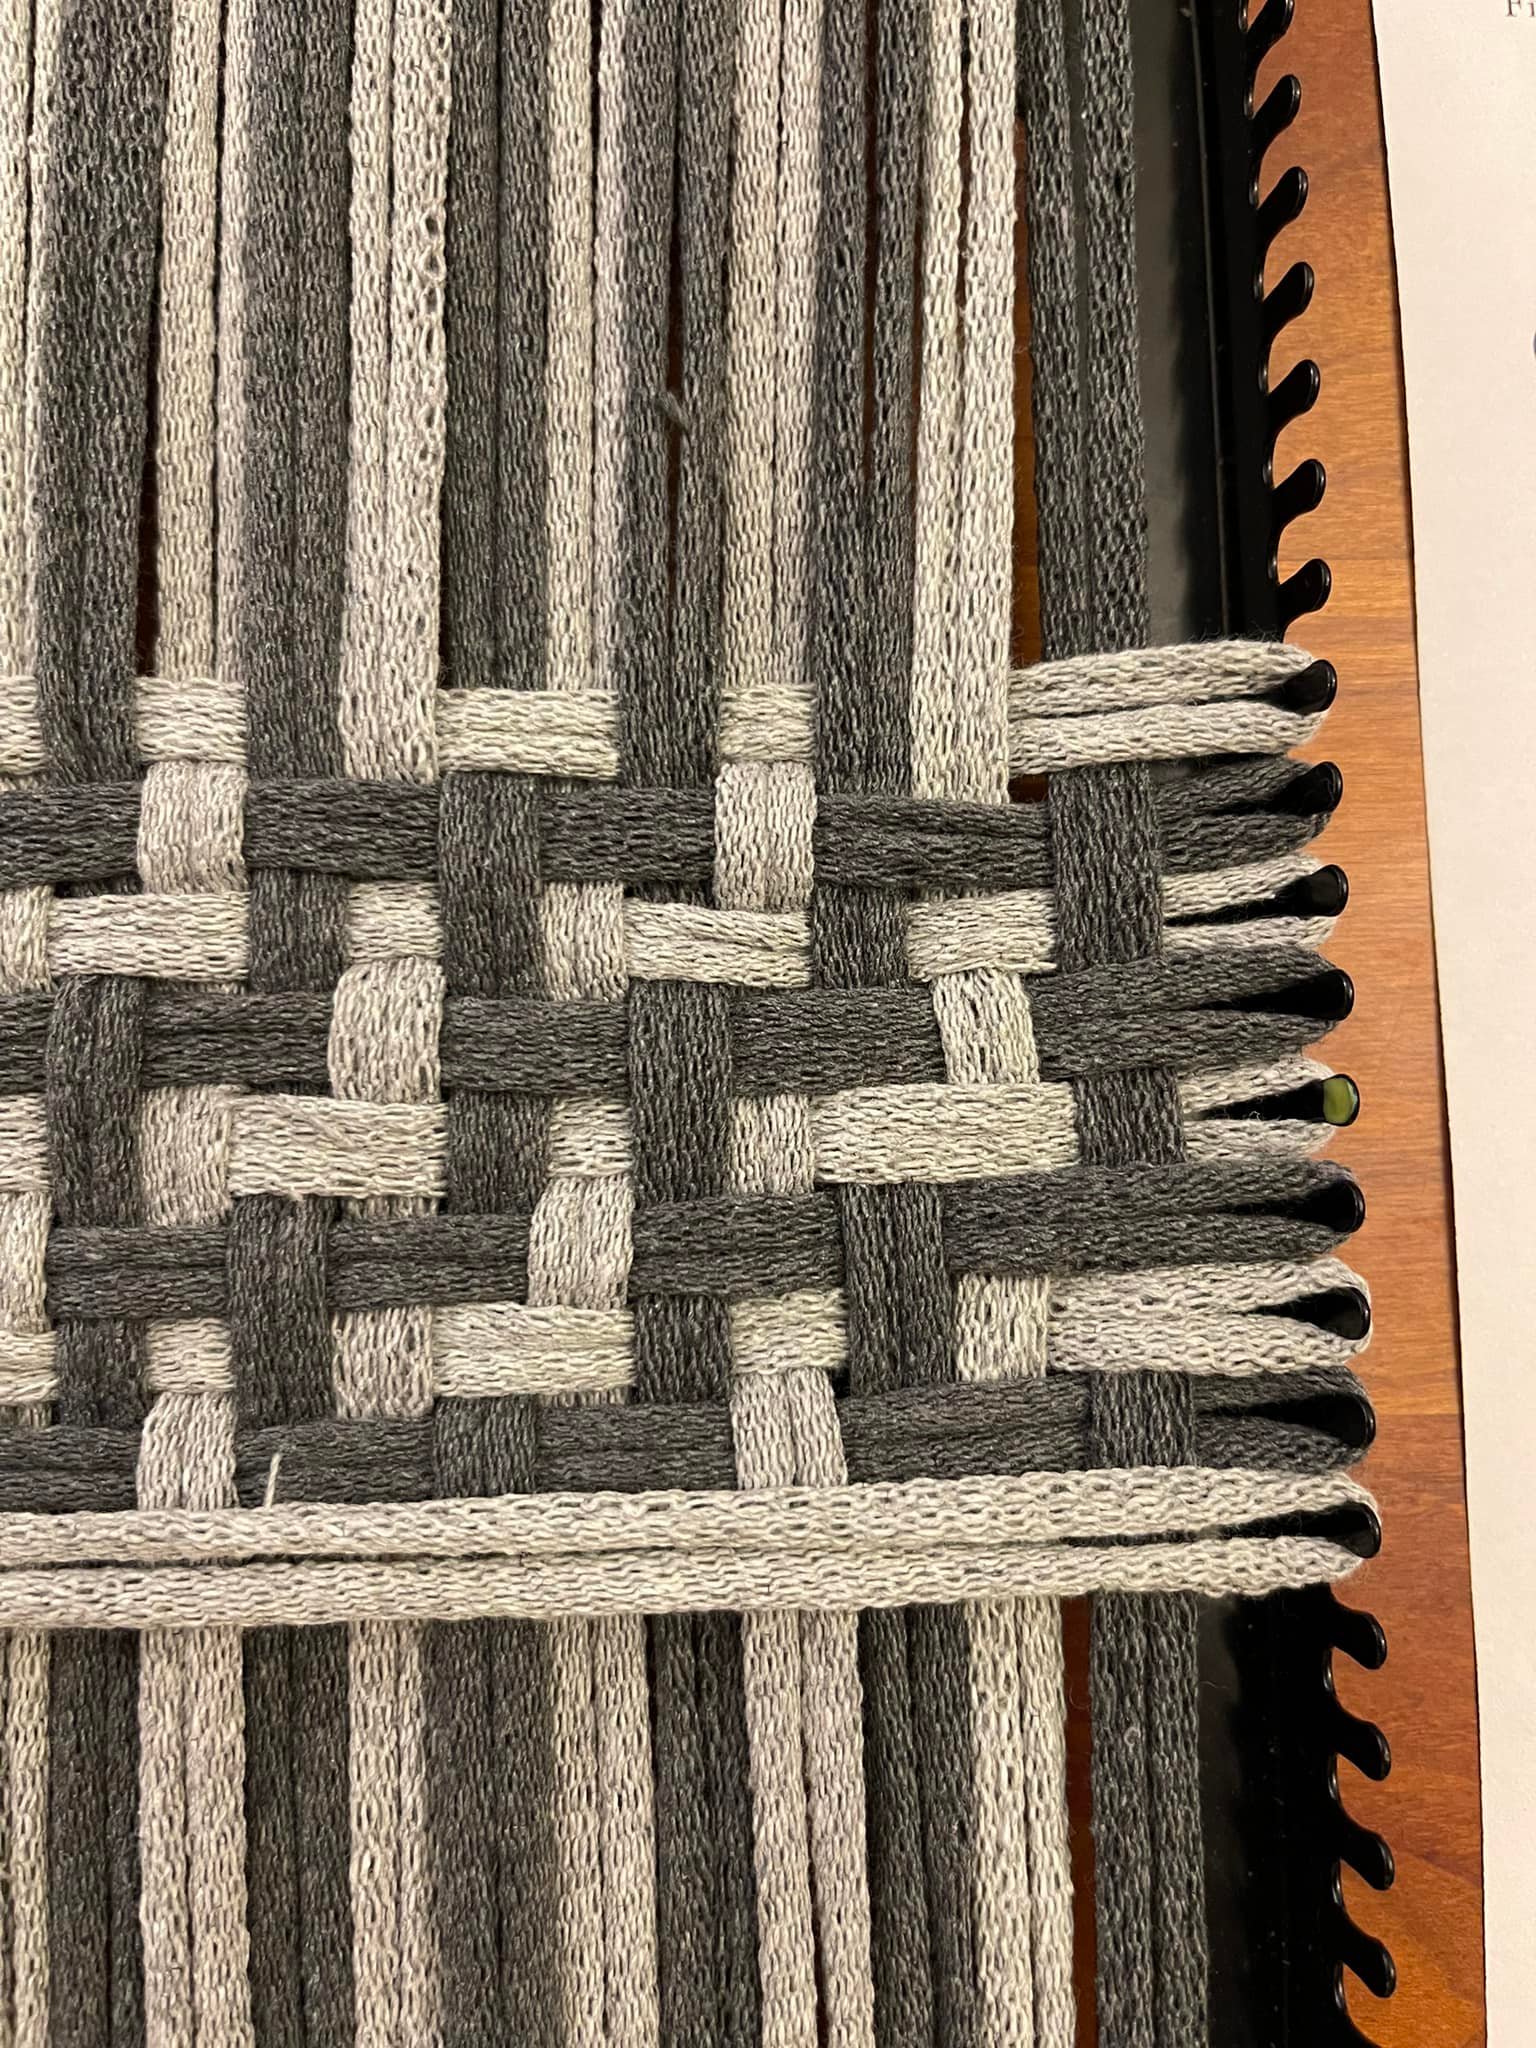
When you’re weaving in your first two weft loops, take a moment to carefully shift the doubled-up loops apart and weave over and under them as called for in the pattern. Once you’ve done the first few weft loops, they’ll hold the warp in position and you can mostly ignore the fact that they’re sharing a peg.

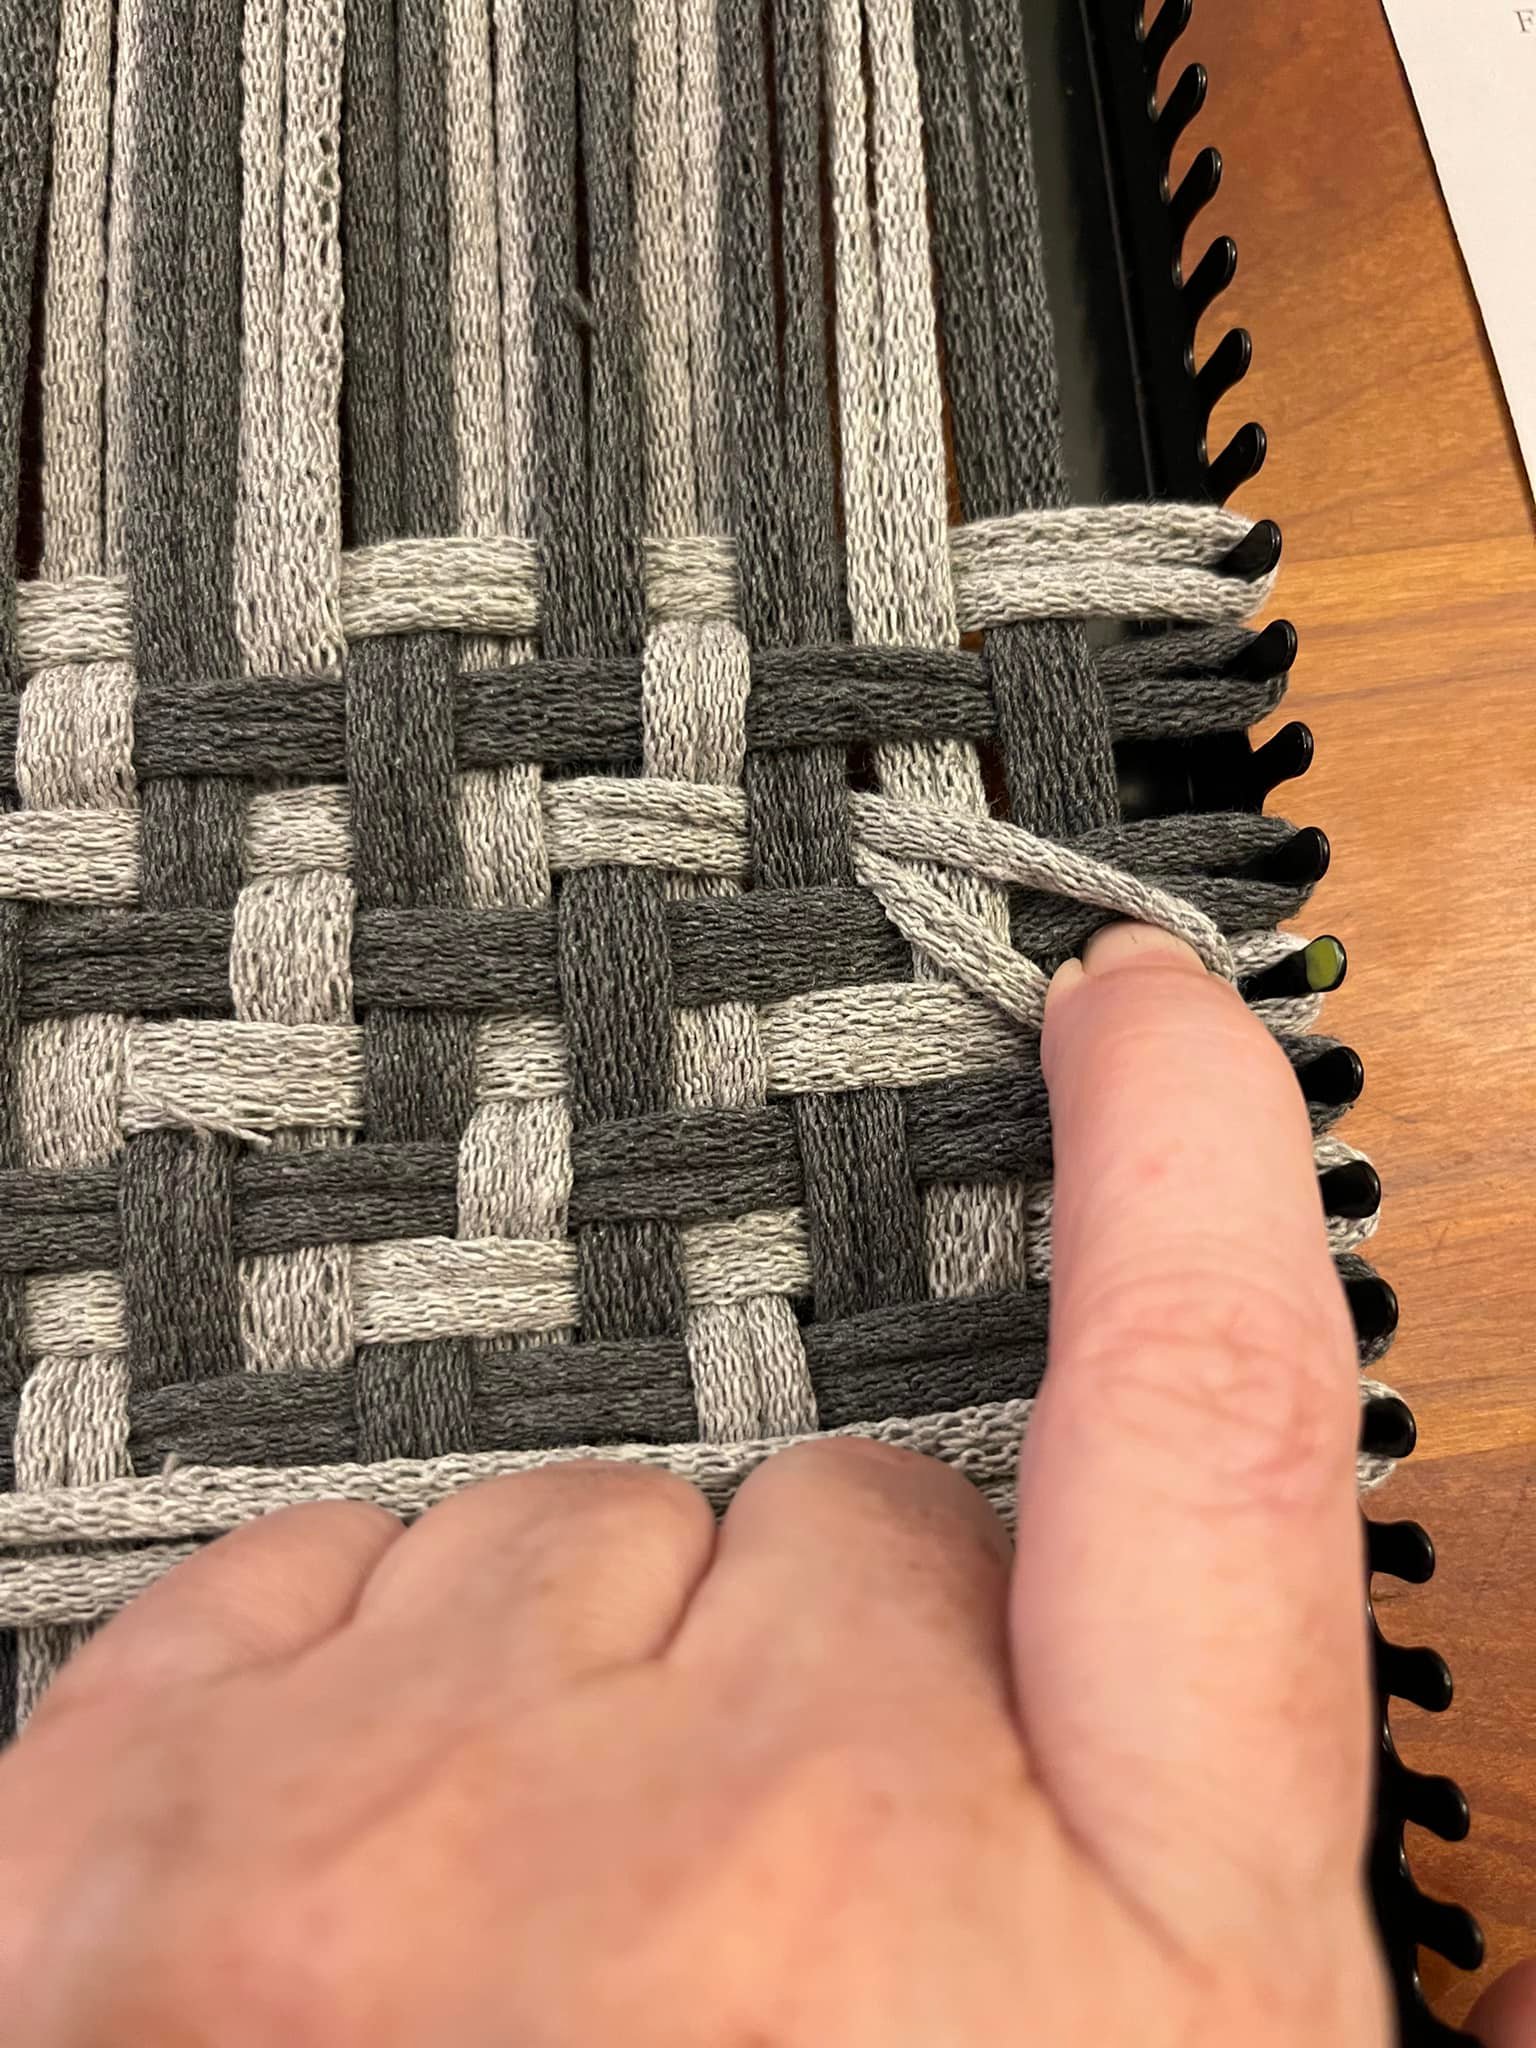
To squeeze in an extra weft loop, just pull a loop through normally and then stack the ends on top of an already-used peg. You could do this at the start of the process, at the end, or in the middle — but I think earlier is better, because you’ve got more slack at that point.

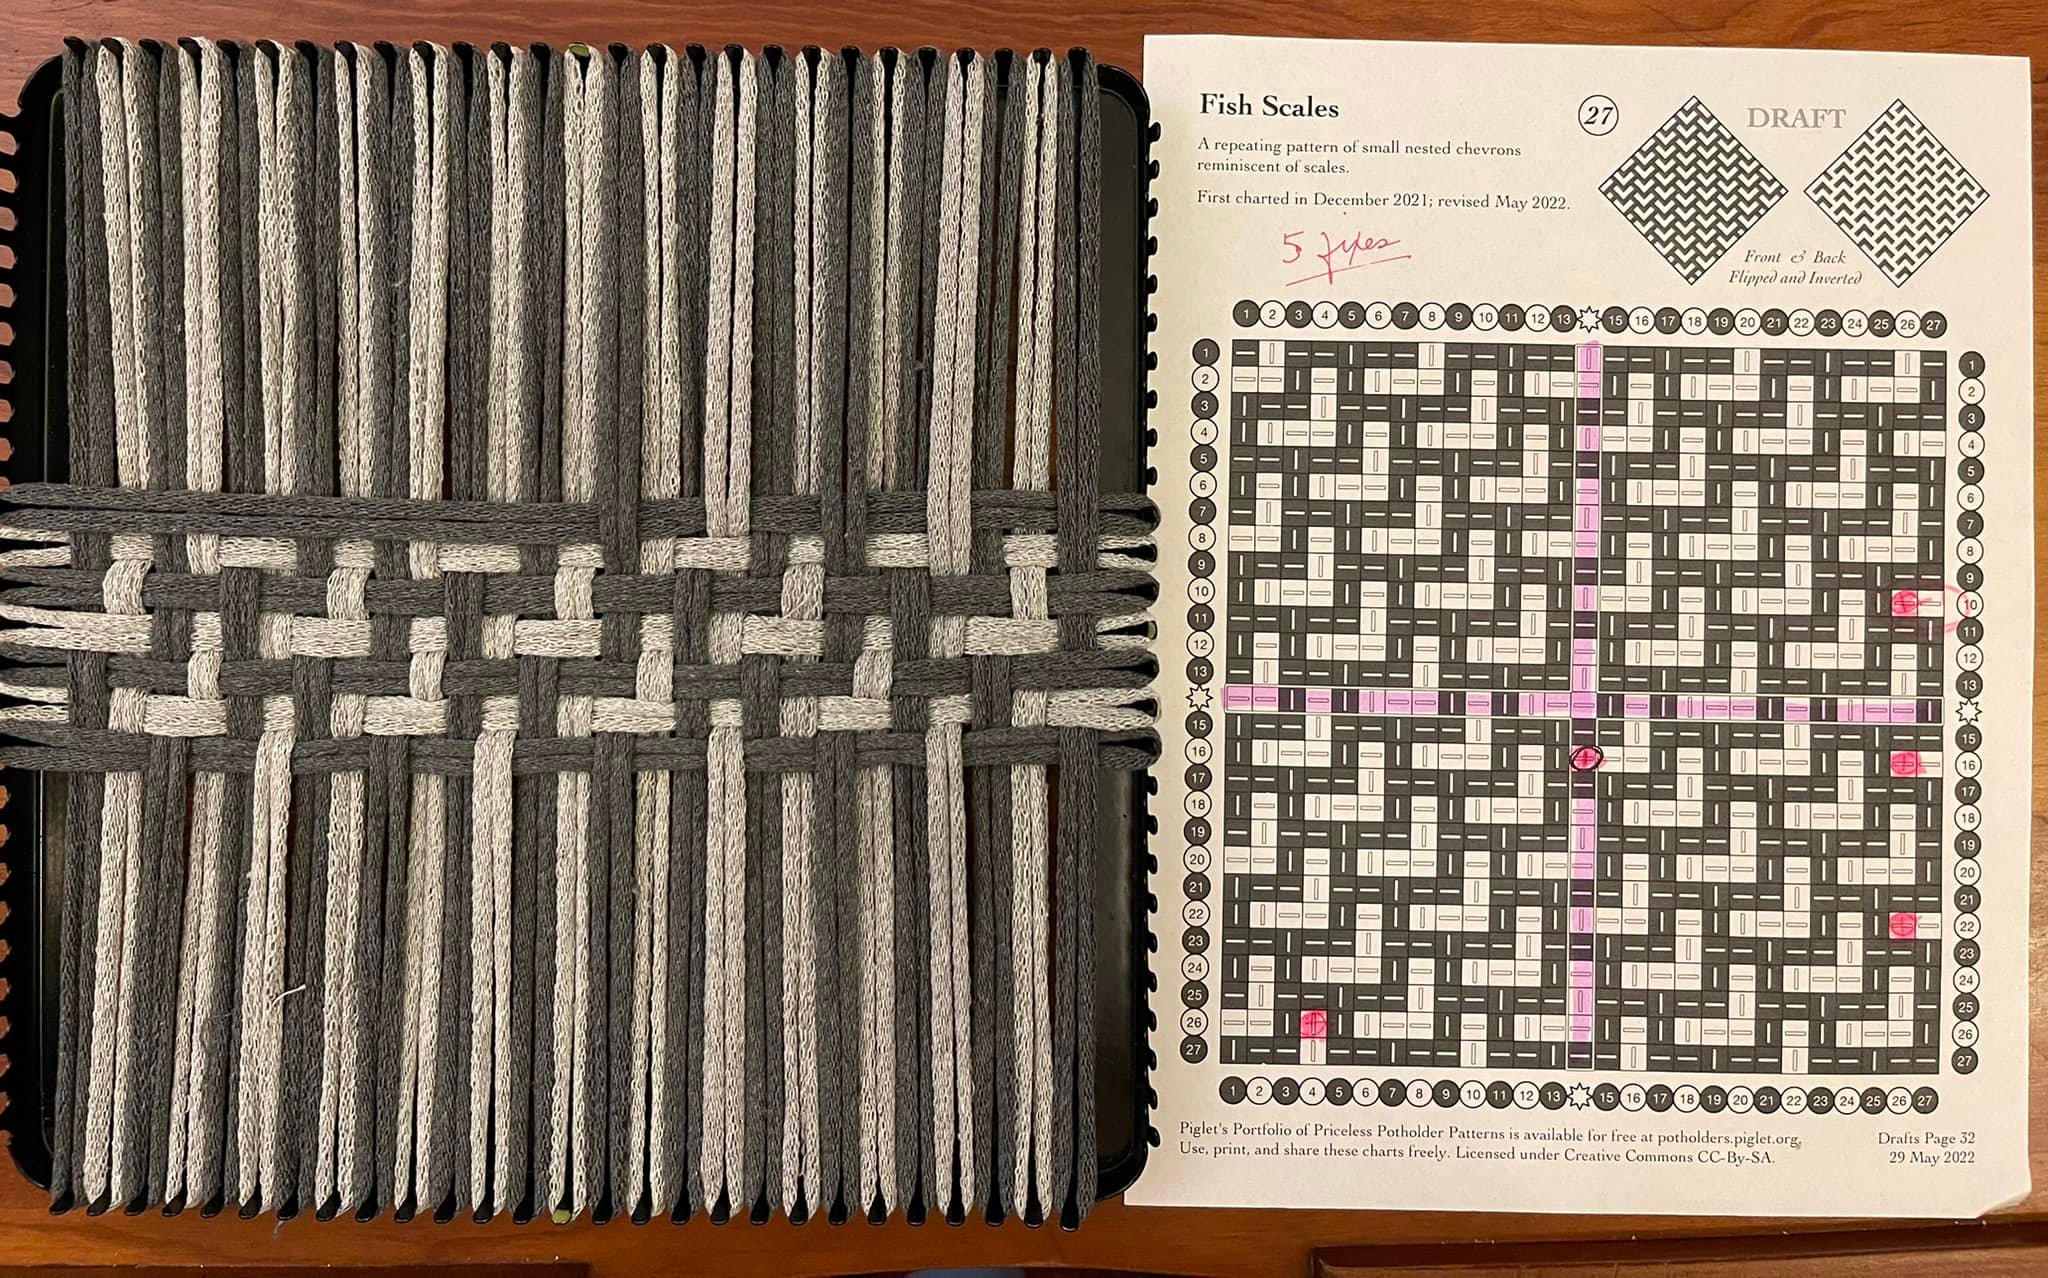
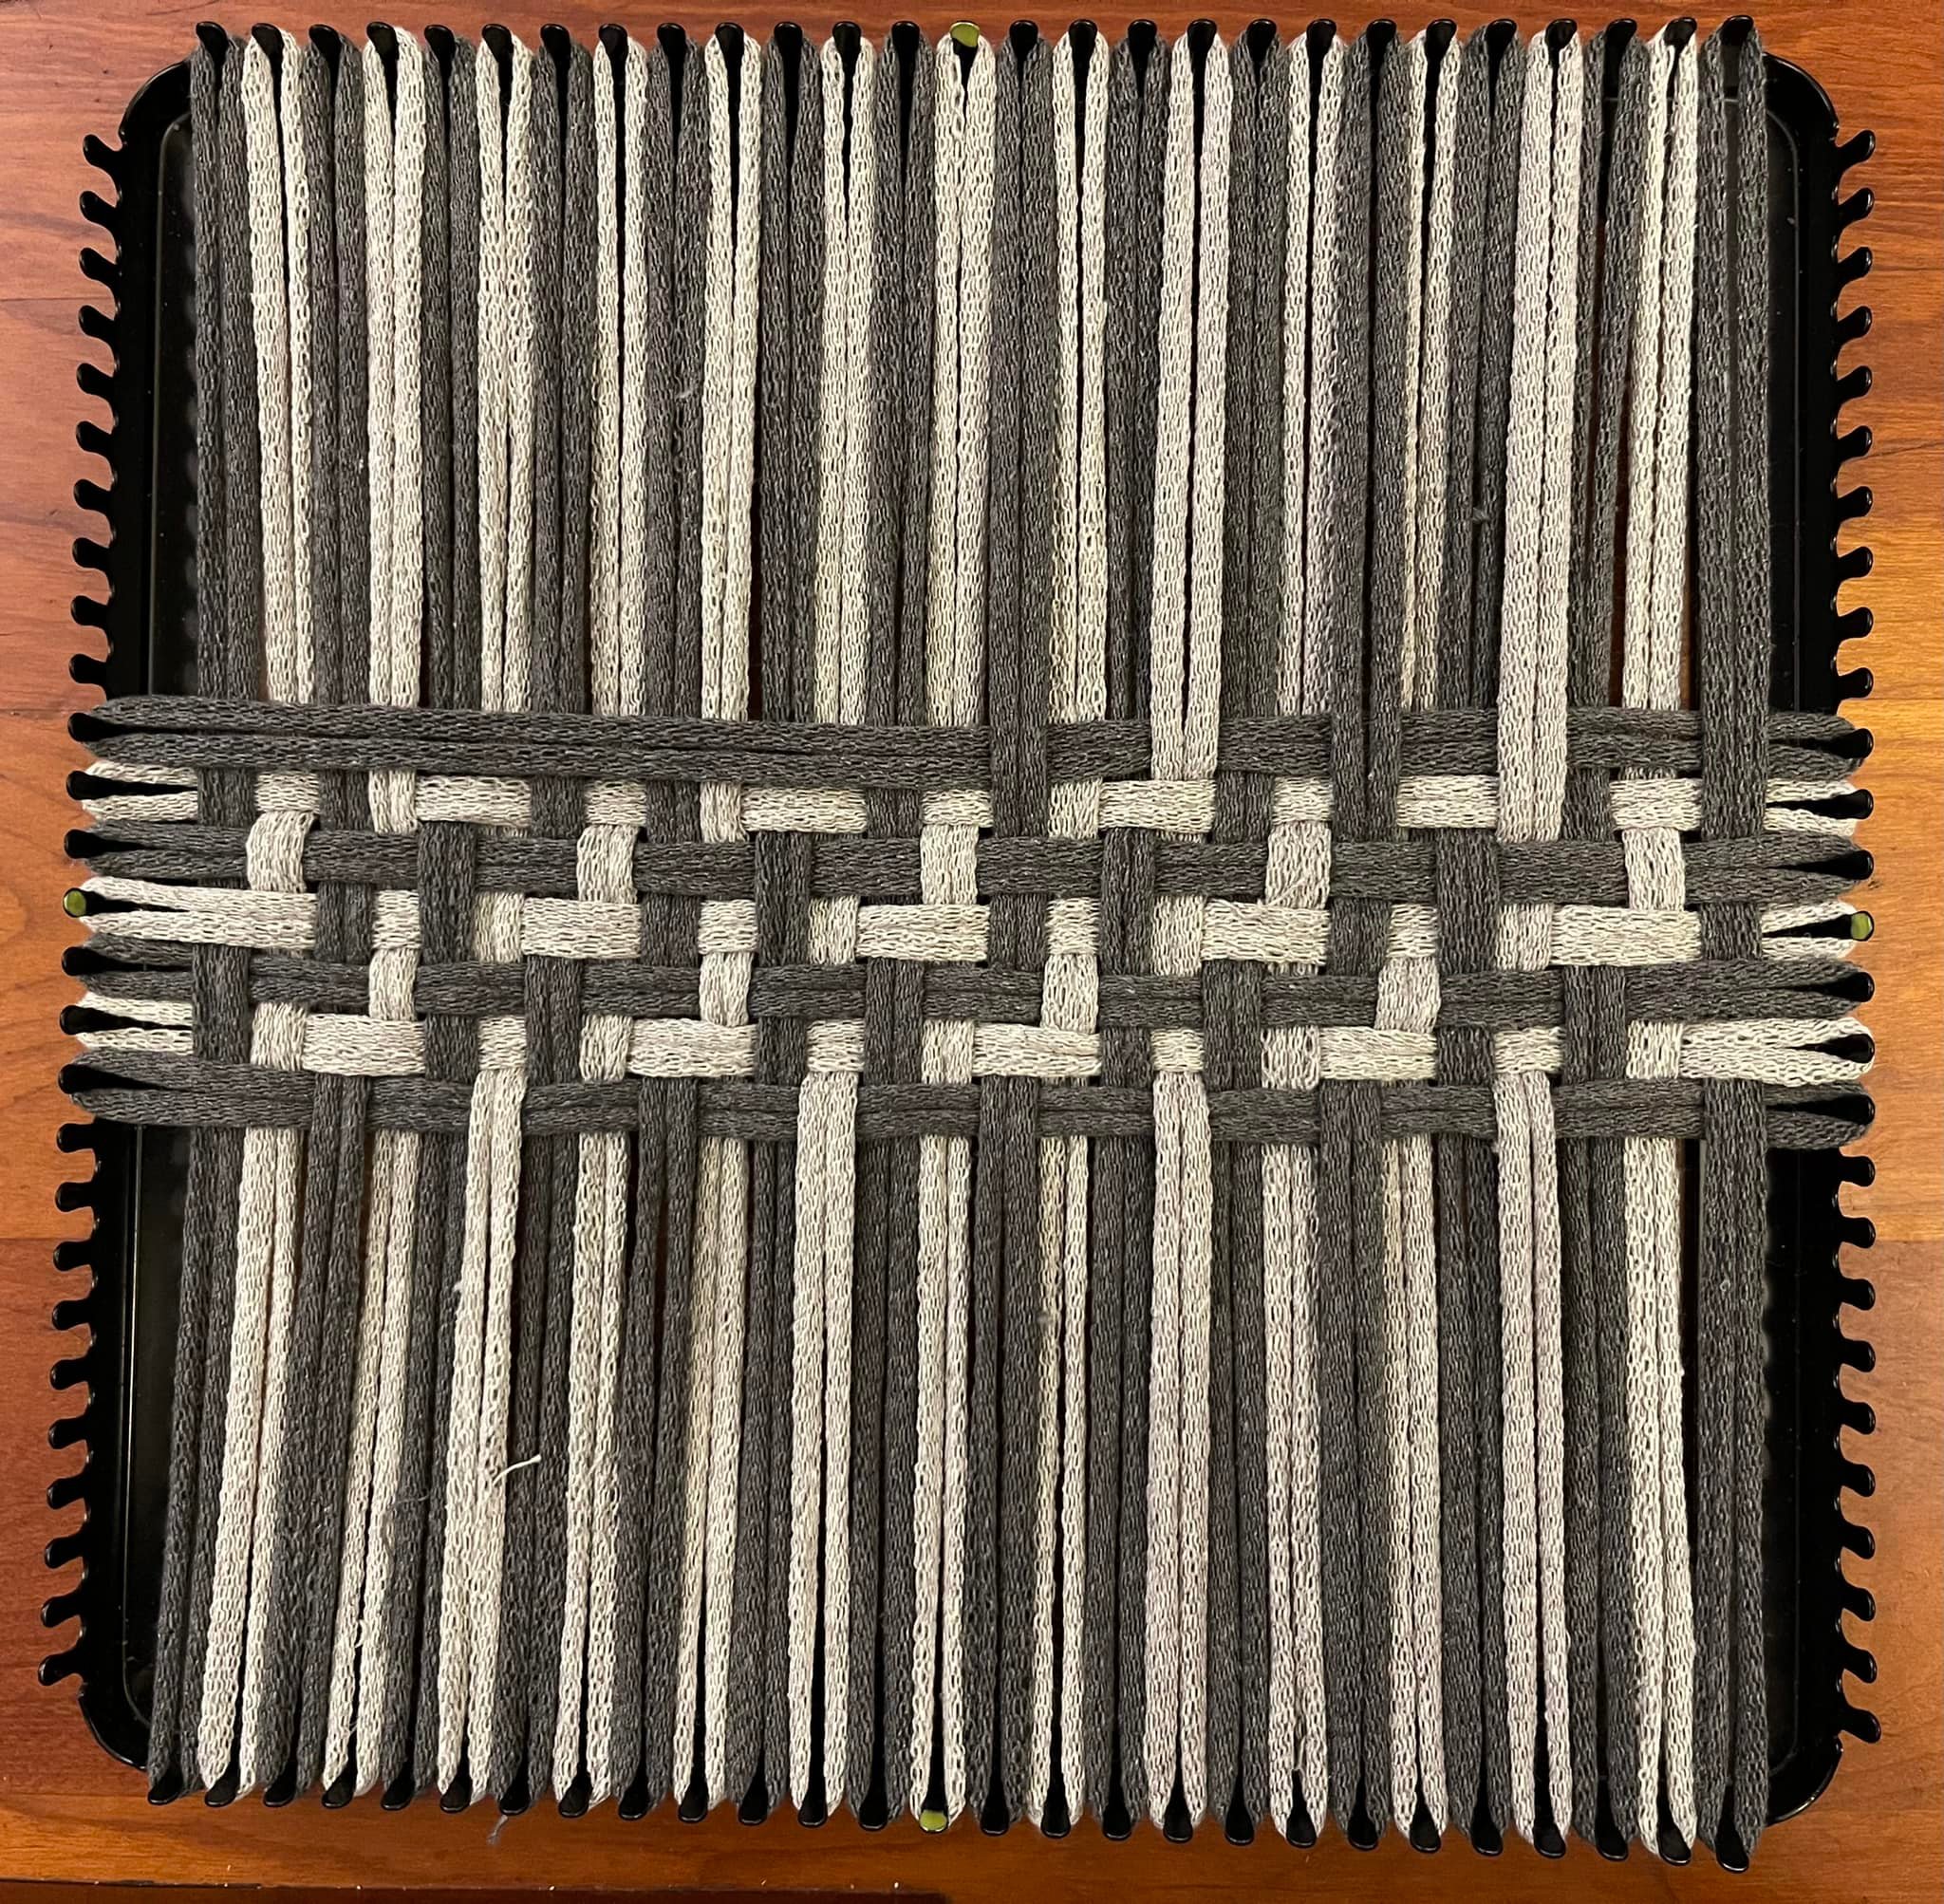
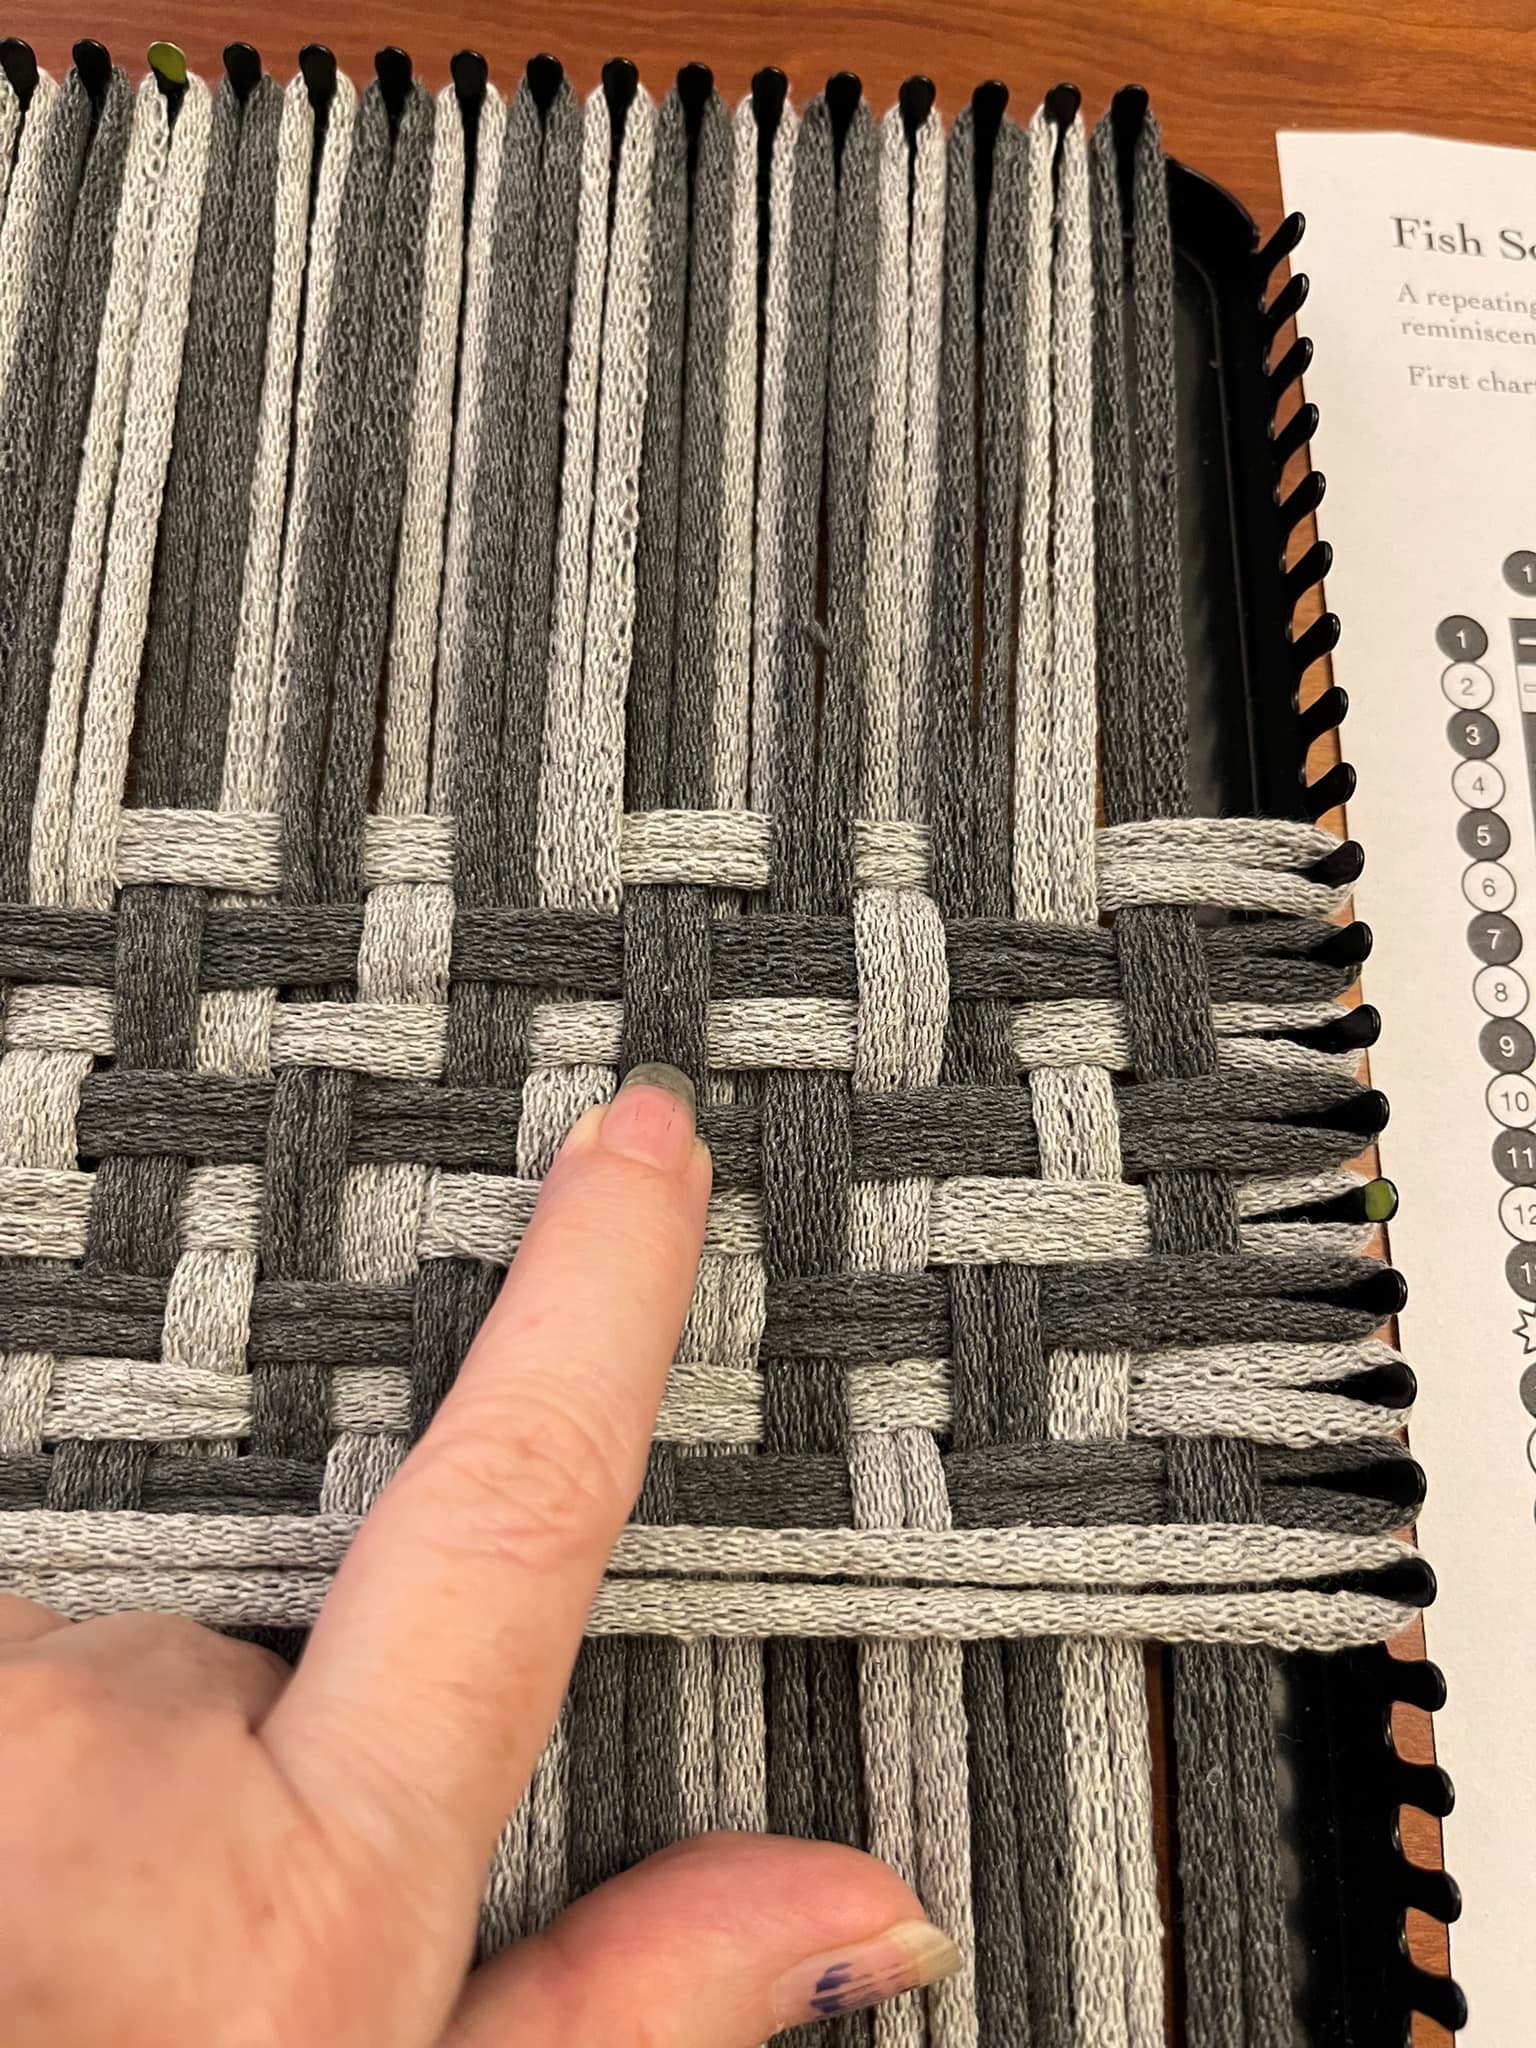
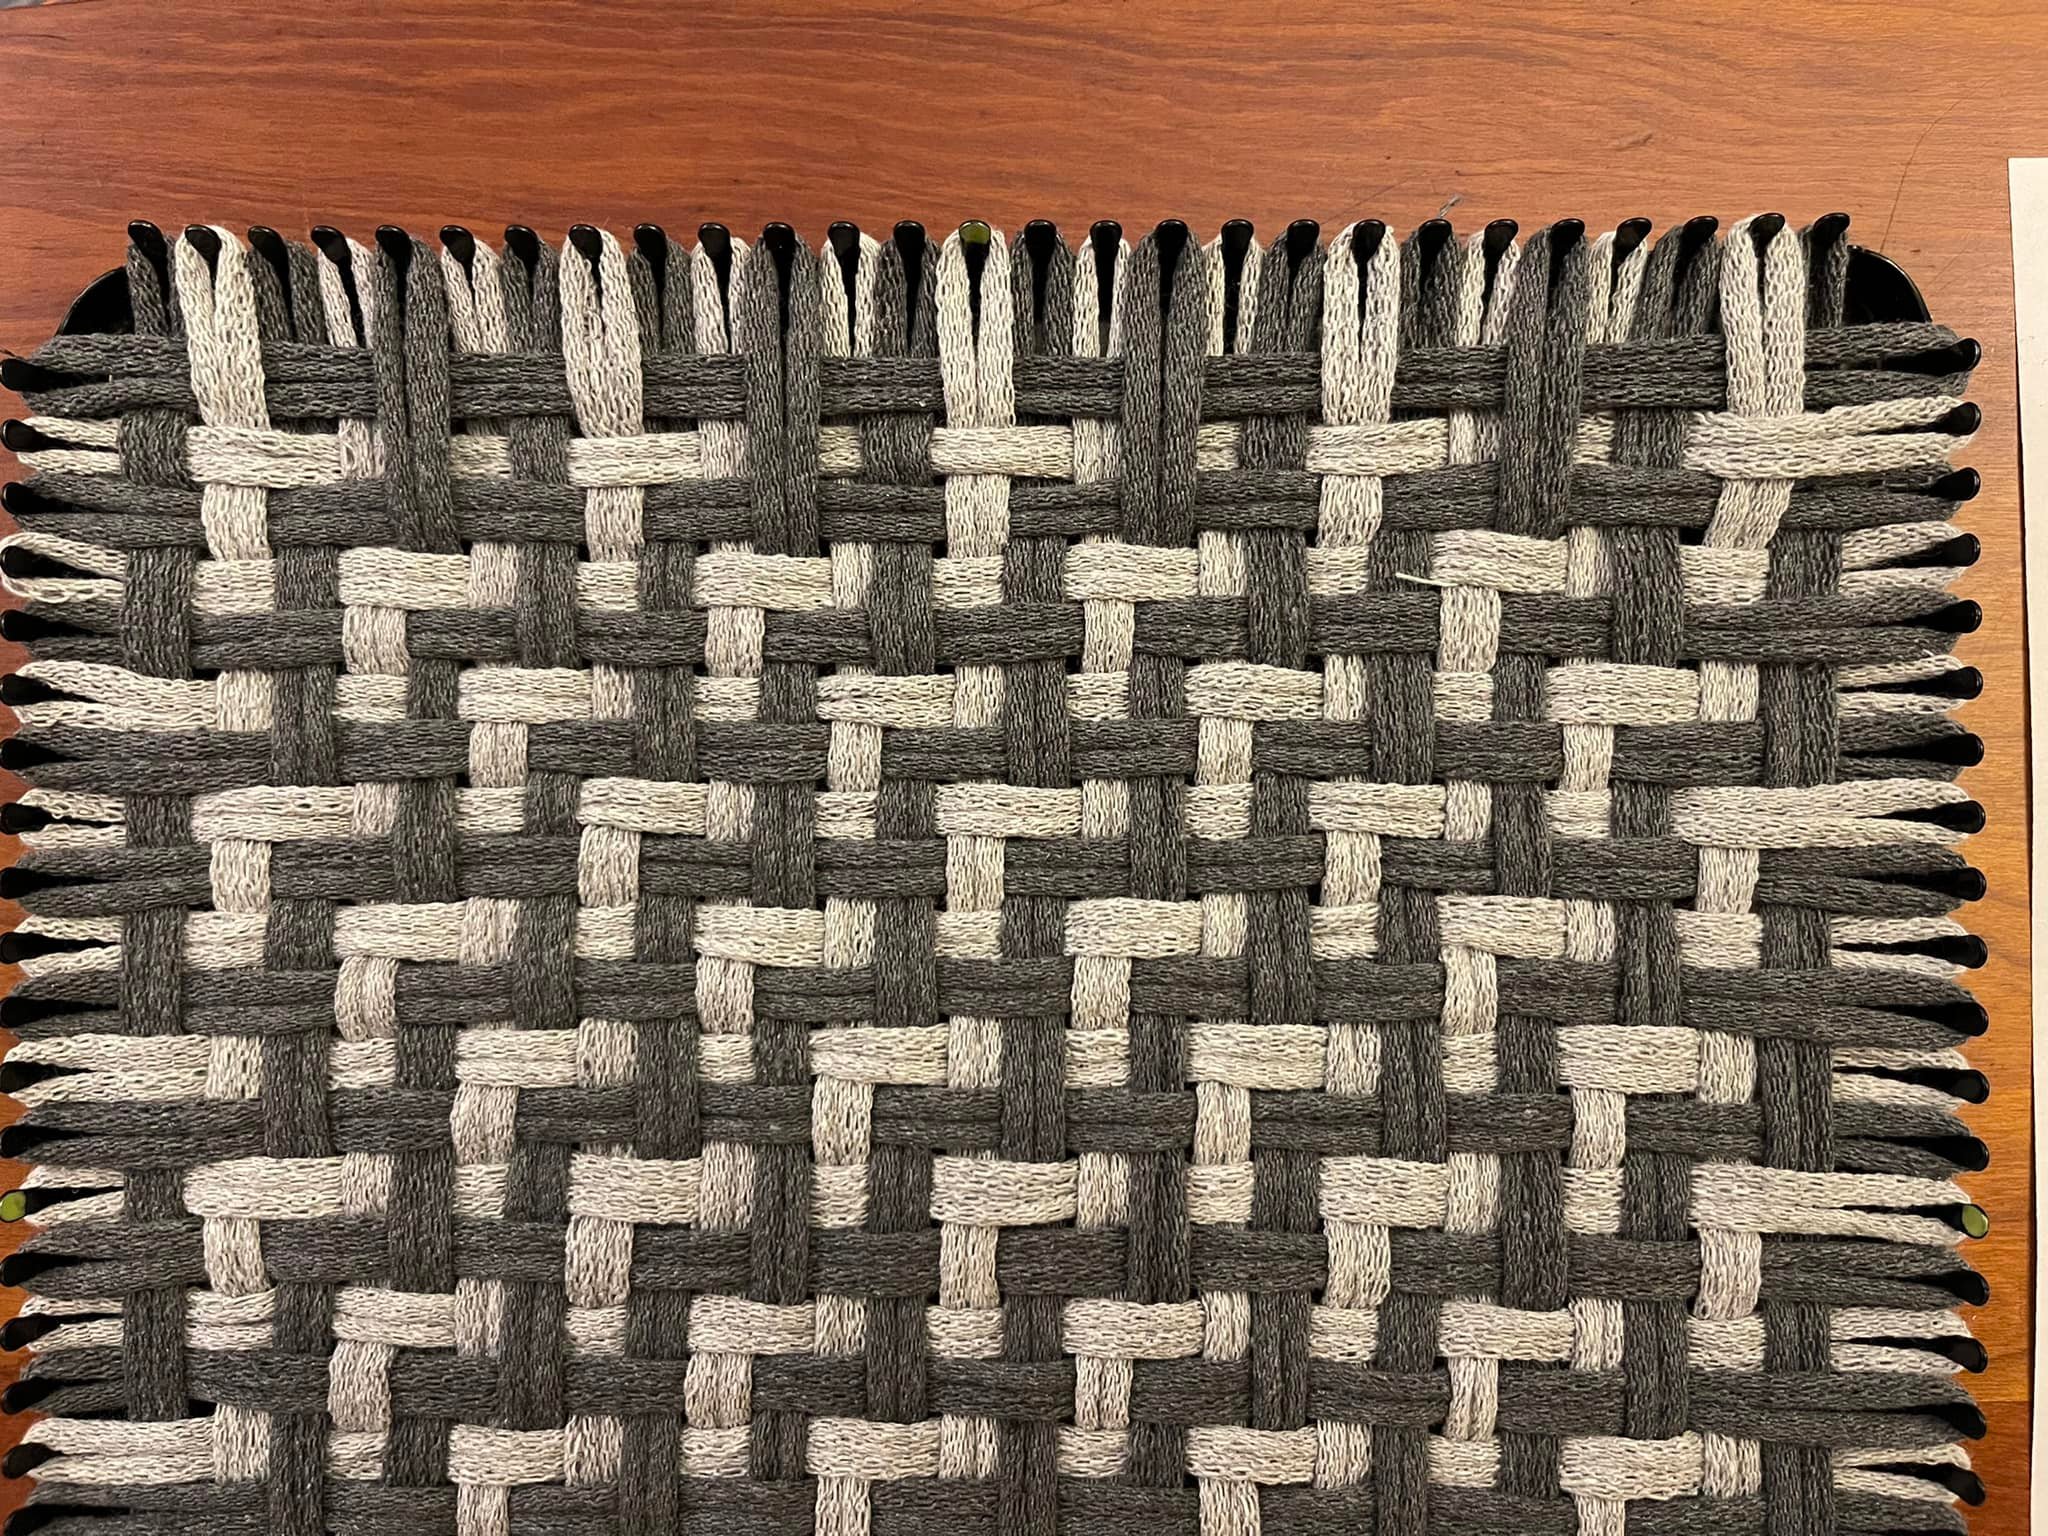
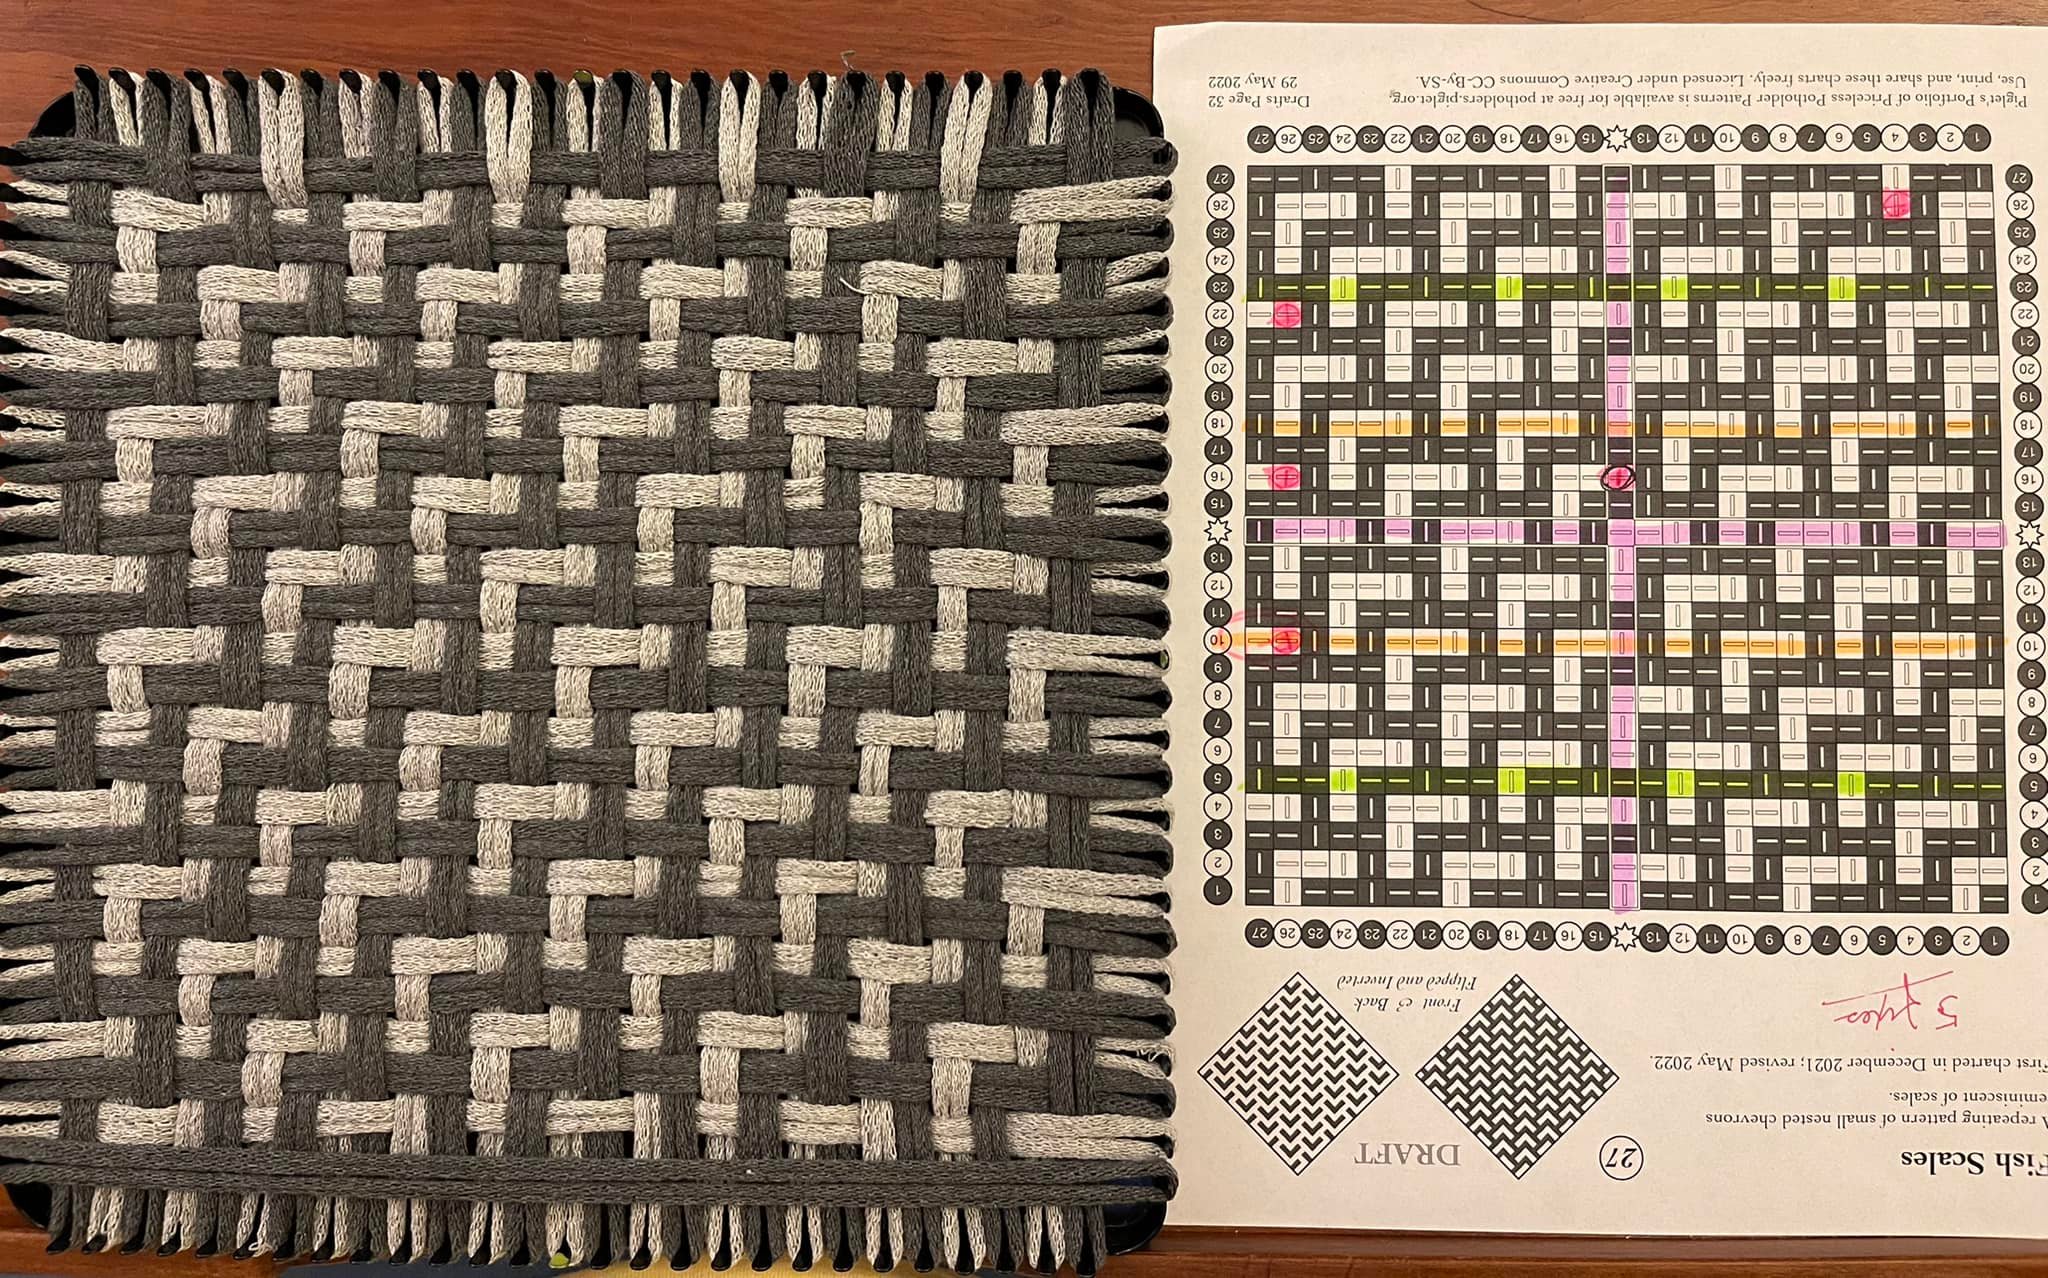
The picture below shows a 27-peg loom fully-warped with 28 loops (doubled up on the middle peg) and with the first two weft loops woven in (doubled up on the middle peg). Piglet does her weaving from the middle out, but this technique would work just as well if you were starting from either end and working across.

When binding off, treat the doubled-up loops separately — sometimes this will mean that when binding off you’ll need to pause just as you reach the peg with the doubled-up loops so you can manually un-stack one of them on to an adjacent peg to get to the one underneath it.

You’ll see some folks using other techniques, including the use of knitting needles or hairbands to hold the end of the extra loops, and I know Piglet tried things like that when she was first starting out, but the doubling-up technique described here is simpler and works great once you’ve done it a couple of times.

(I imagine that you could use the same technique to squeeze in more than one extra loop if you had a 29-peg pattern, but at some point you’ll run out of space to work.)

Starting Points for Extra Thickness

Someone recently asked for advice about making thicker potholders, and I thought I would share my recommendations here for easy reference.

Obviously the choice of materials makes a big difference. Opting for high-quality cotton loops or plush wool loops will produce fuller results than if you use thin poly loops or scraggly offcuts.

But the less-obvious factor is weaving structure, where there are a variety of techniques that yield thicker results:

  • Twills produce thicker results. Try Three-Three Houndstooth or Four-Four Twill Fletching.
  • Weaves with raised ribs have room for extra air space. Try Alternating Float Weave, Alladorf 60, or Liége Waffle.
  • Weaves with multiple layers are often twice as thick. Try Padded Basketweave, Three-Three Shift Twill, or Double-Faced Twill.

Charts for all of these are included in our collection.

Potholder Weave Dimension Reference

I put together a little chart to help visualize the range of sizes produced by different weaving patterns.

The differences are striking: the long-float twills can be as small as 60% of the area of a plain-weave potholder (20% smaller in both height and width), but they make up for that by being up to twice as thick — or even more than that in the case of ribbed and waffled weaves.

This is definitely not an authoritative scientific survey — I just grabbed a ruler and took some rough measurements from a mix of recently-made samples fresh off the loom and well-worn ones that have been hanging in our kitchen for years.

There’s a lot of variation; in places where you see little black bars sticking out of the right edge, those show a range of smaller and larger measurements I took from different examples. There are multiple factors at play, but I suspect the biggest driver is the variation in loops — sometimes you’ll get a bag of loops that are stretchier or tighter than usual, and that impacts the size of the finished product.

These measurements are all from potholders woven with Harrisville (“Friendly Loom”) cotton loops, with no skipped pegs — if you’re using wool or poly loops, I’d expect the results to be different.

Swapping A Loop

Sometimes, in the middle of weaving, you realize that you’ve used the wrong color of loop — here’s a simple way to make it a bit easier to  swap in a different one.

When I put in my first row, I accidentally used a white loop when it should have been yellow. I only noticed after putting in the rows above and below. Working middle rows is trickier when they are forced atop each other for the 19-peg pattern. So I looped my replacement yellow into the white loop that was there, and threaded it through in its place. Best to work it through one crossing at a time, I find, because the knot is lumpy. Slower, but so much easier on a complicated pattern than taking it out and starting from scratch.

Three-Layer Warping Demonstration

Silent demonstration video showing the three-layer warping technique from end to end, including warping, weaving, and binding off.

The weaving here is done by hand, from the center out, but the same general approach is equally applicable if you use a hook or start your weaving on any side.

This video is uncut and takes just over half an hour; if you’re already familiar with loop weaving, you can use YouTube’s “playback speed” setting to watch it at 2x speed to see the key points of the technique in action.

If you want to jump ahead, here are the key moments in the video:
00:15 First warp
01:13 Second warp
02:15 Third warp
03:40 Weaving
24:05 Binding off
32:51 Finger-blocking

Some Notes on Binding Off

Often people worry about binding off when there is more than one loop on the same side of your last row.

Here’s a series of shots of how to just do it, one loop at a time, and why it works.

Pick up our green column….

And then our flax column….

Now we pick up another green….

…and the next flax, from the same side as the last green. You’ll notice the flax row has a double float on the edge now.

But that’s okay! As soon as we pull the next green loop over the last flax loop, it locks it solidly in place, just like when they alternate. It’s not going anywhere.

To keep the tension until the whole potholder is bound off, I hook loops back onto the loom after binding them off. It stretches them out a bit, as you can see here…

And the stretched loops are still visible right after taking it off the loom.

So we go to the base of each stretched loop, grab it by the short side, and tuuuuuug it to even the distortion.

After tugging, the stretched loops settle back into place.

Mid-Weave Corrections

There I am, weaving along, when something on the back feels wrong…

Here’s a closeup of where I noticed the row had gone wrong…

And when I flip it over to look at the back, I find a loose column! That is absolutely not in the pattern.

Here is the point at which I went wrong, in the row before this one. The pattern on the even row is 2/2/1/1 repeating. Here, I went 2/2/1/1/1 before continuing 2/2/1/1 through the end of the row.

Pull out the offending row to the crossing that I made the wrong way…

Pick up the next under, and now we are back in pattern of 2/2/1/1…

Continue re-weaving into the pattern, picking up the next 1…

…ending with a 1 (so it looks like 2/2/1/1/1 at the end. of the 3rd row down) because that is the odd row out. It would be part of the first 2 of the 2/2/1/1 pattern if there were more columns to weave.

Check the back to confirm that the loose column is properly tied down.

And we’re done!

Oh, wait. This looks weird? See the small boxes at the top? We don’t have those on our chart. Note also the pattern direction change? Yes, I turned my loom upside down in the course of weaving the row before this one, but then worked that last row as if it were row 1.

So, to make things easier, I turn my chart upside down, and fix the “last” row, which is now at the top of my chart.

All better! No more boxes, scales all the way to the edge.

See Also:

  • Fish Scales, to see the completed fabric off the loom.
  • Purse, to see this folded and sewn into a small container.

3-layer warping, a tutorial

If you are a pin-loom weaver, then you are already familiar with the 3-layer warping technique.  Did you know you could apply it to potholder loom weaving!?  If you are producing a tabby (over-under) fabric with no twills, then you can weave a potholder much more quickly, with more even tension, and less wear-and-tear on your loops and hands.  Here’s how:

Step 1: place loops on every other peg of your horizontal.

Step 2: place loops on every other peg of your vertical.

Step 3: place loops on the empty pegs of your horizontal.

Step 4: weave loops on the empty pegs of your vertical.

Voila!  A finished potholder with half the weaving.

Would you prefer videos, to walk you through the entire process?  You’re in luck!

[2022 Update]: For another take on this, check out this thirty-minute silent video.

How to weave a coaster on a potholder loom

Using an 18-peg traditional Harrisville loom, you can easily weave a coaster-sized 9-peg fabric.  The trick is to use every *other* peg, which makes a smaller result, and evenly distributes the tension throughout.  I learned this trick on a potholder Facebook group (sadly, I have forgotten who taught me, or which group it was).