A priceless portfolio of weaving charts for loop potholders.
Cobblestone
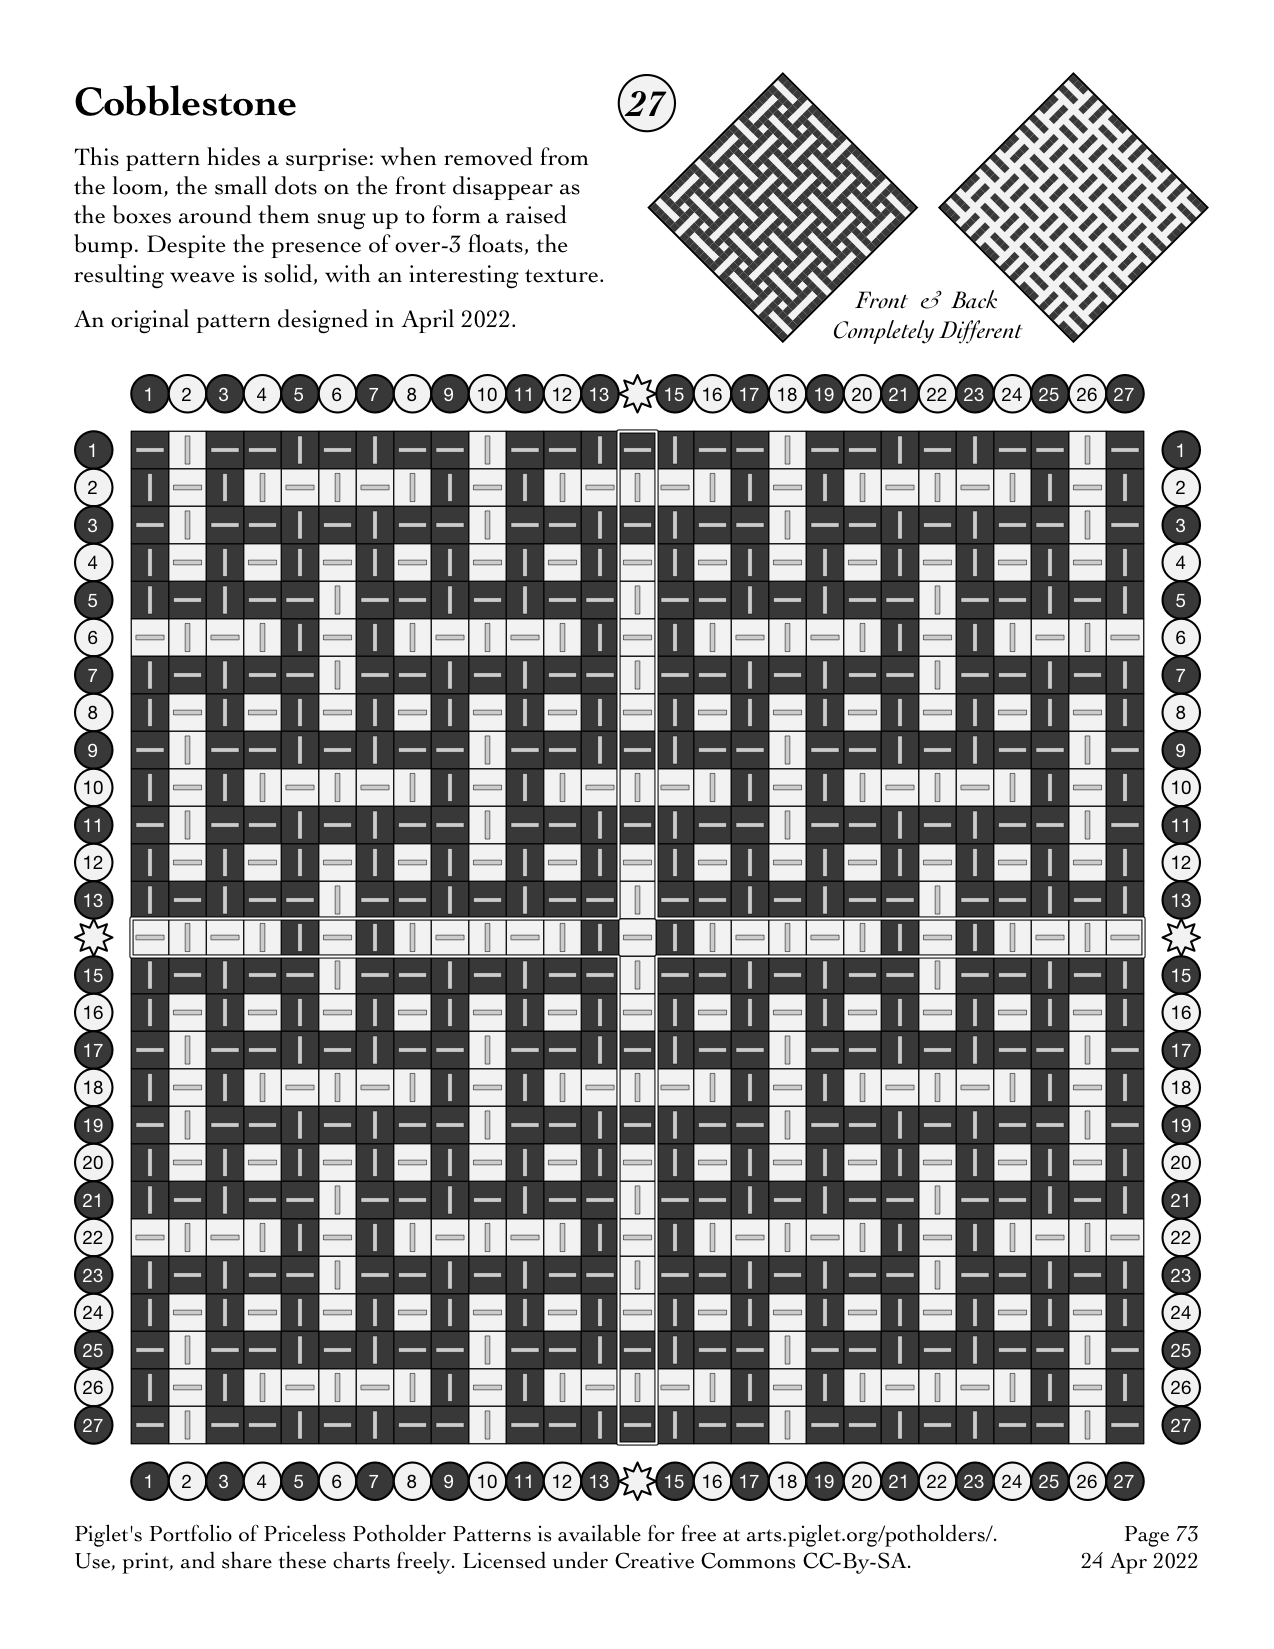
New fabric from Matthew!! This one is amazeballs. I don’t know how he keeps doing it. Renamed “Cobblestone” after binding off.
The fabric is remarkably stable, with distinct bumps where the squares close up over their center. It folds easily on the grain (horizontally and vertically), but does not like to fold diagonally or twist on the bias.
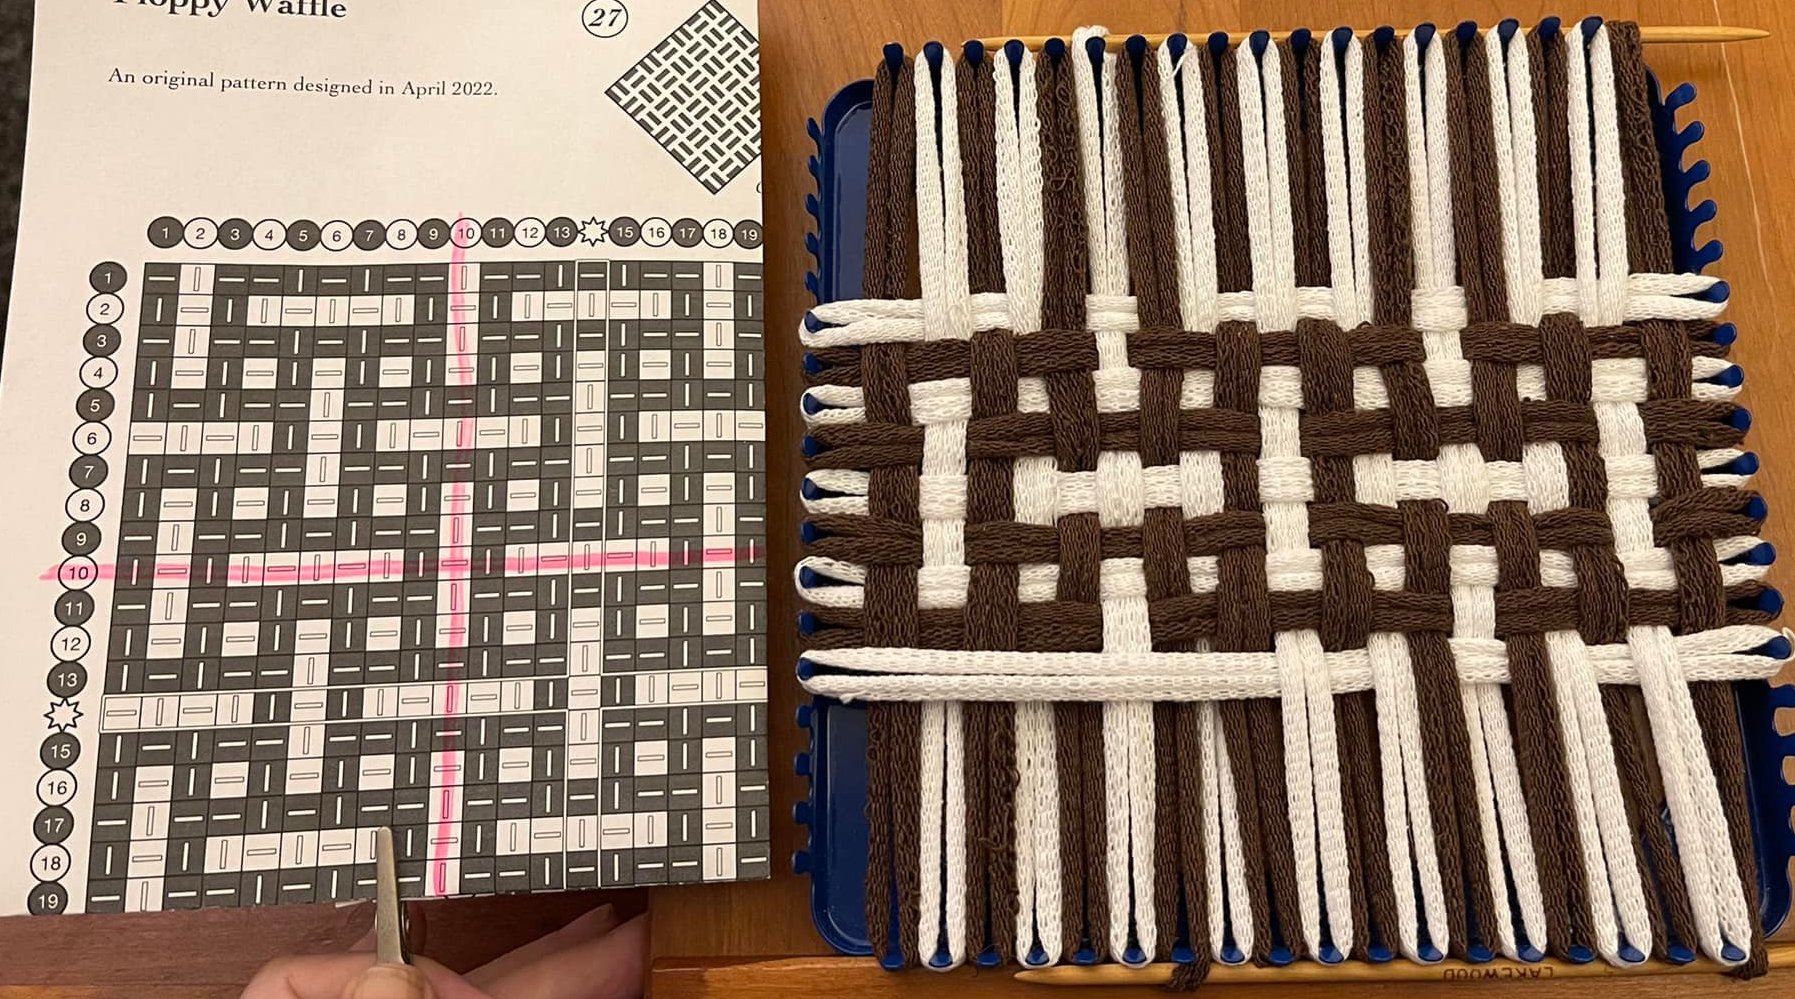
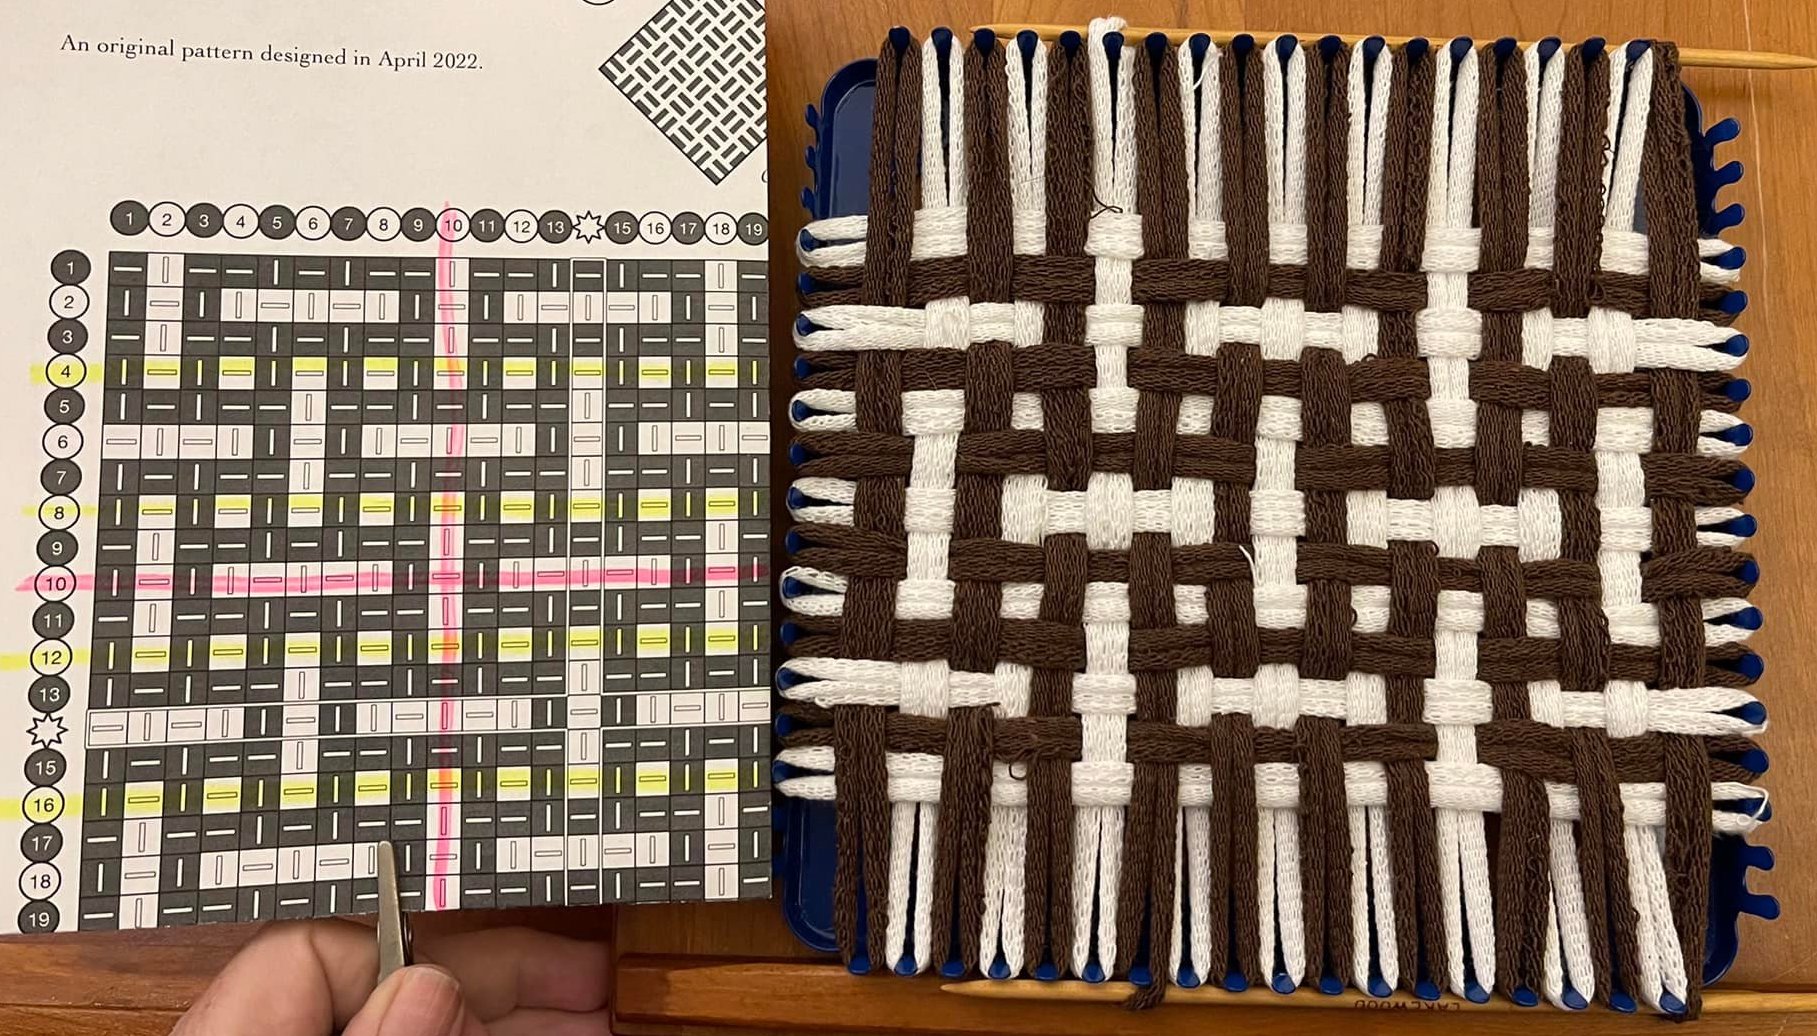
I have woven the sample on an 18-peg loom, using the first 19 rows and columns. Because the pattern is quadrilaterally symmetric, it is an astonishingly easy weave. If you start in the center and work out, you repeat each half row 4 times. Every 4th row is plain tabby (simple over/under) across the row. Photo tutorial to show all steps, exhaustively.
The finished potholder, massaged into shape and hanging from its ring.Back of the completed potholder, freshly bound-off.Angle displaying the raised square bumps on the surface.Another slanted view of the “cobbled” surface of the potholder.Step 1: alternate colors in your columns. To stuff an additional 19th column onto your loom, use whatever you have at hand. I used double-ended knitting needles. At the top and bottom of my loom, one needle end is threaded through a loop mid-way across the loom, and the other holds the new extra loop in the space after the 18th column. I selected different loops to support the needles at the left end, to reduce the strain on the extended loop (and therefore also on my needle, which I don’t want to break).I folded the 27-peg pattern at the 19th row & column, then highlighted the new center, row and column 10. I place my starting center white row on the 10th pegs. My 19th extra row will end up at the bottom of my loom.Here is the center row, woven as charted.Here are rows 9 and 11, woven.Rows 8 and 12, woven.To illustrate how working from the center out simplifies weaving on this chart, here is the right half of row 7, woven, with the left half of row 7 stretched in place, and row 13 stretched in place.Row 7, woven, along with the right half of row 13, woven, and the left side of row 13 still just stretched.Rows 7 and 13, woven.Step by step through rows 6 and 14, I start by stretching them into place.Next, I weave the right half of row 6, reading the pattern from the chart.Now I repeat the pattern on the right half of row 14, using what I just did on row 6 as my reference.I now reverse the pattern (that I just wove twice) on the left half of row 6.And finally I repeat that reversal on the left half of row 14, using row 6 as my reference.Here’s how it looks with rows 5 and 15 stretched into place.Rows 5 and 15, woven.I mentioned above that every 4th row is tabby (plainweave, over and under across the row). I highlighted those rows when I encountered them on this pass, before weaving in rows 4 and 16.Rows 3 and 17, woven, along with the right halves of rows 2 and 18. Almost done!! How will we support the 19th row!?We have one empty set of pegs (row 1). We’ll fill that row first, so we can take out the top stick.Row 1 is stretched into place on its pegs. I have parked the loop for row 19 on top of the 18th row.After I weave in the right half of the top row, I can remove the supporting needle. I park the top of the 19th column, previously supported by that needle, on the top peg of the 18th column.Next I weave the right half of the bottom row. At this bottom right corner, I have to park 2 ends: the bottom of the 19th column, and the right end of the 19th row. It doesn’t matter which order I stack them for parking, as long as i pay attention when binding off to pick up my loops in the correct order.Here is how the 19th row looks, half-woven. You can see that it doesn’t matter now that there is no extra peg. The fabric already woven accommodates the space for the row. We don’t need to add supporting needles.Fully woven, all 19 rows and columns.Bottom-left closeup.Bottom-right closeup.Top-right closeup.Top-left closeup.Binding off, I reach a peg with double-parked loops. I see they are out of order.I have control of the loops! I re-order them so I can pick them up correctly.Almost bound-off, you can see the fabric tugging itself, the small squares beginning to close up.Right off the loom, it is remarkably flat.Massaging the fabric into shape helps the squares pull together.Voila!


One thought on “Cobblestone”