You know how tabby (plainweave, over/under across the row) can be a little stiff? This weave includes 3-floats in the center, and 2-floats that progress along the vertical, the horizontal, and both diagonals, so that the potholder flexes easily in all directions, and can be crumpled into your hand. The mostly tabby construction keeps it stable. It molds extremely well, and would be excellent for items like Dutch oven lids, whose knob can be hard to grasp and also wicked hot, fresh out of the oven.
The 3-floats cause the small boxes (4 white on the front, and one blue on the back) to close up on themselves, hiding the center opposing color.
Because of its moldability, this would be an excellent base for a potholder bowl or other flexible construction.
You’ll see in the captions that I have ideas for adjusting the weave. If you work this before I put out the finished pdf (and honesty even after, I’m always up for improvement), I’d love to hear your input on your twilling choices.
I decided to work my example in white and turquoise, one of my new Harrisville colors, because it really popped when I put them together. (And maybe also because I was wearing blue-and-white stripes!? Must’ve felt it that day…)I begin with my center row. The pattern is symmetric in both directions, so I will be working the same half-row 4 times as I proceed (left & right of the rows above & below the work already in place).Row 13 is in place. What the heck!? We start with a 3-float!!? Yup, the center of row 13 (and also the corresponding row 15)You’ll notice that it doesn’t fully lock our columns in place, and they do like to roll around on us. That’s okay, we can nudge them where they belong. Hey, do you see my mistake? Don’t worry if you don’t; I won’t catch it for another 2 rows.Here’s how the loom looks after I’ve taken a moment to straighten my columns and line them up properly.Here we are with the center 3 rows completed. Oh no, you say!! There’s a white column totally unsecured, floating in space! Yup, there sure is. You’re doing it right. That’s the center 3-float that will help tighten up the middle box into a tight square of apparently solid color. Let’s check out the other side….Oh dang. Here’s the other side. I have 2 (blue) columns unsecured!! Whoops. Where did I go wrong??My colors matched the pattern, but I got the over/under on a blue/blue square wrong. The 3rd column from each end of the row should be on top of the row loop, not underneath.Time to start marking up the chart! Pink highlighter, to show myself where the 3-floats are; yellow highlighter on the 2-floats, to help me get them in the right place in the row.Here the center white column is about to be locked down by rows 12 and 16.Highlighting the 2-floats in the row makes them easier to see and also alerts me when the floats in one row line up with the floats in an adjacent row. It feels natural when weaving to run the row under the columns that are lower, and over the columns that are higher. When floats line up, you find yourself working against that tendency.Comparing the work to the chart as you go can be tricky. Bordering the work with fresh contrasting loops can make it easier to compare to the picture.Now that we’re past the center, the work proceeds more smoothly. Each row is a bit like the previous row, with the outer 2-floats moving one step away from each other, and inner 2-floats staying the same columns. (This might not make sense until you are weaving. It’s hard to explain in words.)Here I’m using the white loops to double check the I am forming the correct picture.As I continue highlighting the floats, you can see that we have a center capital I formation of 3-floats (one column, two rows), and 4 surrounding capital T sideways formations (one column, one row). The I formation causes the one-dot-center box on the back to draw up tightly into itself. The 4 front boxes, where we have a T formation, do not draw up as evenly on themselves, and so leave a bit of color poking out. I would like to try another weave, switching columns 12 and 16 in rows 10 and 18 from “-” to “|”, to see if that works as well, and update the pattern if it does.Halfway through, the work is progressing rapidly.
Most of the way through, I have marked up much of the chart, and you can clearly see the diagonal, horizontal and vertical progression of the 2-floats, highlighted in yellow.Looking at my finished weave on the loom, I ponder those 3-floats in the center area and wonder if I can switch up my twills somehow to eliminate them…The highlighted spots are my first thought, which I reject after exploring how they would affect the neighboring columns. I wish I’d thought of the alternate arrangement that I figured out (above) looking at the completed work, lol.Closeup of the finished work, still tensioned on the loom, in case anyone wants a visual reference for the stage.Binding off, whee!The “radiating boxes” side of the potholder, having rested after being taken off the loom, and having to close up on itself.The ‘intersection” side of the finished potholder.Does it crumple? YES!! It does.You can see the 8-way creasing as i loosen my grip and let it unfold in my hand.And now it recovers to hang mostly flat.
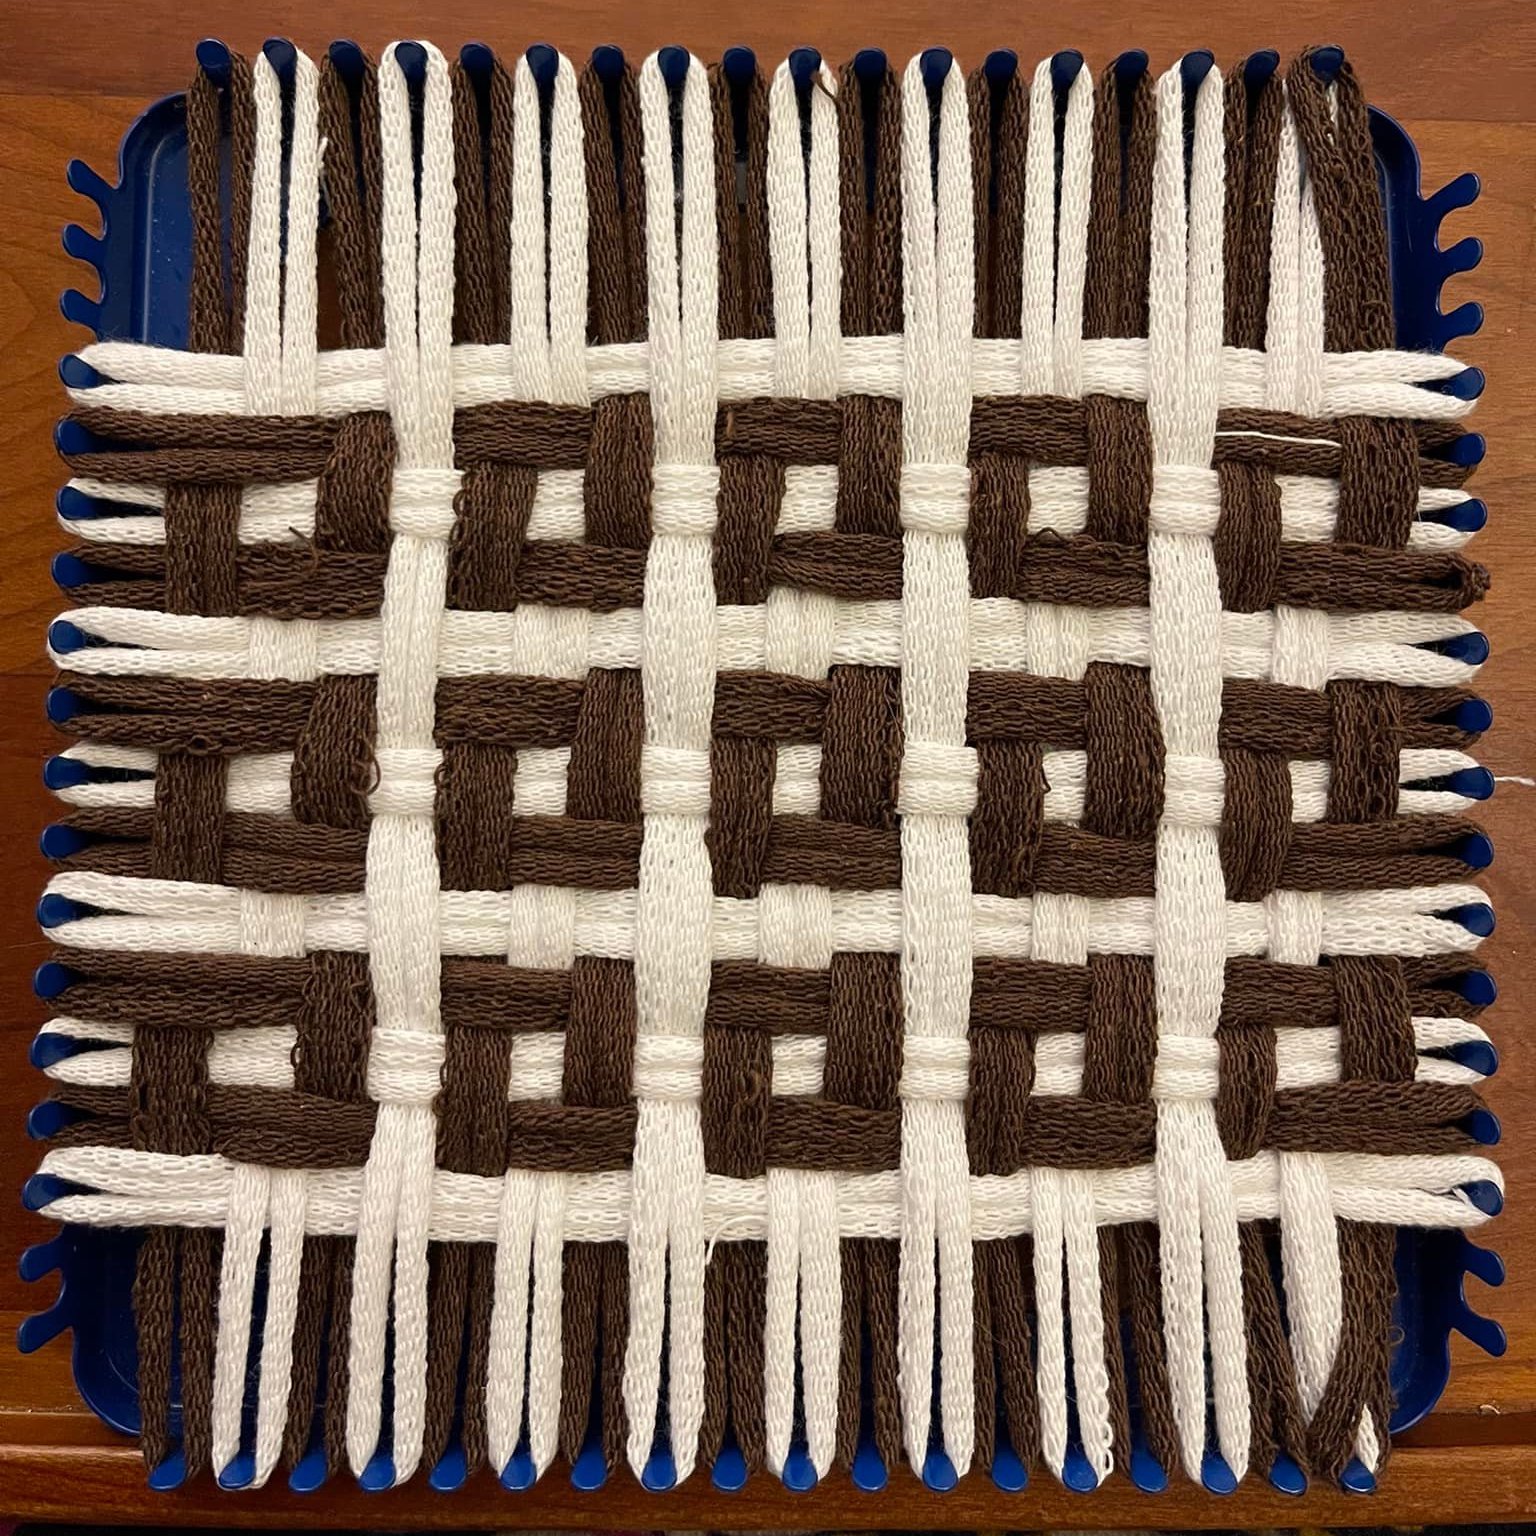
Here’s a fun variation based off of “Cobblestones” that is provisionally named “Tiny Boxes”. It’s another highly textural fabric, very ridged, almost like corduroy? Has insulating pockets spread out evenly, and should make an excellent trivet.
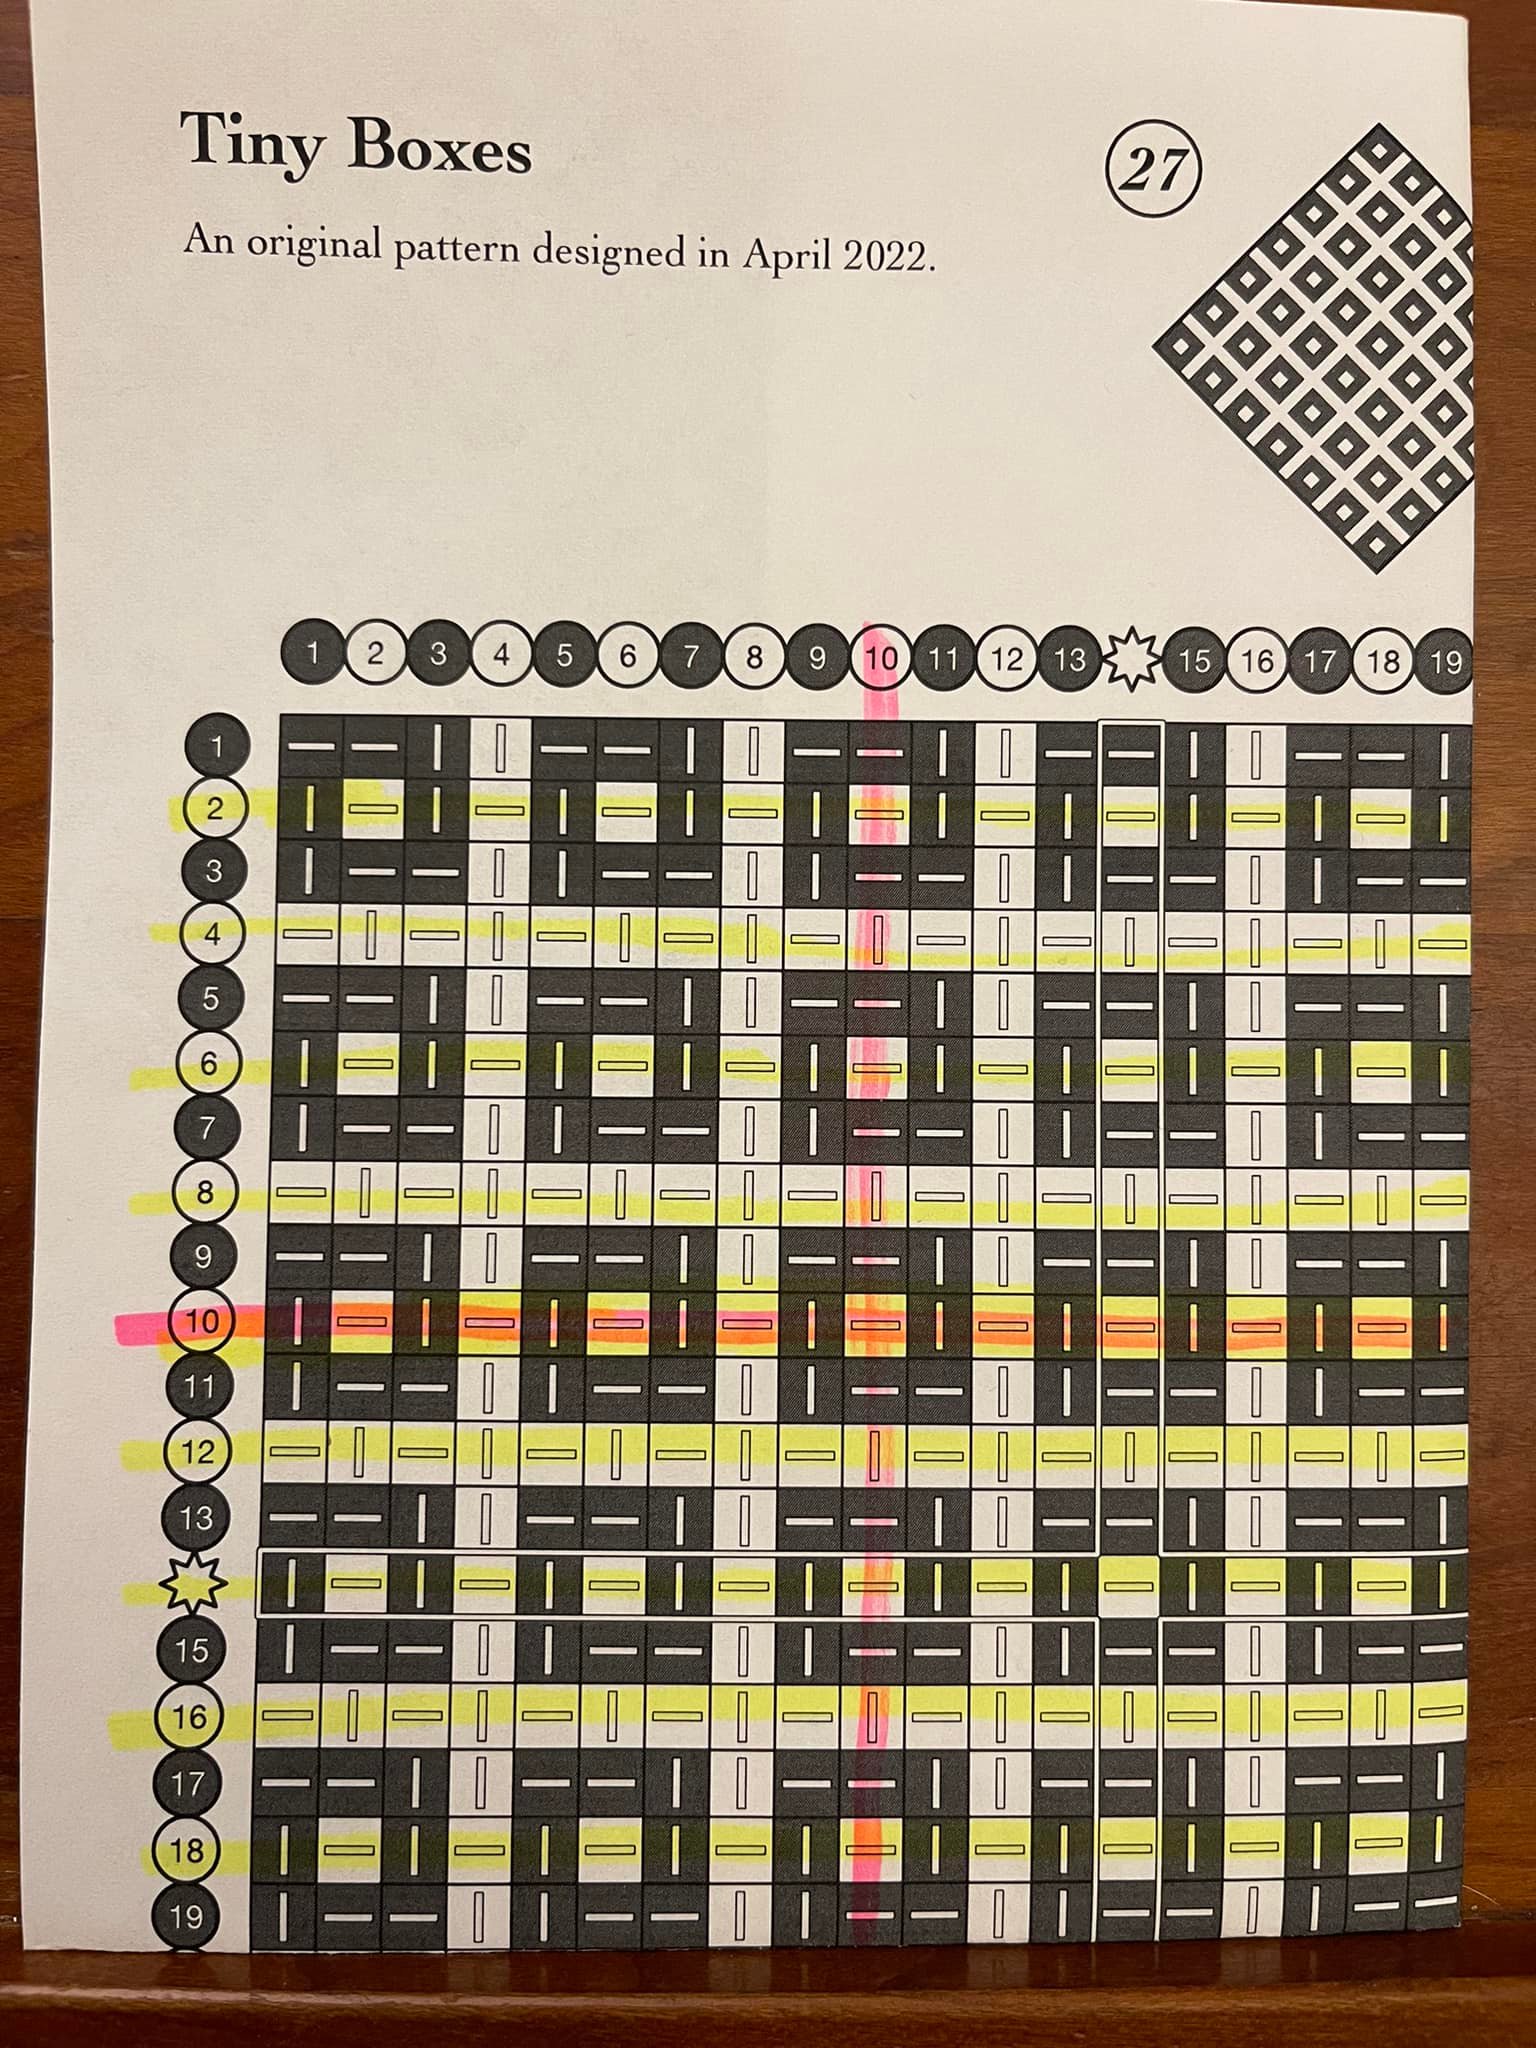
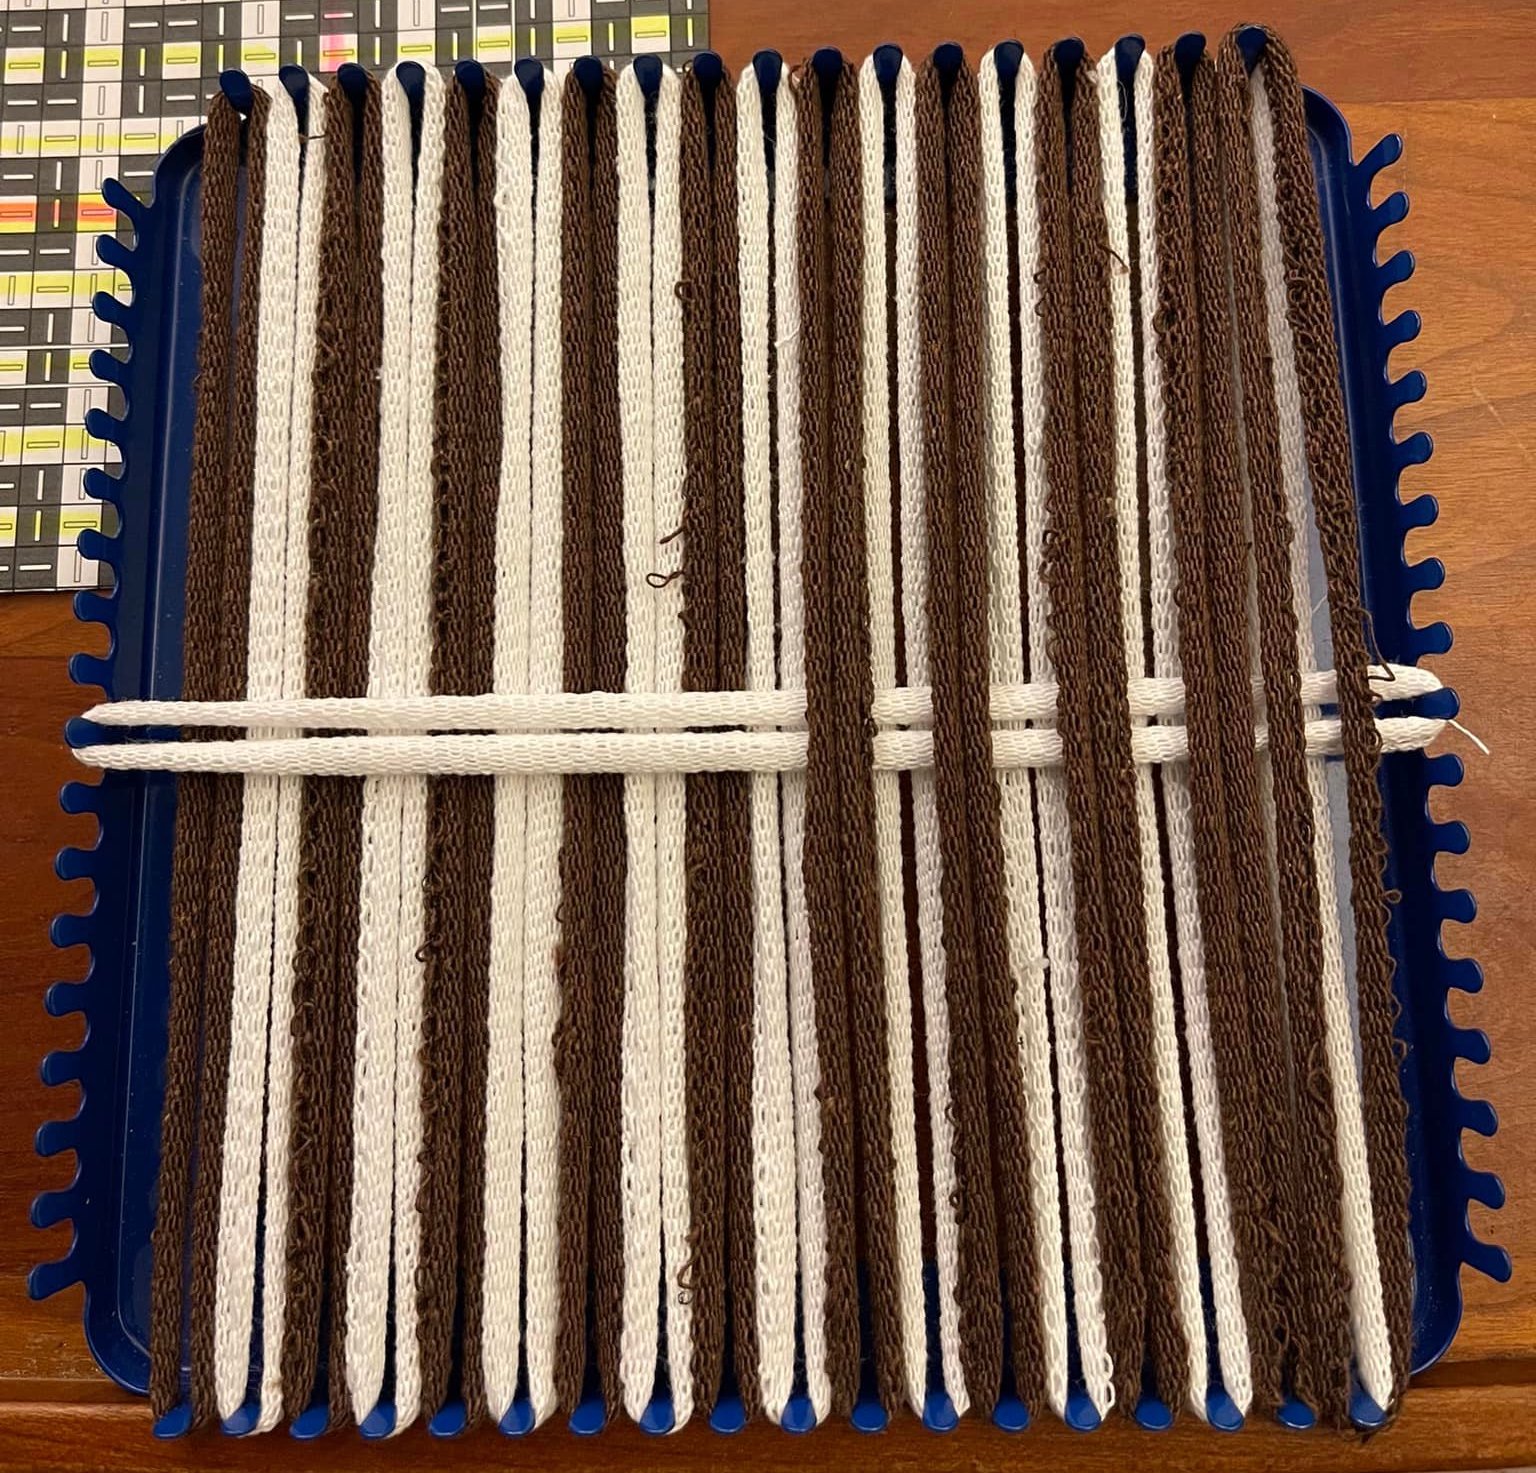
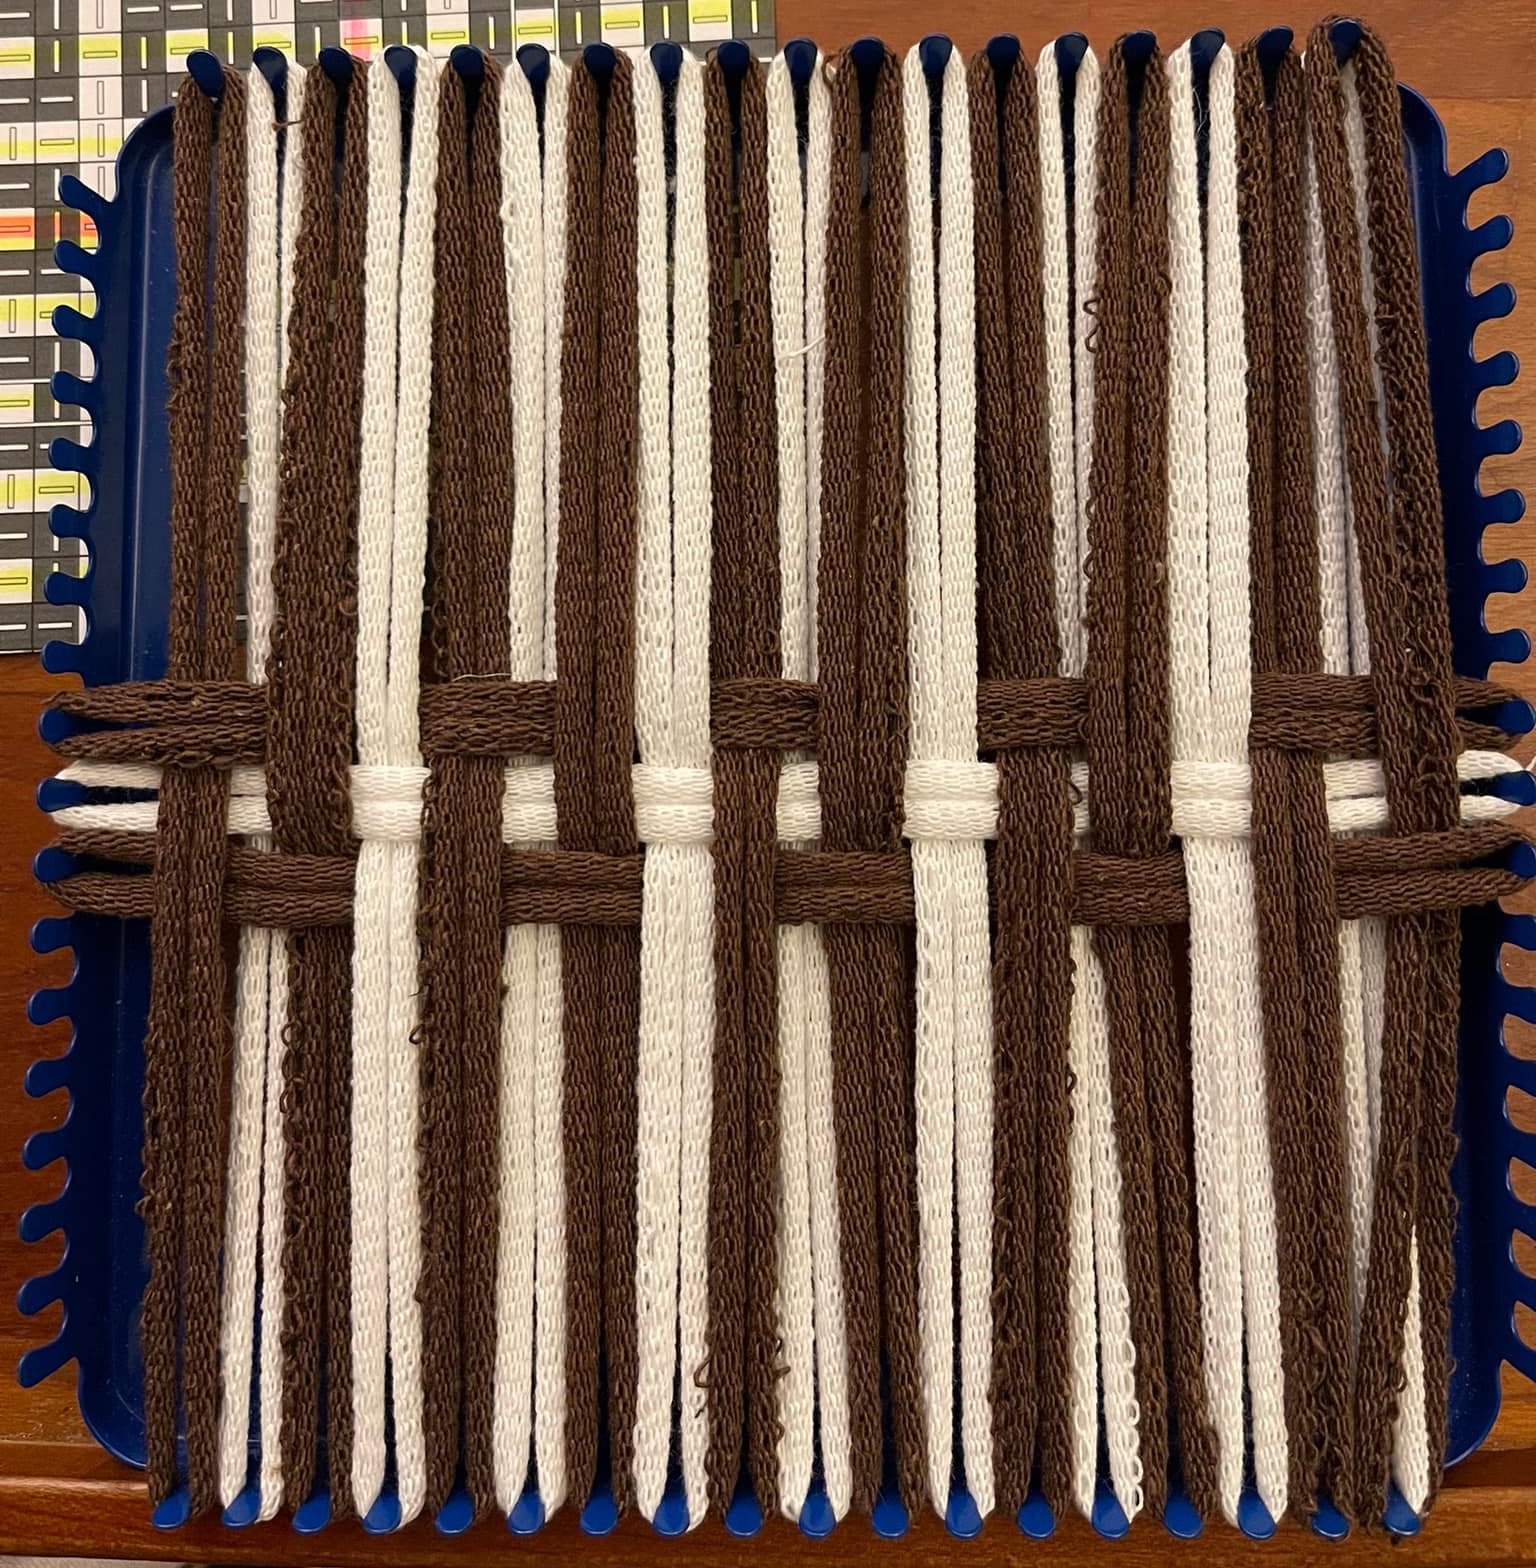
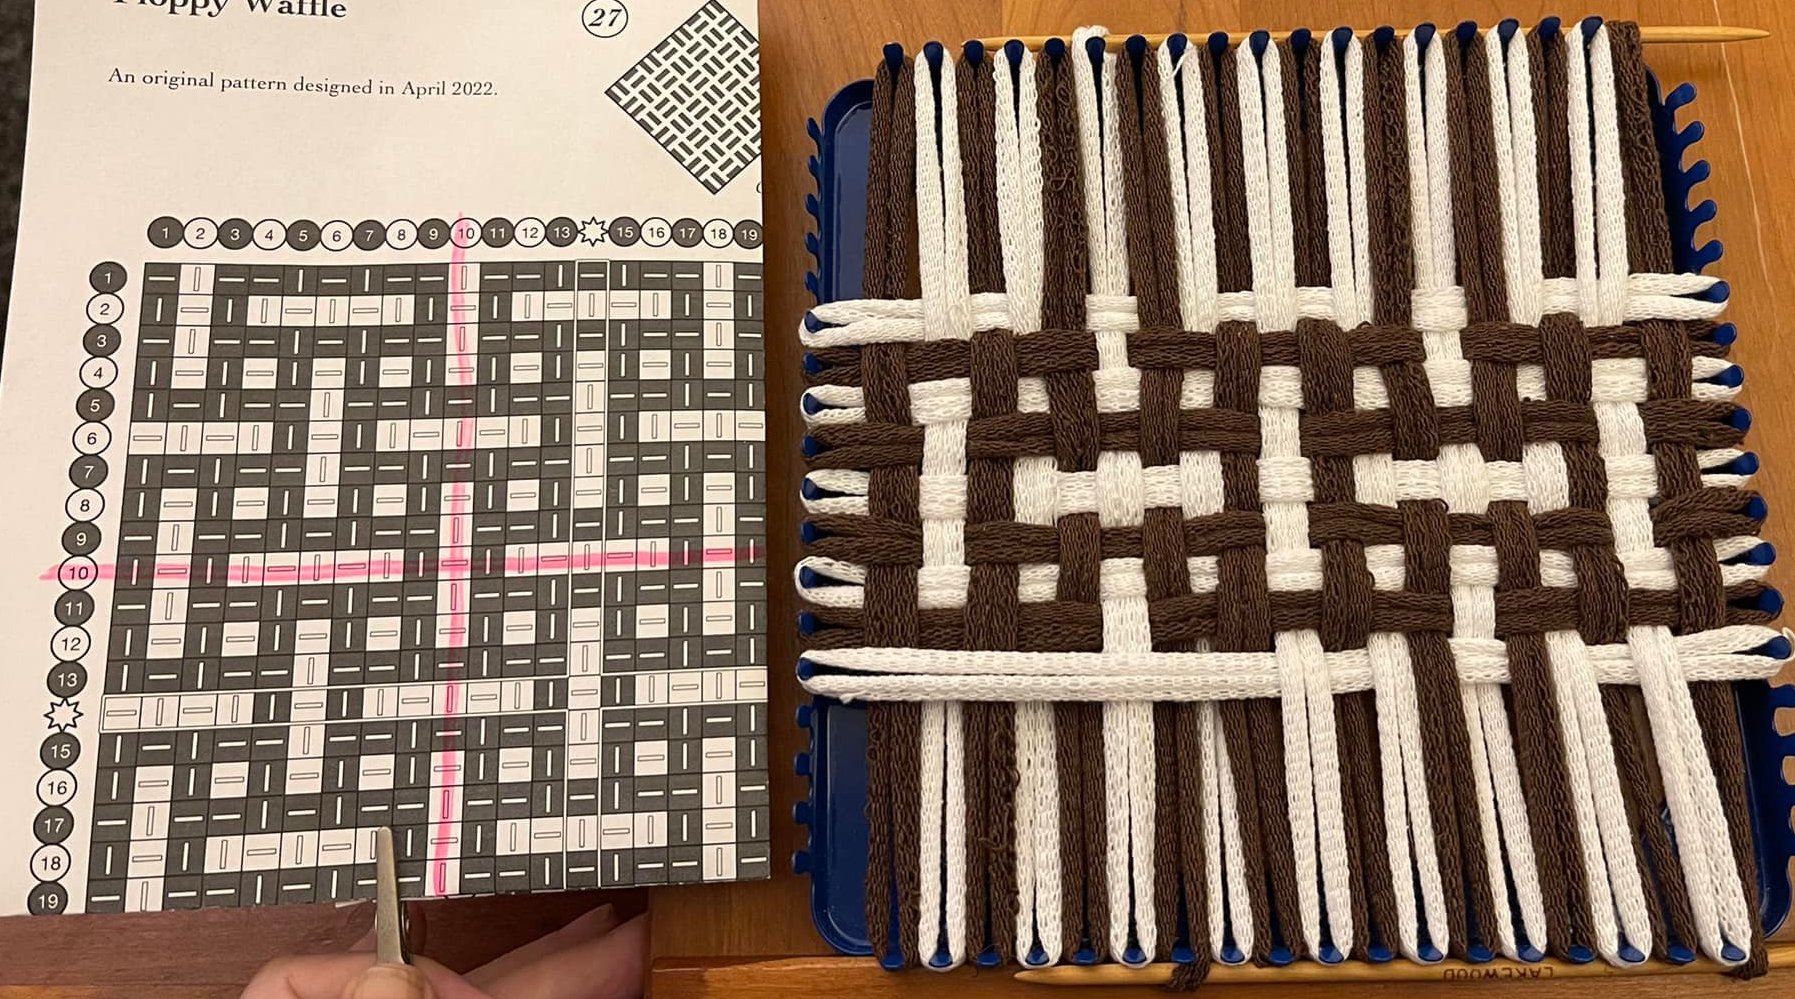
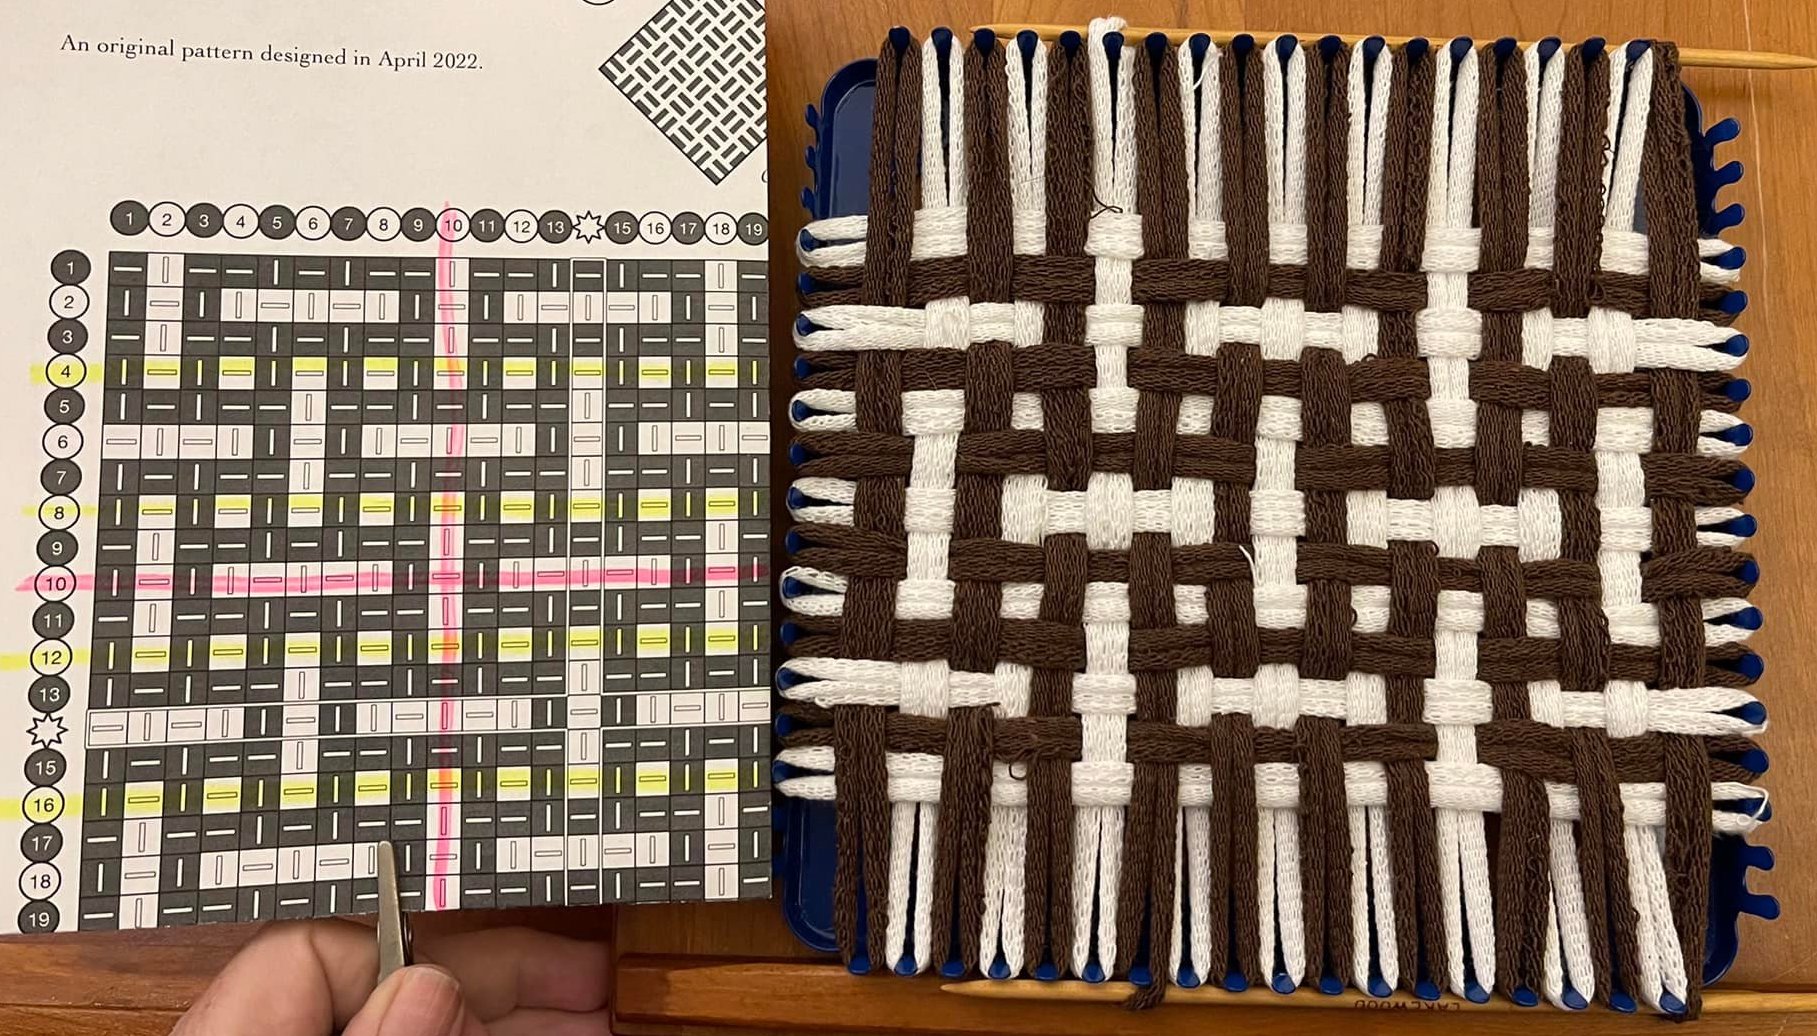
For the smaller version of this potholder, I folded the 27-peg pattern to show the first 19 rows and columns. I marked my new centers with pink highlighter. This pattern is easy to weave, once you notice its internal structure. Every even row is plainweave (tabby, over/under across the row). You begin with an over for the rows between the boxes, and with an under for the rows that form the middle of the boxes. The odd rows are a 2×2 twill (over 2 / under 2 across the row). On the rows that are box tops, you start with over 2; on the rows that are box bottoms, with under one.I start weaving in the center, to distribute the tension more evenly. Because weaving pattern is so easy, I also opted for a simpler method of handling the extra column. I have put a 19th loop on this loom by simply stacking it on top of the 18th loop. As I begin weaving, I have to be careful to include the columns in their correct order. As I work, the fabric locks them in place so they are properly separated.After just 3 rows, the 18th and 19th columns are clearly white and then brown.With the middle line of boxes complete, you can really see the pattern coming together. This is not a tightly constrained weave; the loops like to roll around while you are doing this. Take the time to put them back where they belong as you work. Fidget with it as you go to keep squaring off your boxes, and it will draw up better when you take it off the loom and massage it into shape.
Front of finished potholder, dangling from its corner ring.Closeup of potholder front, showing 5×5 brown boxes.Angled view of front, highlighting the ridges.Another view of the front, slanted to capture the texture, which is impossible. It’s so corrugated!Back of finished potholder, showing…. 4×4 brown boxes!! The front and back are not identical, after all.
Look at this amazing chart I woke up to this morning!! I had to work in lime for the contrast because this pattern is SO SHOCKING.
I don’t think this pattern will be effective in an 18-peg version that is a subset. I think it would need to be re-charted to get the full unsettling sensation. It would make a very interesting placemat, with the greater expanse of fabric.
Texturally, the fabric is supple yet stable, as you would expect from any 2×2 twill. The pattern changes do not significantly distort the result.
Finished lime & white twill-patterned potholder, front.Finished potholder, rear view showing the pattern inverted on the back.Finished potholder, front side viewed diagonally, highlighting the skew in the pattern.First few loops are challenging. It takes a while for the loops to lock in with each other, as with most 2×2 twill. Unhighlighted, the pattern is visually confusing. Where are we going!!?!?? Unclear…Decoding the chart makes the weaving easier. The center row and the row below it, highlighted in yellow, are straight up 2×2 twill (2 over, 2 under across the row, shifted one column to the right for the next row). 4 of the rows (6 & 7, 22 & 23) have 2 discontinuities in them. The other 21 rows have one discontinuity per row. They form small T shapes, with a 3 float in one row and a 1 float in the paired row, highlighted in pink. Start with the center row and the row below, which helps lock in your loops to their correct columns (they do love to roll around, especially in 2×2 twill). Working from the center row to the top and bottom rows, start your weaving in each row with the discontinuity in that row. For the 4 rows with 2 discontinuities, start your weaving in the middle and work out to the pattern changes, which will be at each end of your row.Woven potholder, tensioned on the loom.The highlighted chart, showing where the pattern changes happen.
New fabric from Matthew!! This one is amazeballs. I don’t know how he keeps doing it. Renamed “Cobblestone” after binding off.
The fabric is remarkably stable, with distinct bumps where the squares close up over their center. It folds easily on the grain (horizontally and vertically), but does not like to fold diagonally or twist on the bias.
I have woven the sample on an 18-peg loom, using the first 19 rows and columns. Because the pattern is quadrilaterally symmetric, it is an astonishingly easy weave. If you start in the center and work out, you repeat each half row 4 times. Every 4th row is plain tabby (simple over/under) across the row. Photo tutorial to show all steps, exhaustively.
The finished potholder, massaged into shape and hanging from its ring.Back of the completed potholder, freshly bound-off.Angle displaying the raised square bumps on the surface.Another slanted view of the “cobbled” surface of the potholder.Step 1: alternate colors in your columns. To stuff an additional 19th column onto your loom, use whatever you have at hand. I used double-ended knitting needles. At the top and bottom of my loom, one needle end is threaded through a loop mid-way across the loom, and the other holds the new extra loop in the space after the 18th column. I selected different loops to support the needles at the left end, to reduce the strain on the extended loop (and therefore also on my needle, which I don’t want to break).I folded the 27-peg pattern at the 19th row & column, then highlighted the new center, row and column 10. I place my starting center white row on the 10th pegs. My 19th extra row will end up at the bottom of my loom.Here is the center row, woven as charted.Here are rows 9 and 11, woven.Rows 8 and 12, woven.To illustrate how working from the center out simplifies weaving on this chart, here is the right half of row 7, woven, with the left half of row 7 stretched in place, and row 13 stretched in place.Row 7, woven, along with the right half of row 13, woven, and the left side of row 13 still just stretched.Rows 7 and 13, woven.Step by step through rows 6 and 14, I start by stretching them into place.Next, I weave the right half of row 6, reading the pattern from the chart.Now I repeat the pattern on the right half of row 14, using what I just did on row 6 as my reference.I now reverse the pattern (that I just wove twice) on the left half of row 6.And finally I repeat that reversal on the left half of row 14, using row 6 as my reference.Here’s how it looks with rows 5 and 15 stretched into place.Rows 5 and 15, woven.I mentioned above that every 4th row is tabby (plainweave, over and under across the row). I highlighted those rows when I encountered them on this pass, before weaving in rows 4 and 16.Rows 3 and 17, woven, along with the right halves of rows 2 and 18. Almost done!! How will we support the 19th row!?We have one empty set of pegs (row 1). We’ll fill that row first, so we can take out the top stick.Row 1 is stretched into place on its pegs. I have parked the loop for row 19 on top of the 18th row.After I weave in the right half of the top row, I can remove the supporting needle. I park the top of the 19th column, previously supported by that needle, on the top peg of the 18th column.Next I weave the right half of the bottom row. At this bottom right corner, I have to park 2 ends: the bottom of the 19th column, and the right end of the 19th row. It doesn’t matter which order I stack them for parking, as long as i pay attention when binding off to pick up my loops in the correct order.Here is how the 19th row looks, half-woven. You can see that it doesn’t matter now that there is no extra peg. The fabric already woven accommodates the space for the row. We don’t need to add supporting needles.Fully woven, all 19 rows and columns.Bottom-left closeup.Bottom-right closeup.Top-right closeup.Top-left closeup.Binding off, I reach a peg with double-parked loops. I see they are out of order.I have control of the loops! I re-order them so I can pick them up correctly.Almost bound-off, you can see the fabric tugging itself, the small squares beginning to close up.Right off the loom, it is remarkably flat.Massaging the fabric into shape helps the squares pull together.Voila!
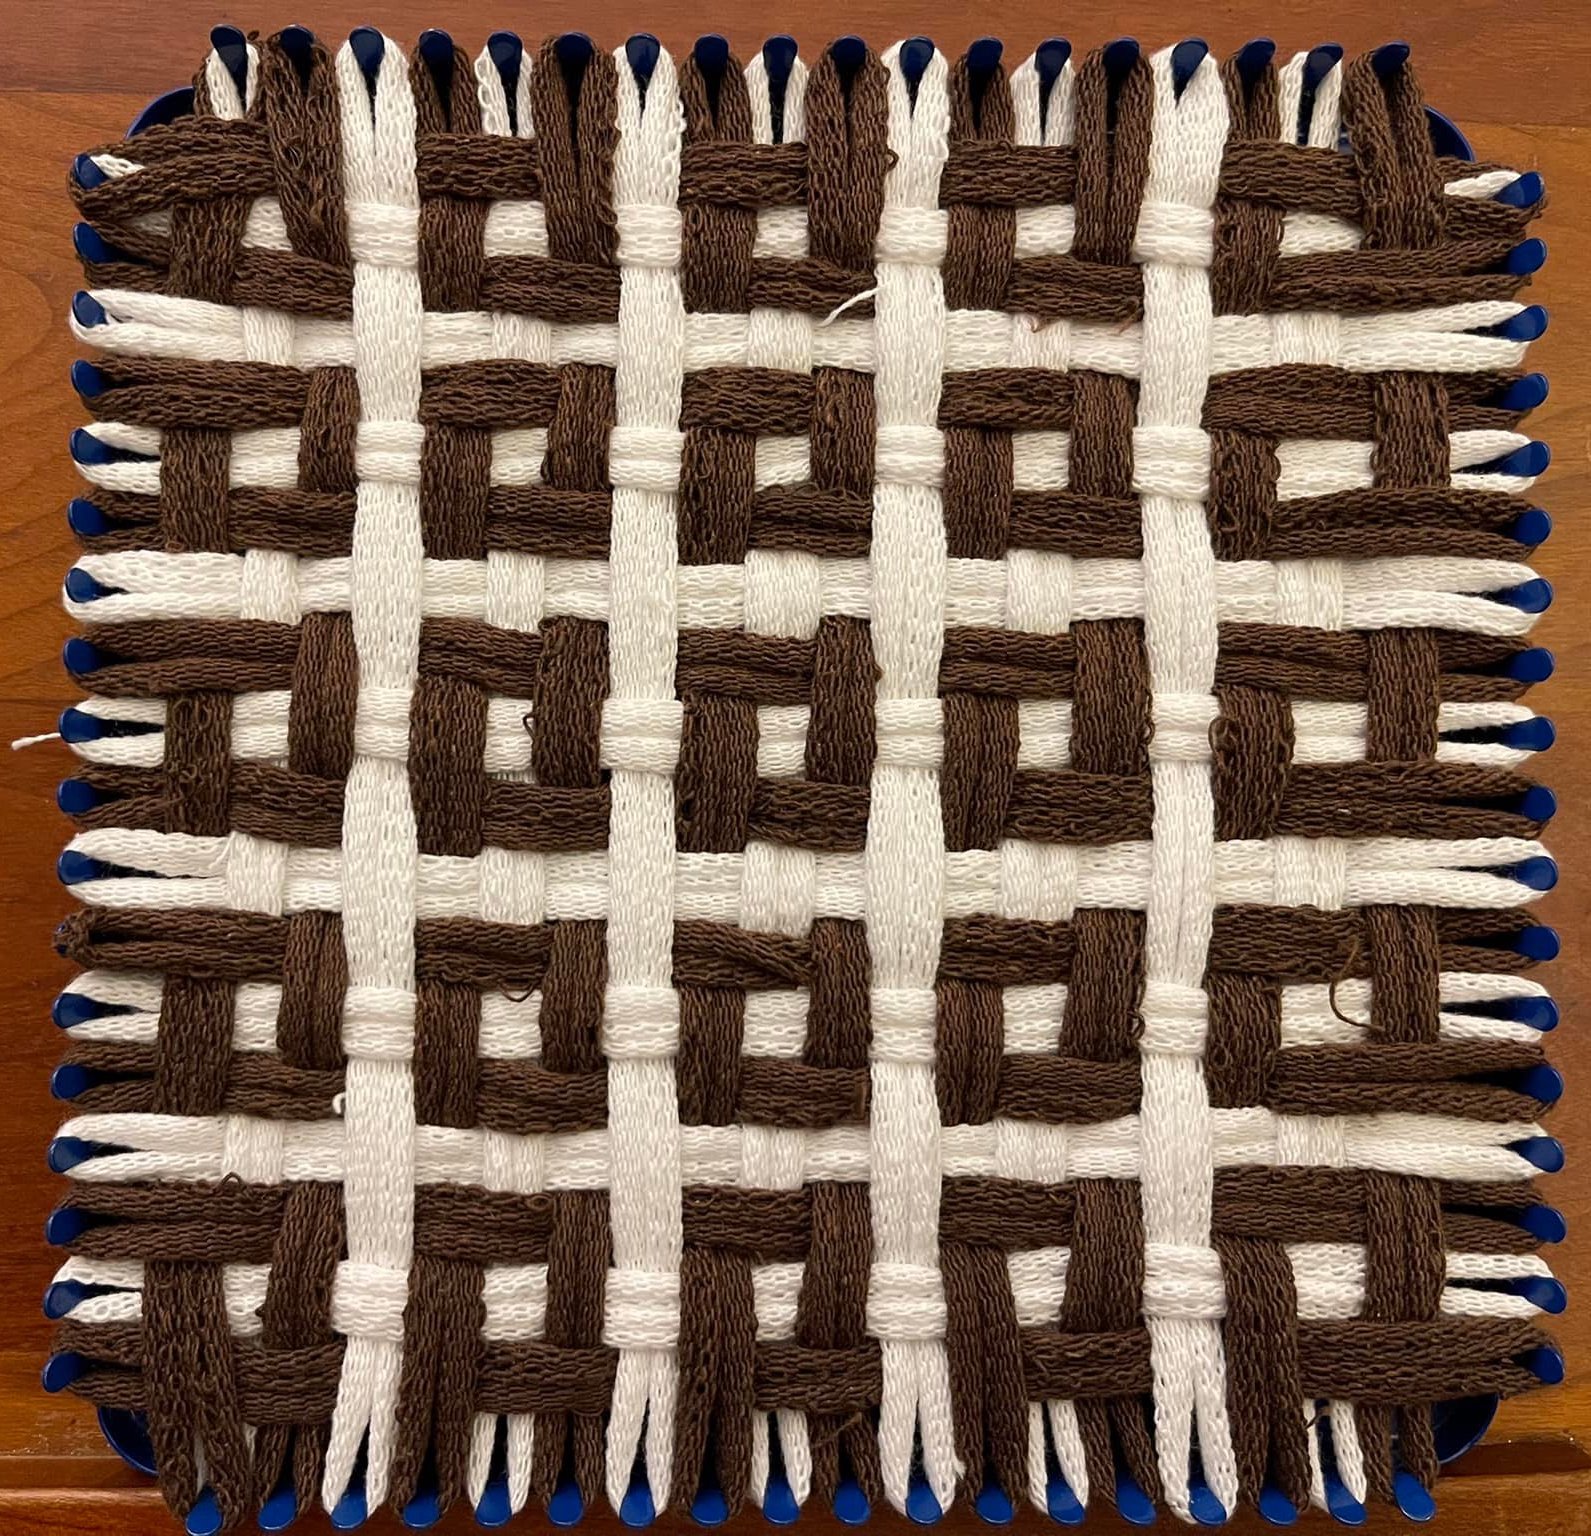
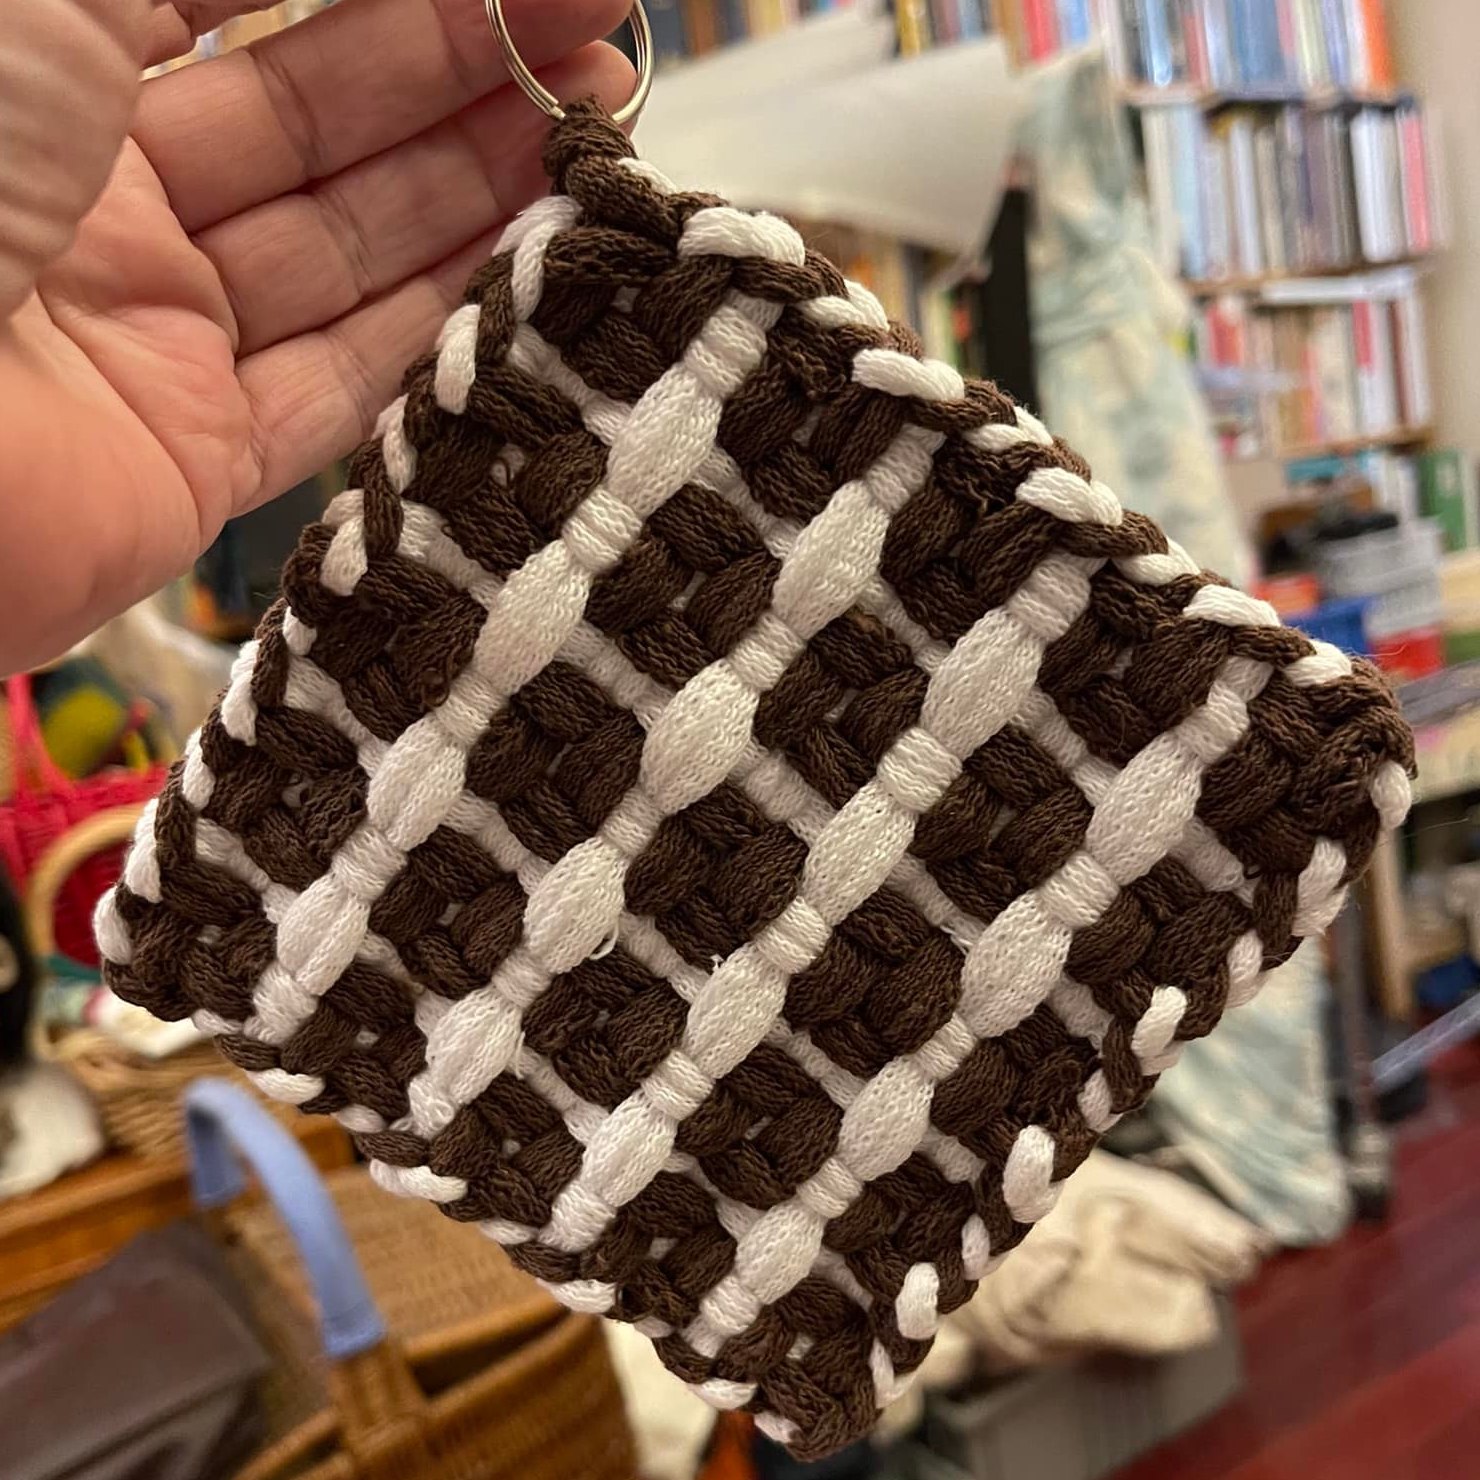
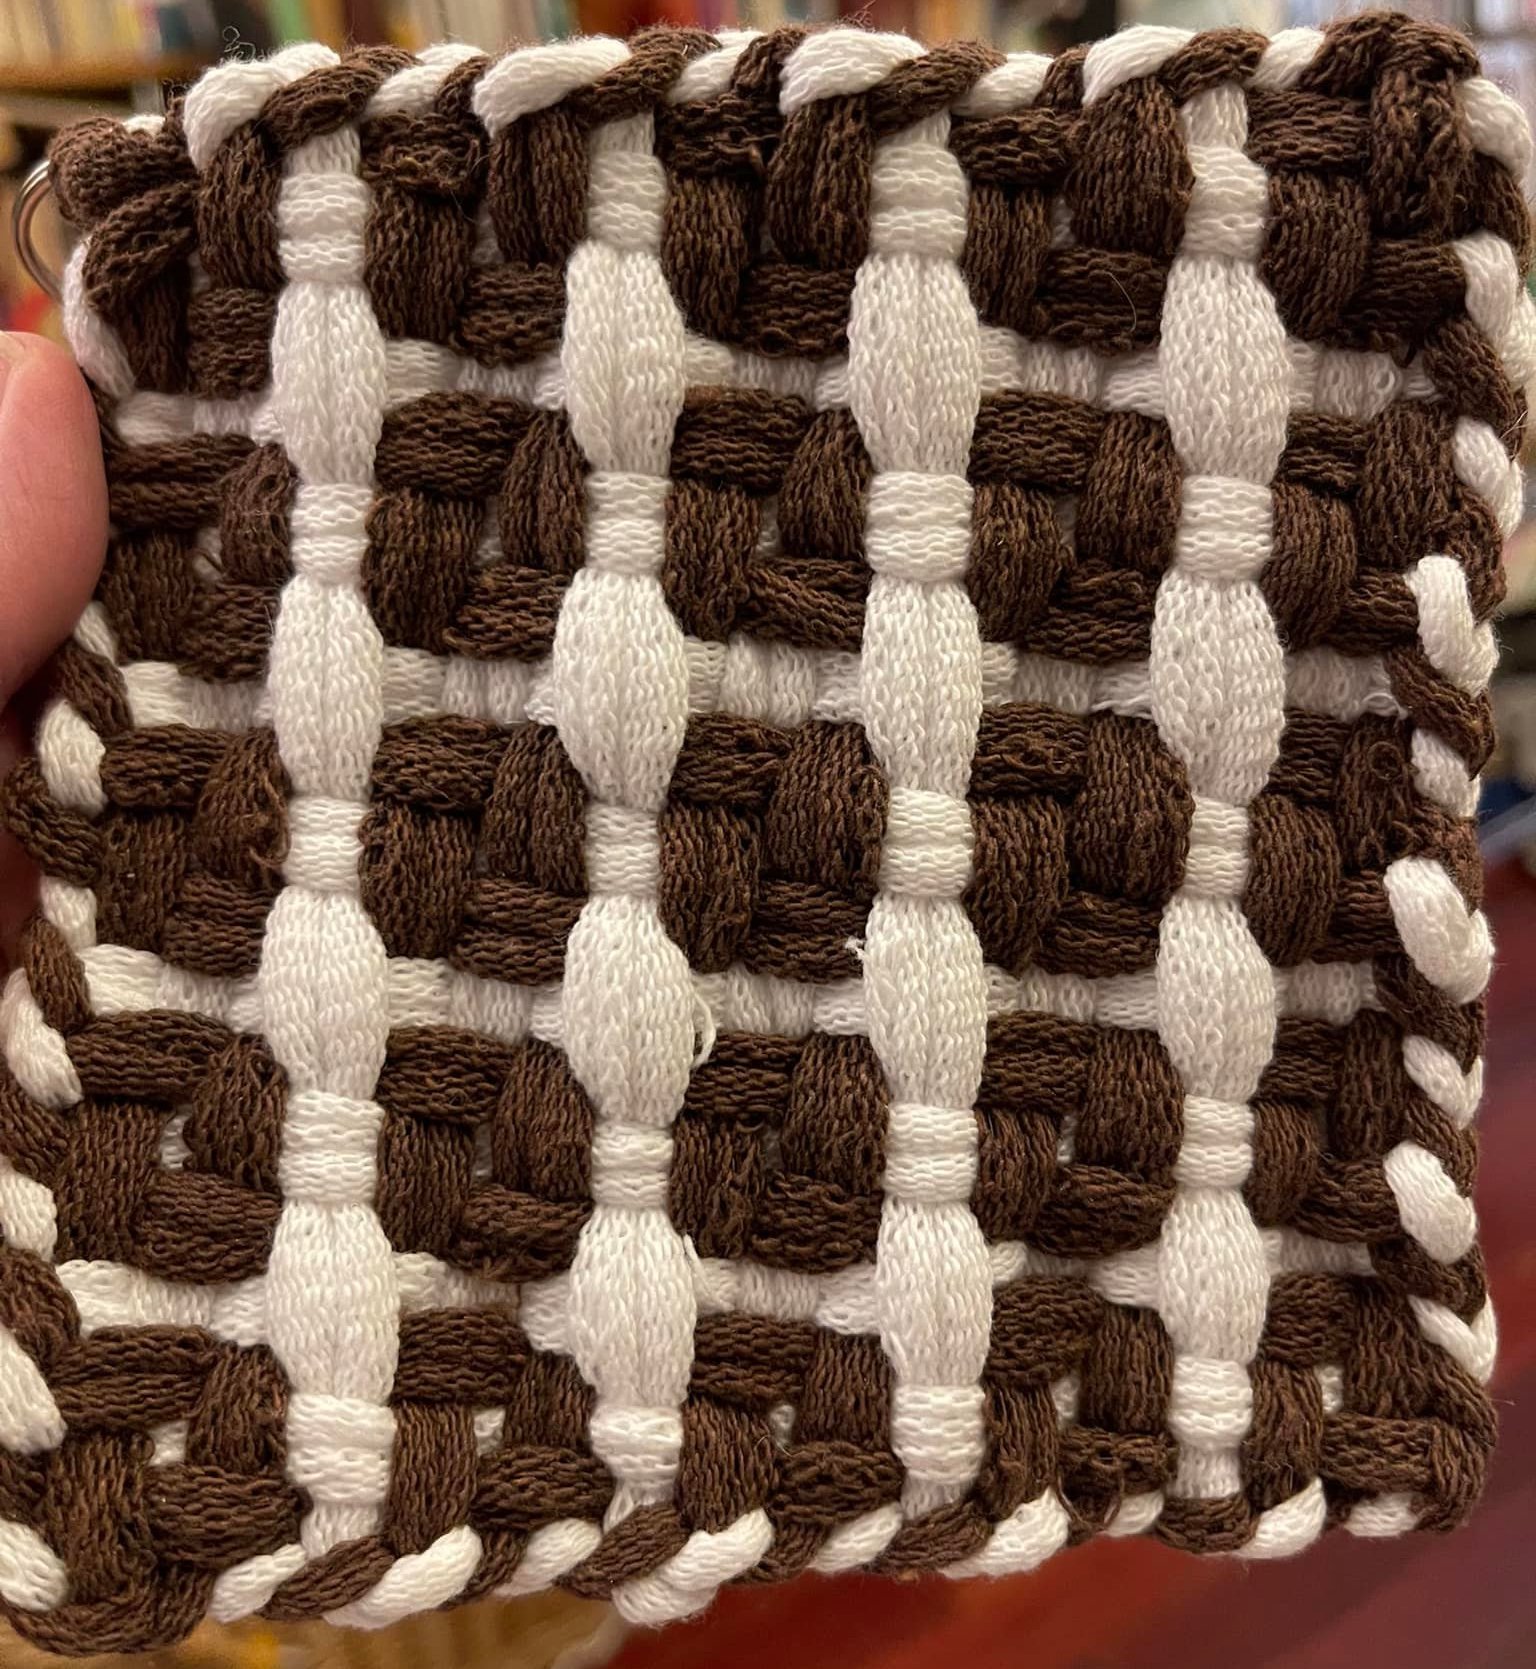
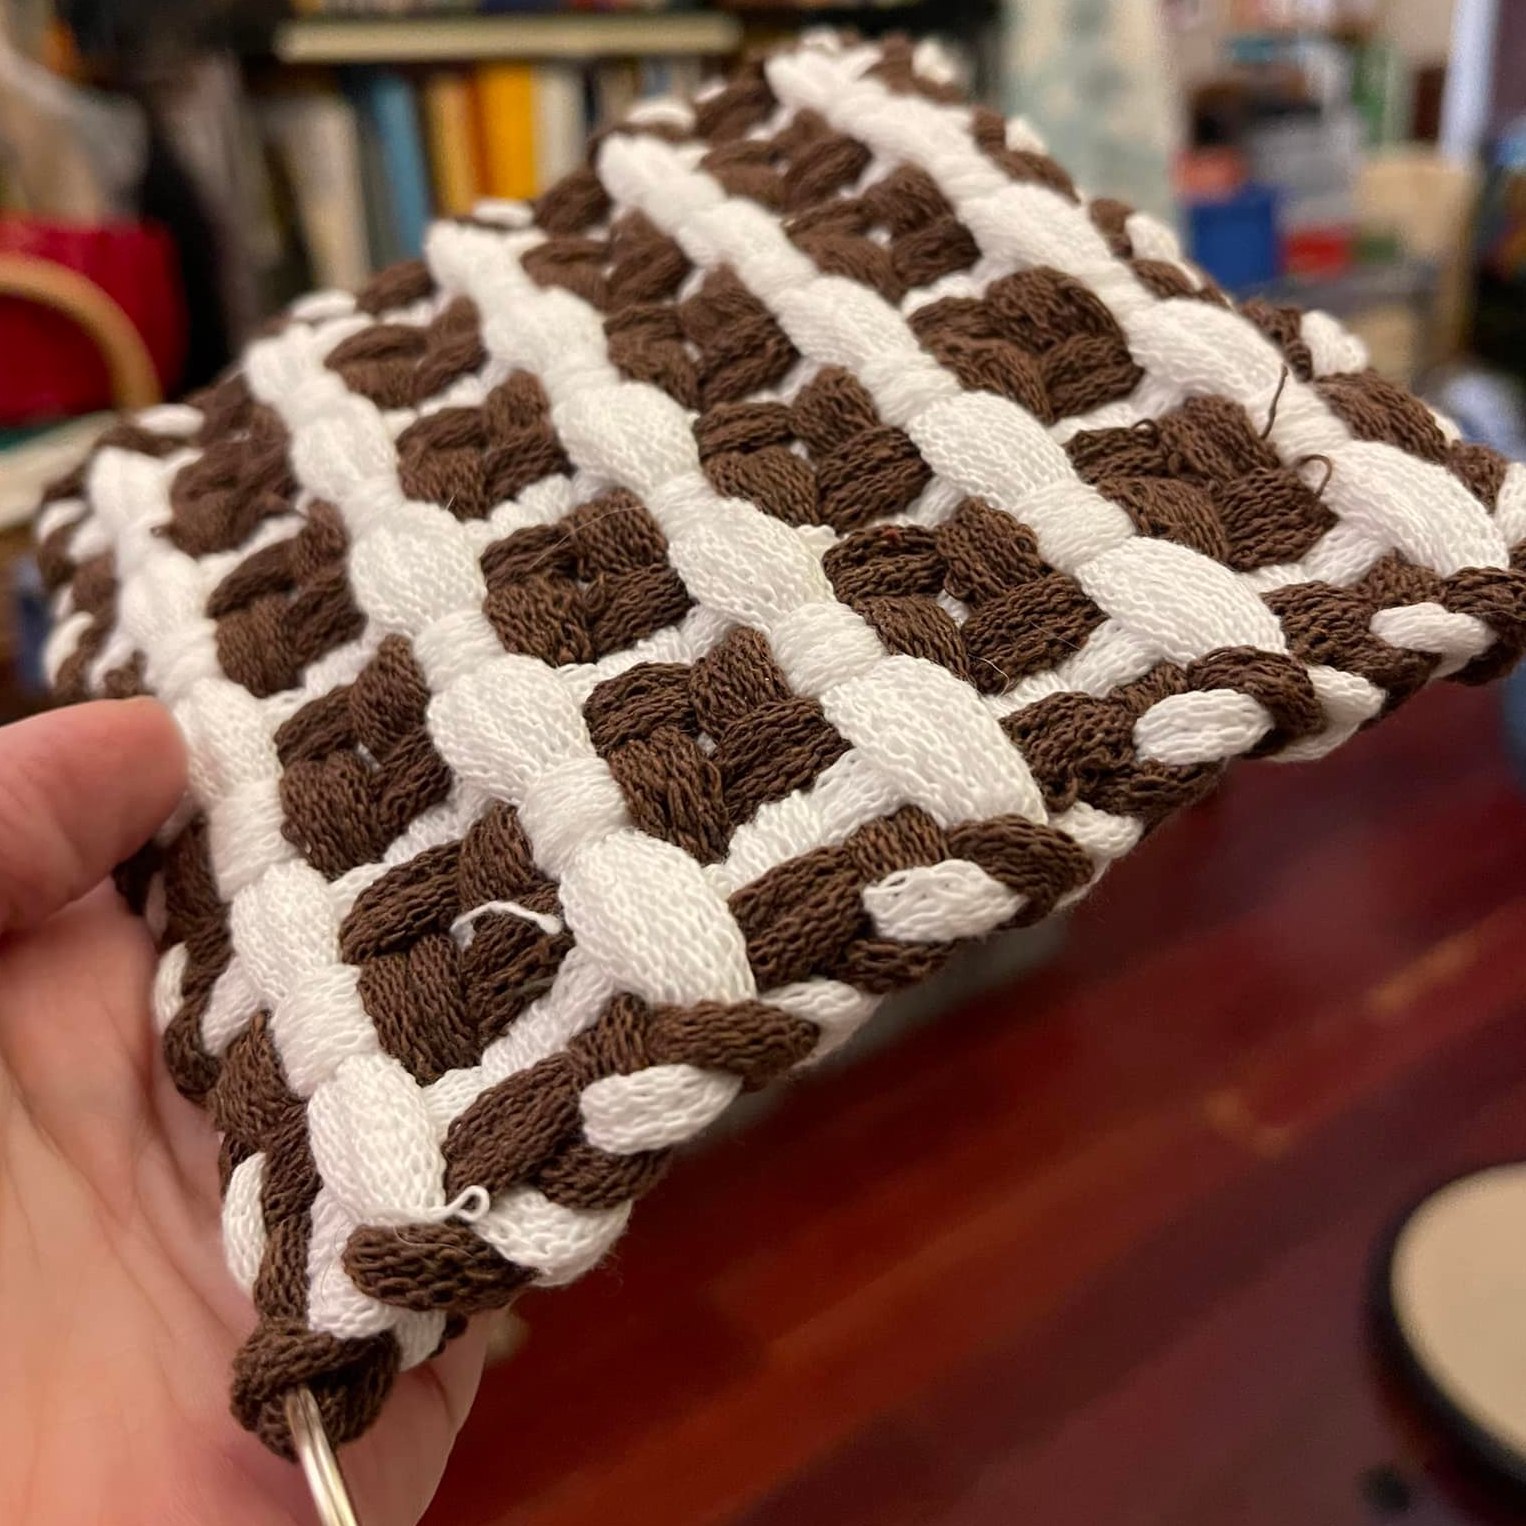
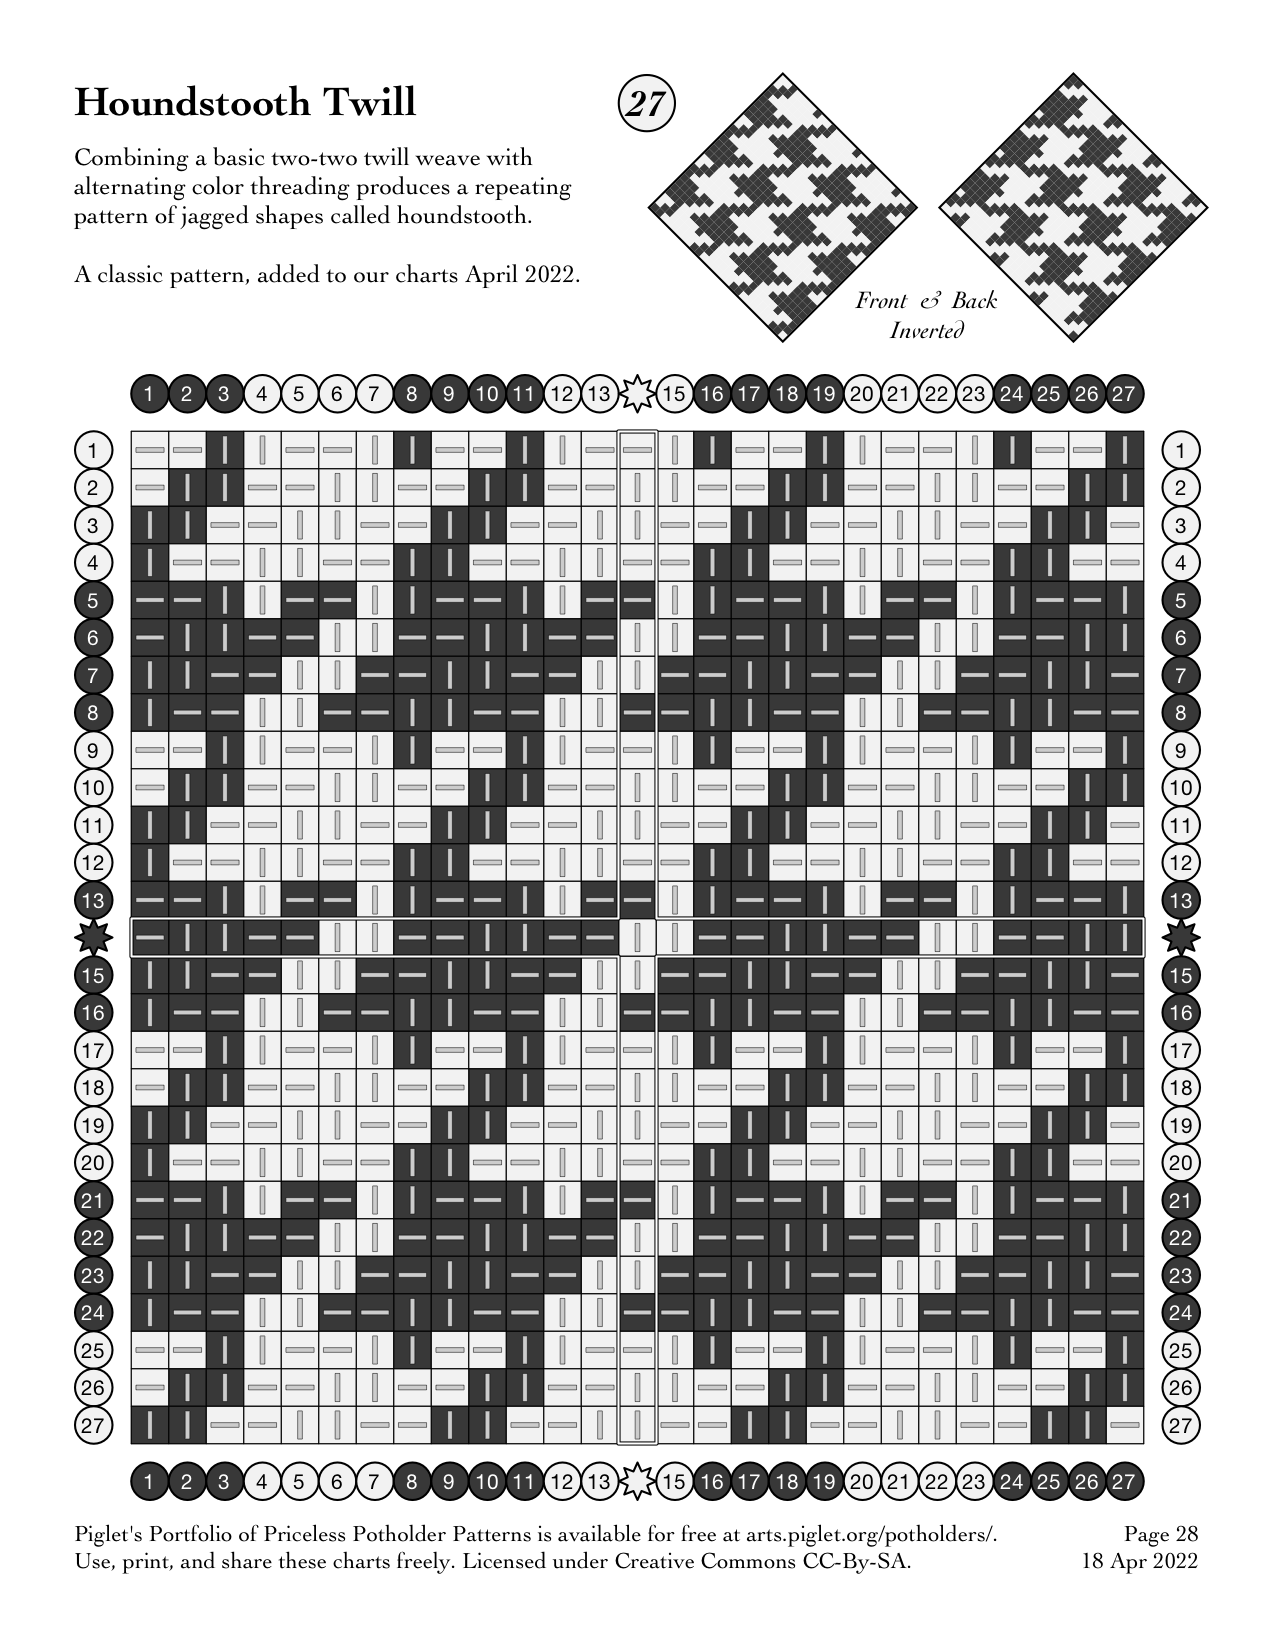
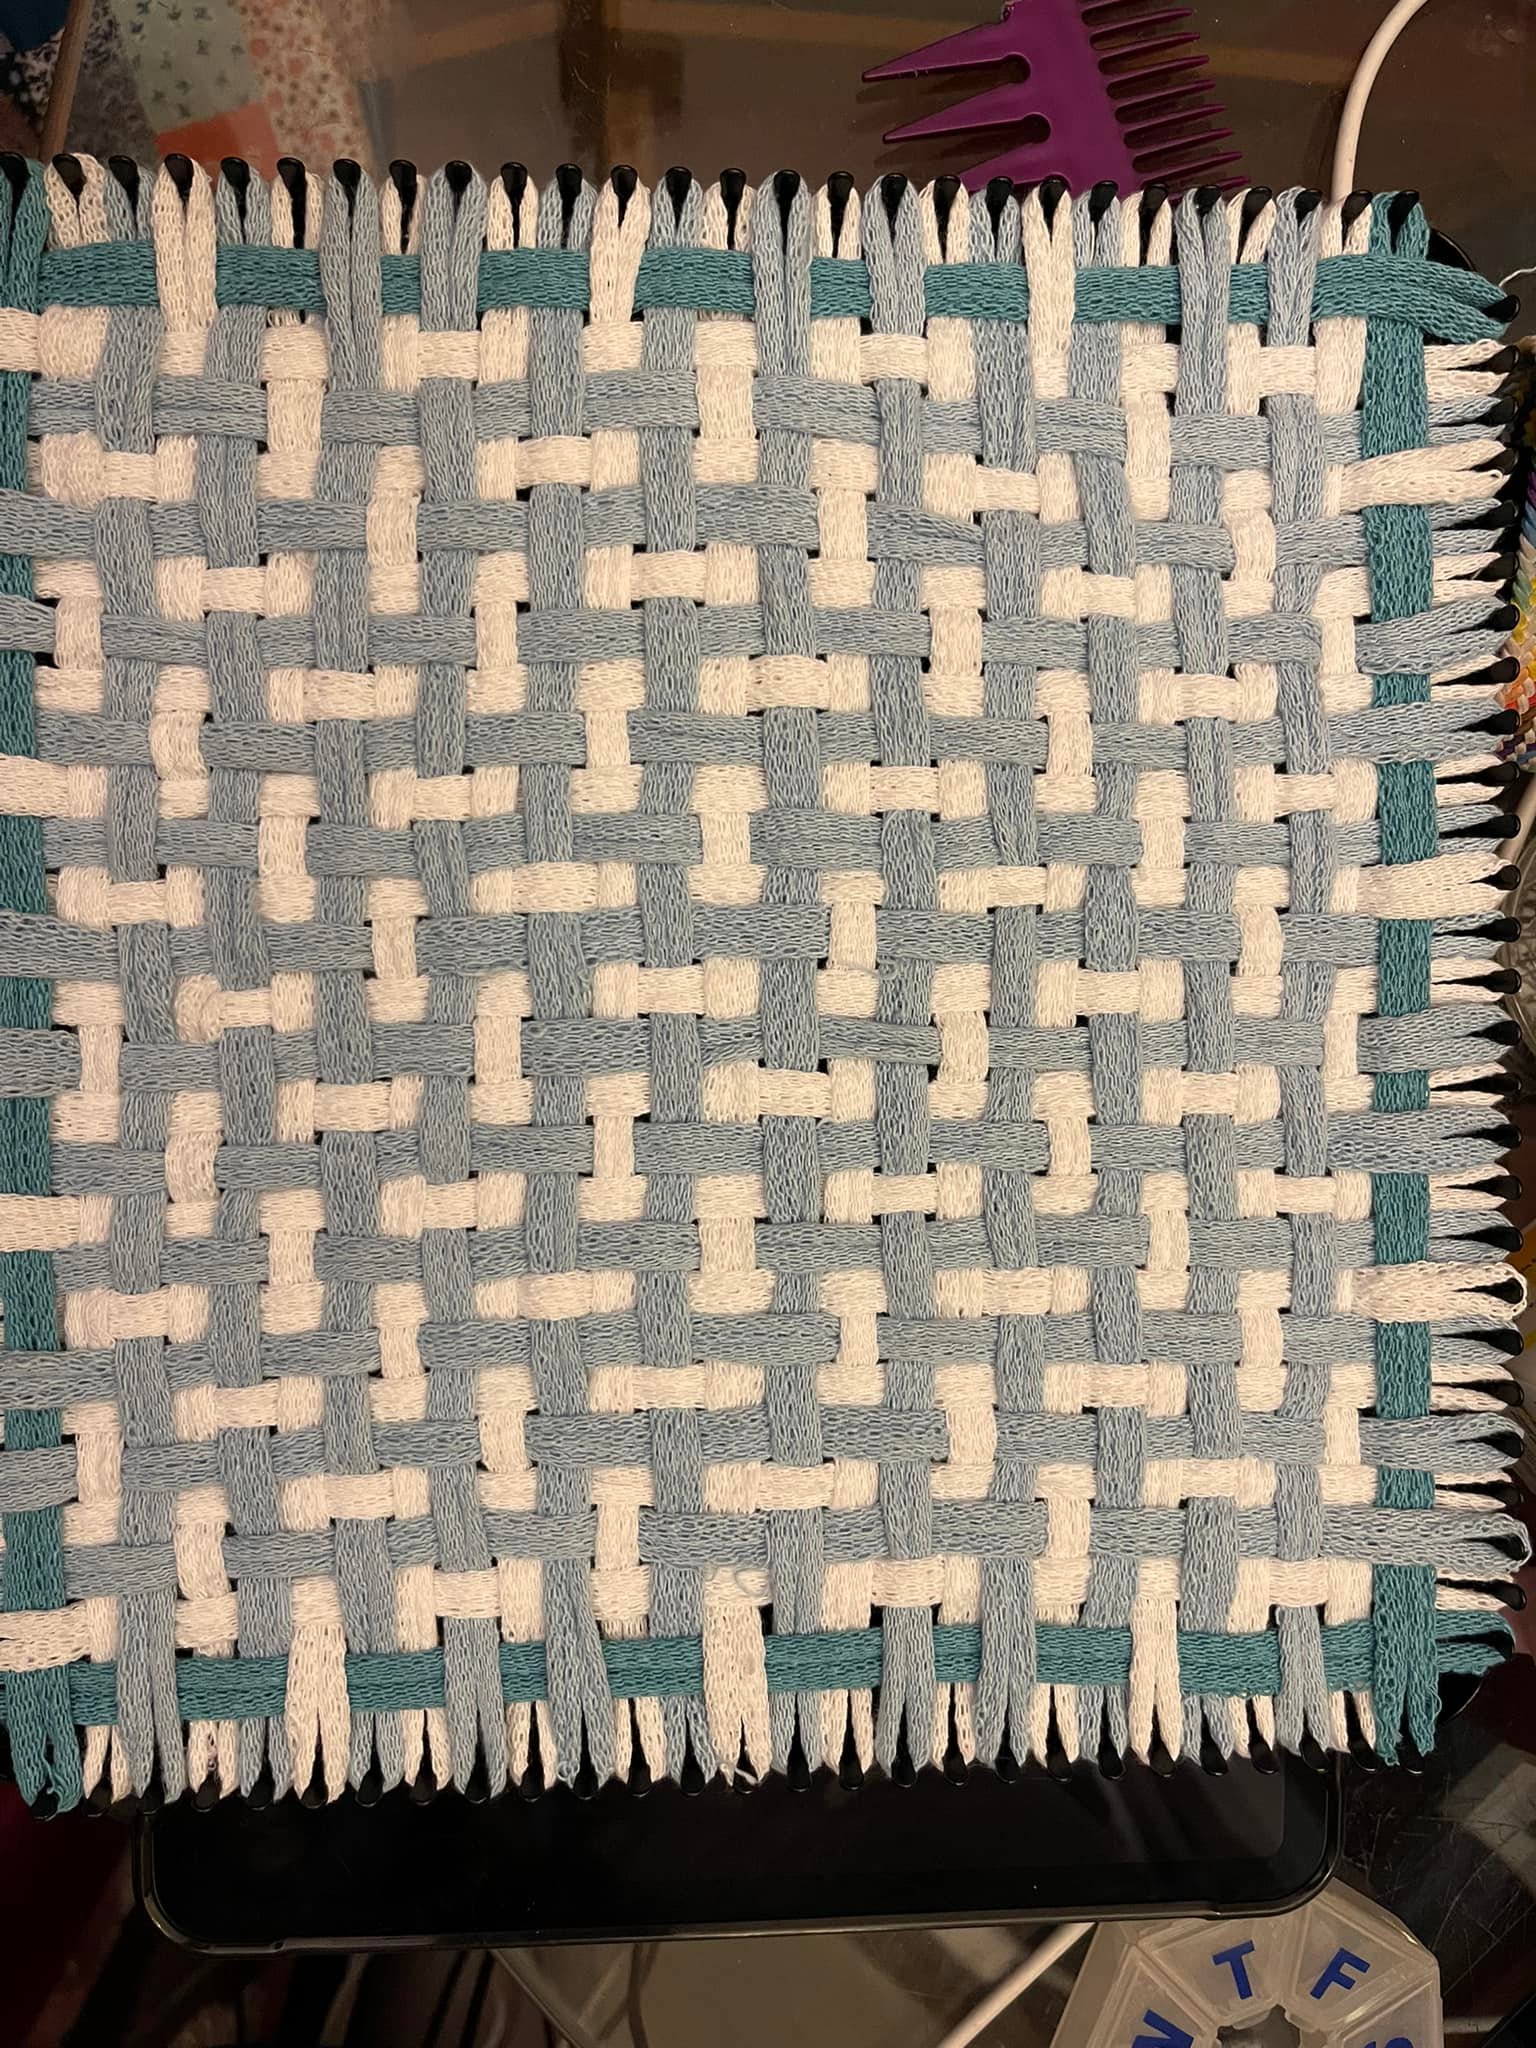
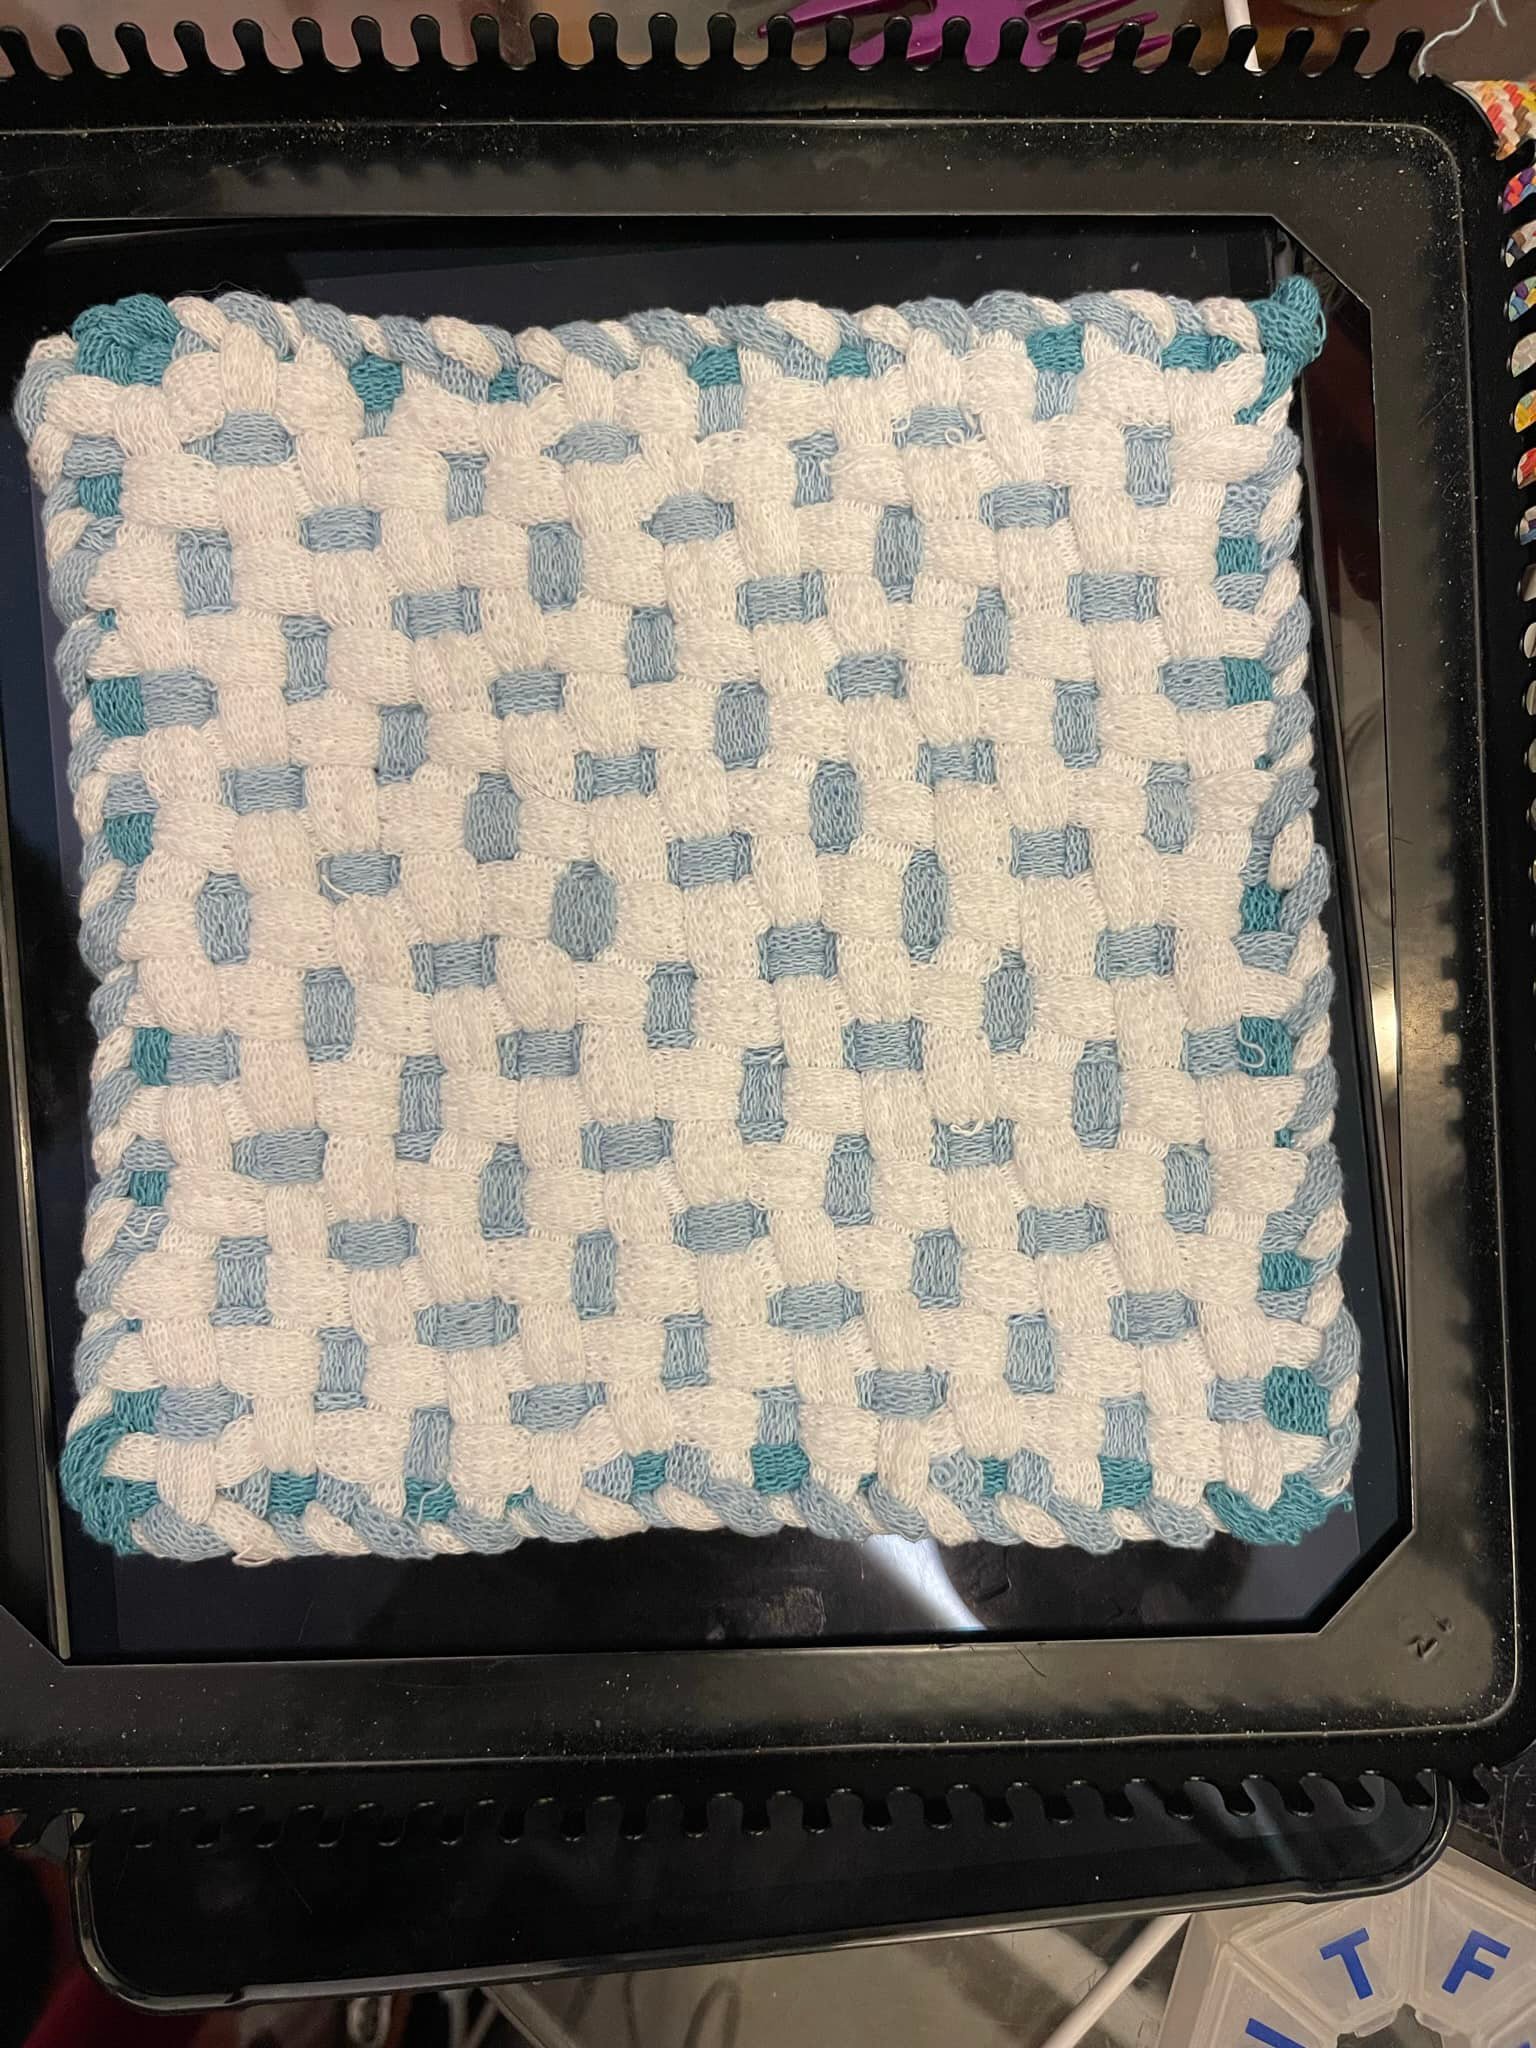
Houndstooth! Matthew charted the classic houndstooth weave, which is threaded with alternating sets of 4 loops, woven in a 2/2 (2 over / 2 under alternating) twill, progressing one loop per row. I opted for chocolate and white for this sample, which gives it a bit of a cow-hide effect. (Cowstooth??)
As is the nature of 2/2 twill, the fabric is thick, small, puffy, flexible in all directions yet stable. This one is 5″ square (off the 7″ loom). It takes a little time to draw in on itself. You can help it along by manipulating it with your hands, and you should expect shrinkage over the course of the first few hours to its final size and thickness as the twills snug up on each other.
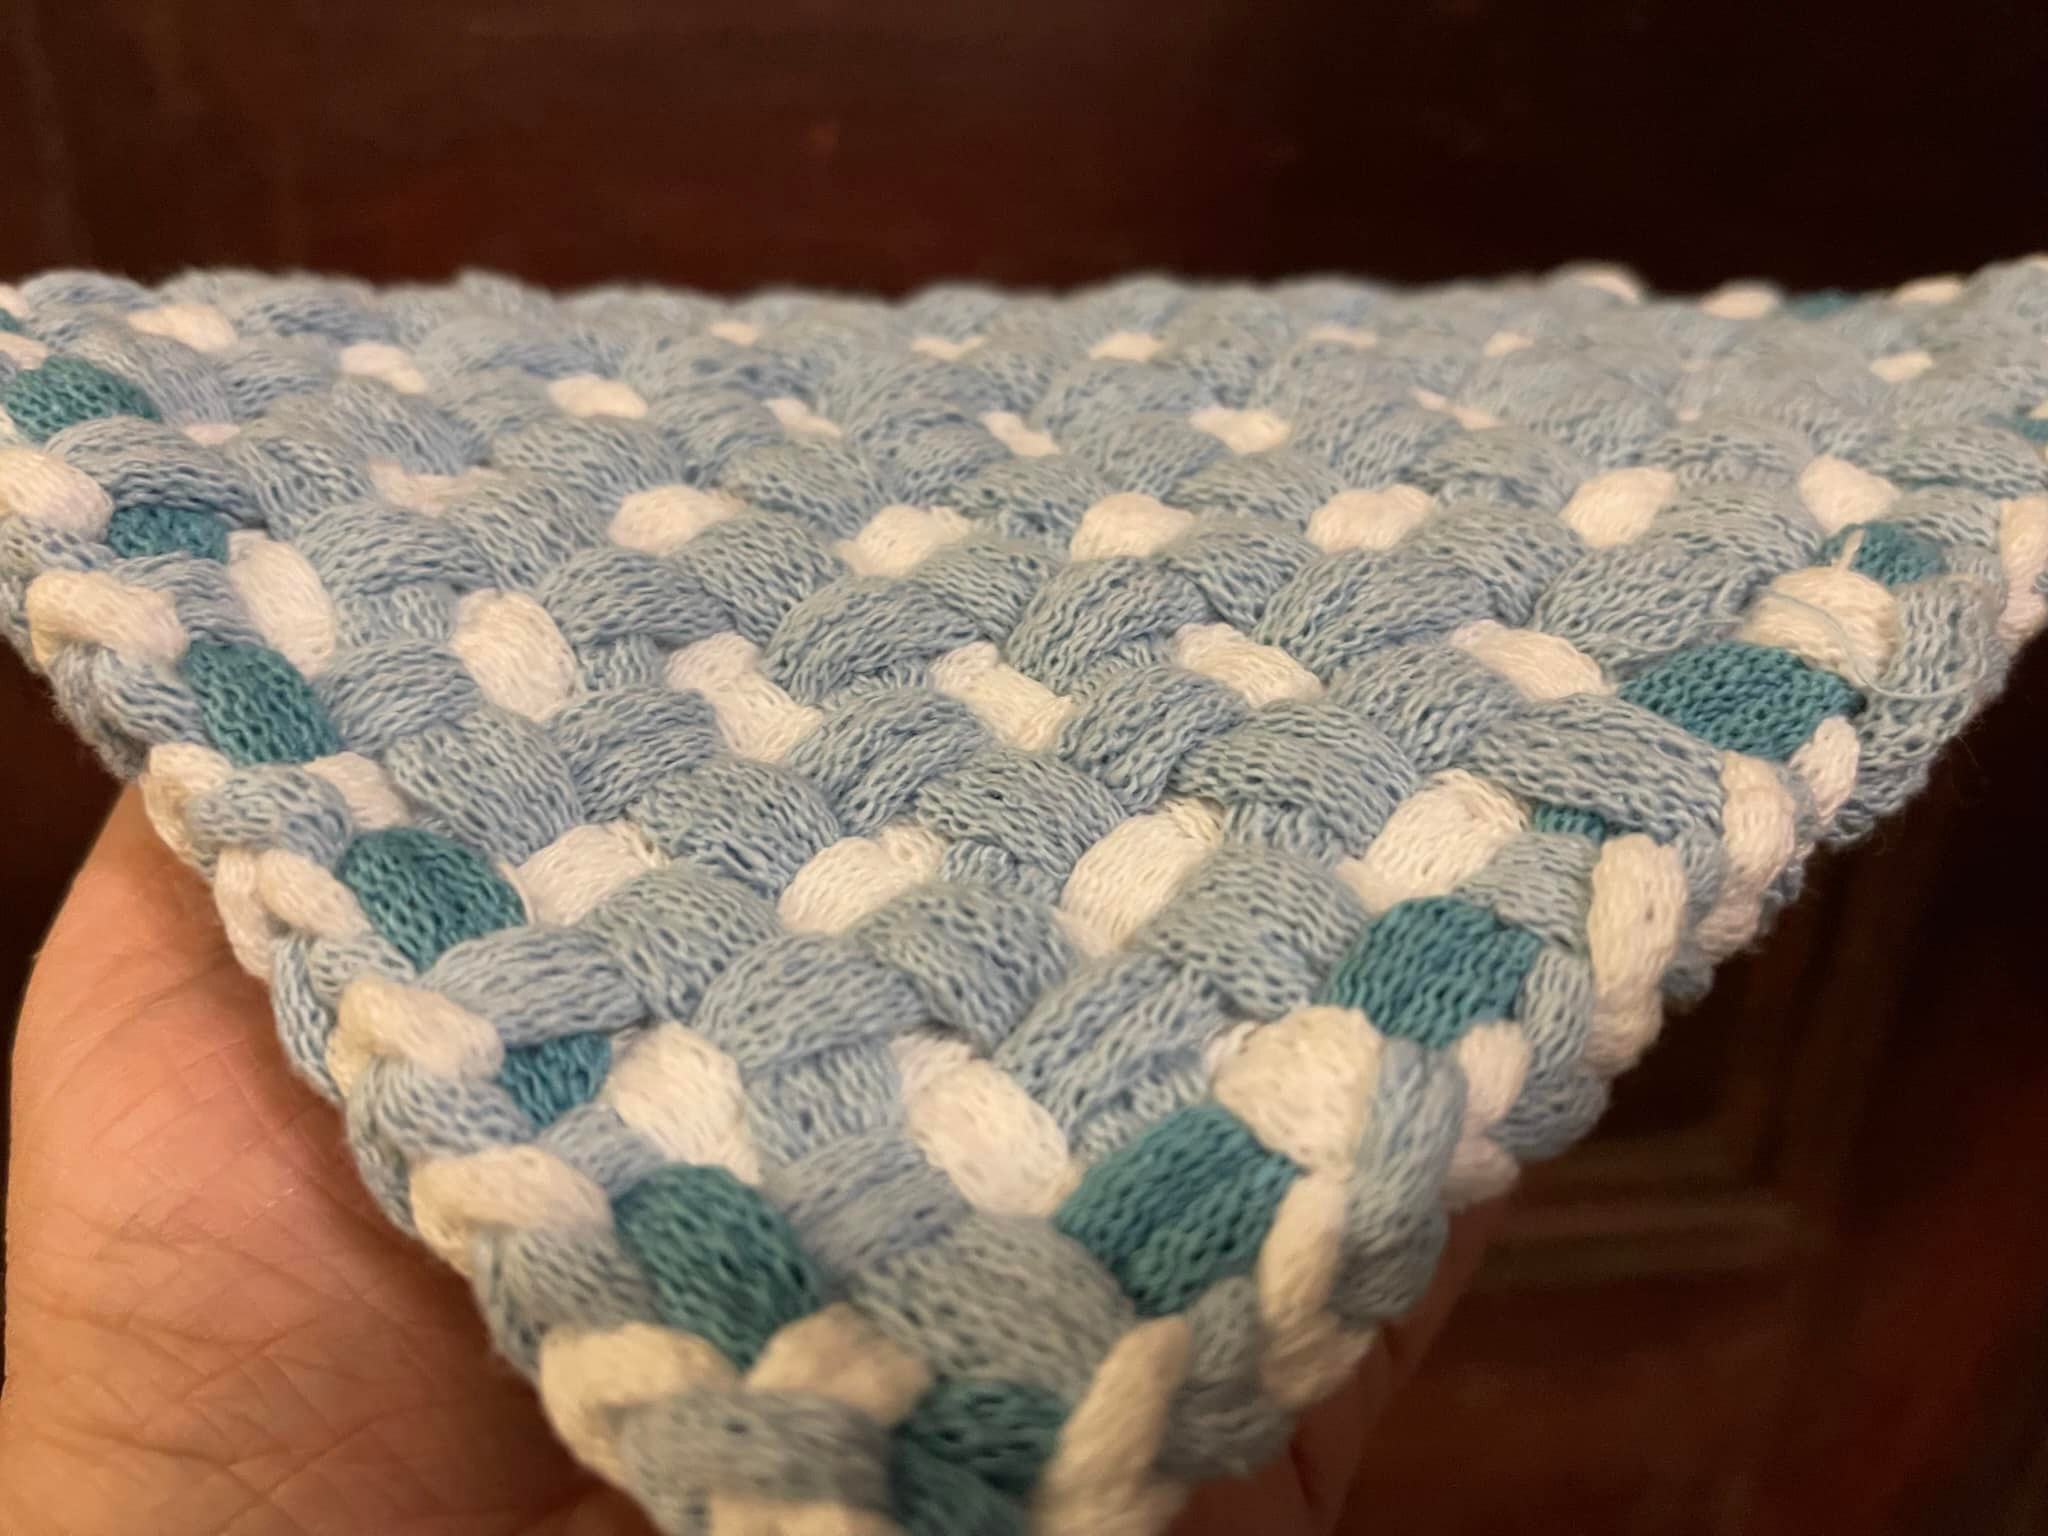
New pattern! Wonder Waffle. With a wonderfully waffly weave! This is a collapsing pattern, which will not look like the same design under tension. Under tension, you have what looks like brickwork. Off the loom, it’s as if the grass and moss surrounding your bricks overgrew them.
Once you take it off the loom, jiggle around in your hands, wriggling it against the bias until it shimmies into shape. The loops will pull each other into a semi-collapsed form that has distinct wells in it. If you look at it sideways you will mostly see one color on each side. It is very thick, extremely flexible, and protective against heat.


