Twill Mesh

Super elegant, with a rewarding cushion-y feel in the hand, twill mesh, adapted from a pattern by Eugenio Poma archived on handweaving.net. Harrisville pro purple and white loops.

You can see by my chart that I highlighted more than usual, working this chart. I noticed within 3 rows of beginning to weave that all even rows were 2/2 twill across (ending with 1 for the odd number of columns). I highlighted all those rows with purple before going further, then highlighted the odd rows in other colors as I wove them. This one is going directly onto my own potholder hook in the kitchen. ❤ 🙂

Three-Three Twill

“Honey, how do you think 3/3 twill would weave up?”
“I don’t know, my love, shall we find out?”
“OK!”

I am SO GLAD we did. You know the problem of enameled cast iron dutch ovens? Super hot, with knobs that need grasping? Solution!! 3/3 twill. Double-thick, extremely flexible, very protective.

I’m including a chart, but you don’t really need it. I found it helpful because I wanted to start my weaving in the middle and still be certain where my ends would come out. I wanted to have the strong diagonal across the center, and not have any 3-overs or -unders on the corners.

Worked in a single color, the texture draws more attention to the chevrons. Worked in 2 colors, the diagonal lines are eye-catching. The finished potholders are quite small, 5″ square. And 3/8″ thick! The flexibility of the fabric means you could work an excellent oven mitt using a pro loom and a traditional/pro rectangle loom. A 10″ pro should come out around 7″ square.
Because there are only 3 stretches per row going under, this is an incredibly fast weave. Work carefully, because it is easy to split loops while you are working this pattern. The loops get pushed into each other, and never fully locked into place, so the spacing the pegs force on them remains throughout your work. There will always be a bit of a gap between strands of one loop.
Whoops! Mistake. Always a good idea to pause and stare at your work before moving on the next row. I made all the right crossings… backwards. Easy to pull out and re-weave.
Much of the way through the chocolate and white exemplar, I am seized with yearning to know how this fabric looks when you highlight the texture instead of the pattern. Thanks to a gracious benefactor, I can throw on a monochrome and test it out right away! ❤
Can you spot the mistake? Look carefully at the bottom woven row.
Fixed! (Narrator: no, it is not. You may have to zoom in to see the split loop in the last place the bottom-to-last row surfaces before connecting to the right peg…)
Nailed it!
Here are both finished potholders, still on their looms. Monochrome vs. two-color changes the focus from texture to design. Lots of room for playing with color here. A monochrome center, for example, would amuse the eye with its focus switching. And you can always taste the rainbow. 🌈
Here is a closeup of the chocolate and white potholder, ready to bind off the loom.
And a closeup of the white potholder, ready to be released from its pegs.
A chart is not necessary for this pattern. You are simply proceeding over 3 / under 3 across the row, shifting by one column for each adjacent row. I like having the chart so I can start in the middle and still be sure that my corners will come out with the over/under arrangement that I wanted. (It’s also helpful to have charts for very simple patterns, when trying to illustrate how to read the charts for more complicated designs.)
Here, I’ve taken the 27-peg chart that Matthew drafted for me, and folded it to show the 18 pegs I want to use. I’ve highlighted the central rows and columns (9 & 10), to make it easy to see my starting point. Once I’ve woven those two rows, I can work up and down by referring to adjacent rows, so I don’t need to mark my place on the chart as I go.
Immediately after binding off, the edges are very curved and the loops that held my tension while I was working the edge are markedly distorted. Fear not! Work them out with your fingers. YOU are in charge of your fabric. Manipulate and massage the edges until they lie flat enough. Yes, they will buckle and wave. You can give it an appealing evenness and straighten the corners for a satisfactory result.
Marvel at the size! 5″ square, and 3’8″ thick, on a 7″ loom.
As a 27-peg chart.
As an 18-peg chart.


May Edition

The May edition of Piglet’s Portfolio of Priceless Potholder Patterns was published last night. Now over 70 designs, many in multiple sizes, for a total of over 100 charts. Posted both as a downloadable PDF and as individual page images. Clear monochrome charts can be used on-screen or printed affordably. Available for free under an “open culture” license so you can use, print, share, copy, adapt, and change to create new designs.

Folks who are familiar with our efforts will know that we add new charts from time to time, and May has been especially productive. If you downloaded a PDF six weeks ago it would have had 53 pages — but the latest version is now 113 pages, and it will continue to grow in the future.

We recognize that this “moving target” creates a challenge for folks who want to be able to print the whole thing out one time and treat it as a completed paper book, but it seems like an inescapable part of releasing our work as we go.

Roses and Thorns

Bed of roses! Yet another delight from the mad adaptation skills of Matthew, who converted a multi-shaft weaving design by Mary Bentley into a potholder chart. Isn’t it lovely!? And ripe for color play. There is so much fun to be had with this design.

The fabric is thick but not especially puffy, and hangs remarkably flat.

I was short 4 red loops, so I used carnation instead. I think they look like scattered petals. There is so much scope for color play here!
On the other side, we see that the pattern is inverted, with 5 “roses” and 4 “thorns”.
Stretched out on the loom, the design is very geometrical. We see no hint of the organic nature to come after binding off.
Here’s how my chart looks, after weaving. Highlighting alternate rows helps me keep track, especially in this design, which does not alternate colors.
Surprise! Remember that the loop colors do not strictly alternate!
27-Peg Chart

Crazy Eights

Puffy, thick, stable, attractive, exceptionally easy to weave. One side infinity, the other side tiles?

Almost finished weaving, you can see the one-dot squares very clearly. The twill pattern causes them to close up when we take this off the loom, and those wee single brown squares disappear underneath a larger 2×2 white square. That’s what produces both the thickness and shrinkage of the fabric.
For fun, I worked this out to 29 pegs, instead of 27. I added an extra burgundy loop on all 4 sides, to finish the pattern at a 2/2 twill row and column, all the way around. This is optional! You can just work the 27 pegs as charted. Here you see my extra edge loops, each hooked onto the pegs of its nearest neighbor. I’ve stacked them in the order I will want to bind them off, so each corner has one stacked with white on top, and the other burgundy on top.
The finished twill fabric shrinks more than tabby coming off the loom. This is about 7.5″ square.
The back is fantastic! Look at that tile pattern!

Super Eights

Here we have a very interesting extension of the figure eights pattern I posted earlier (which had a back view that looked like tiles).

Enlarging the eights changes the twill pattern, as well, into something with many fewer 3-floats (where a loop passes over or under 3 loops, instead of the more usual one or two). The result is less puffy and marginally larger (8″ square), with a remarkably different rear view, like wrapped hard candies.


Traveling Twill

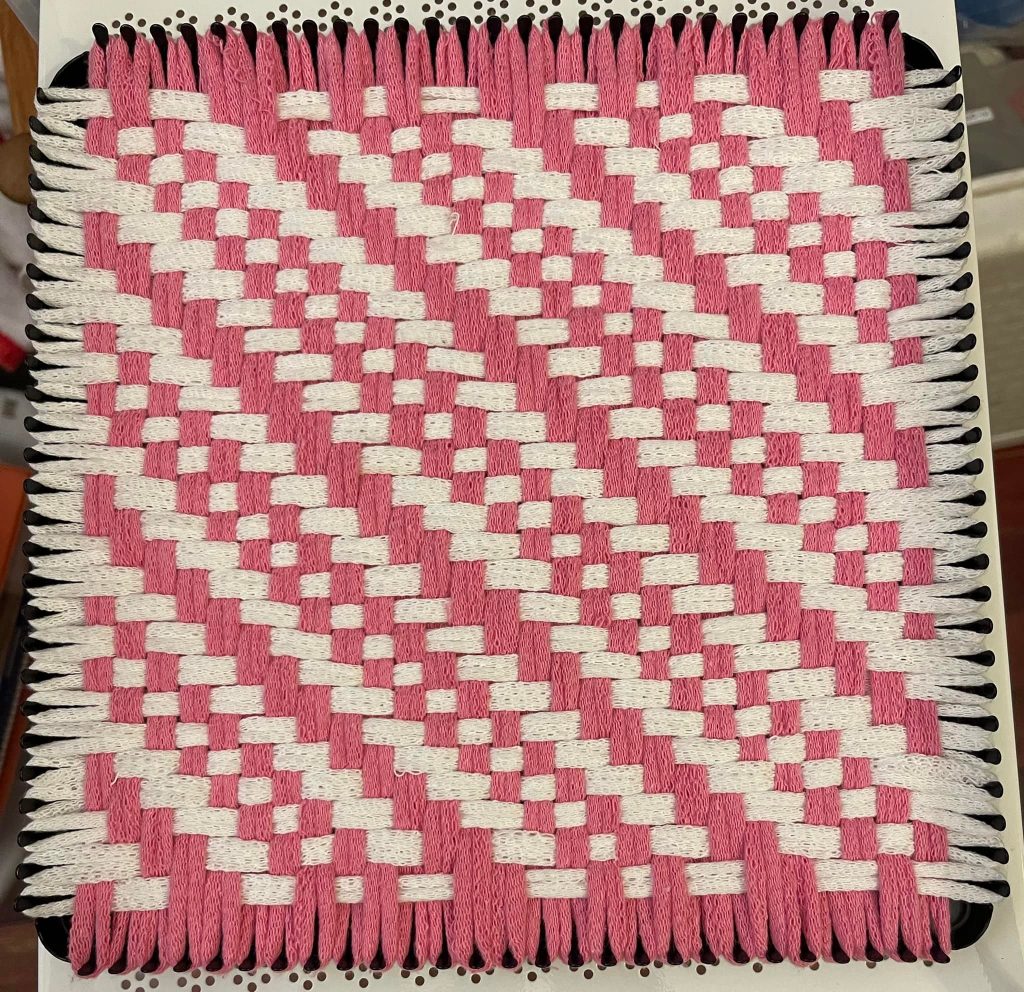
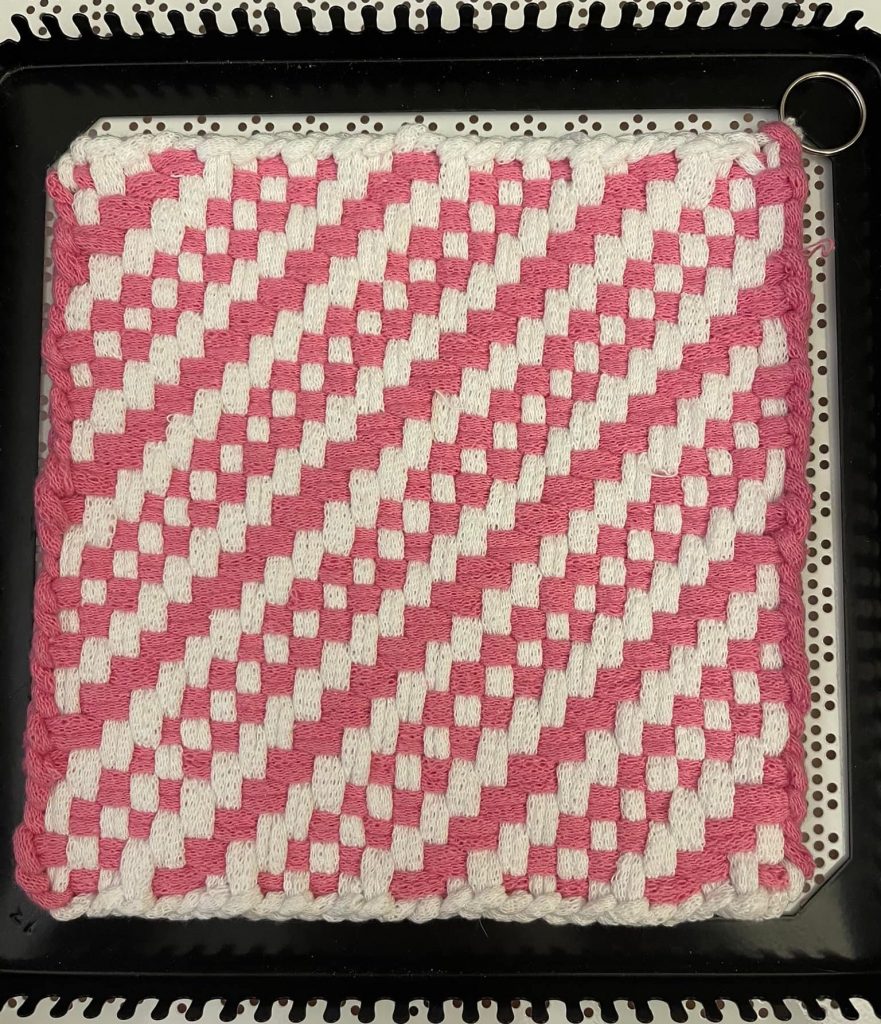
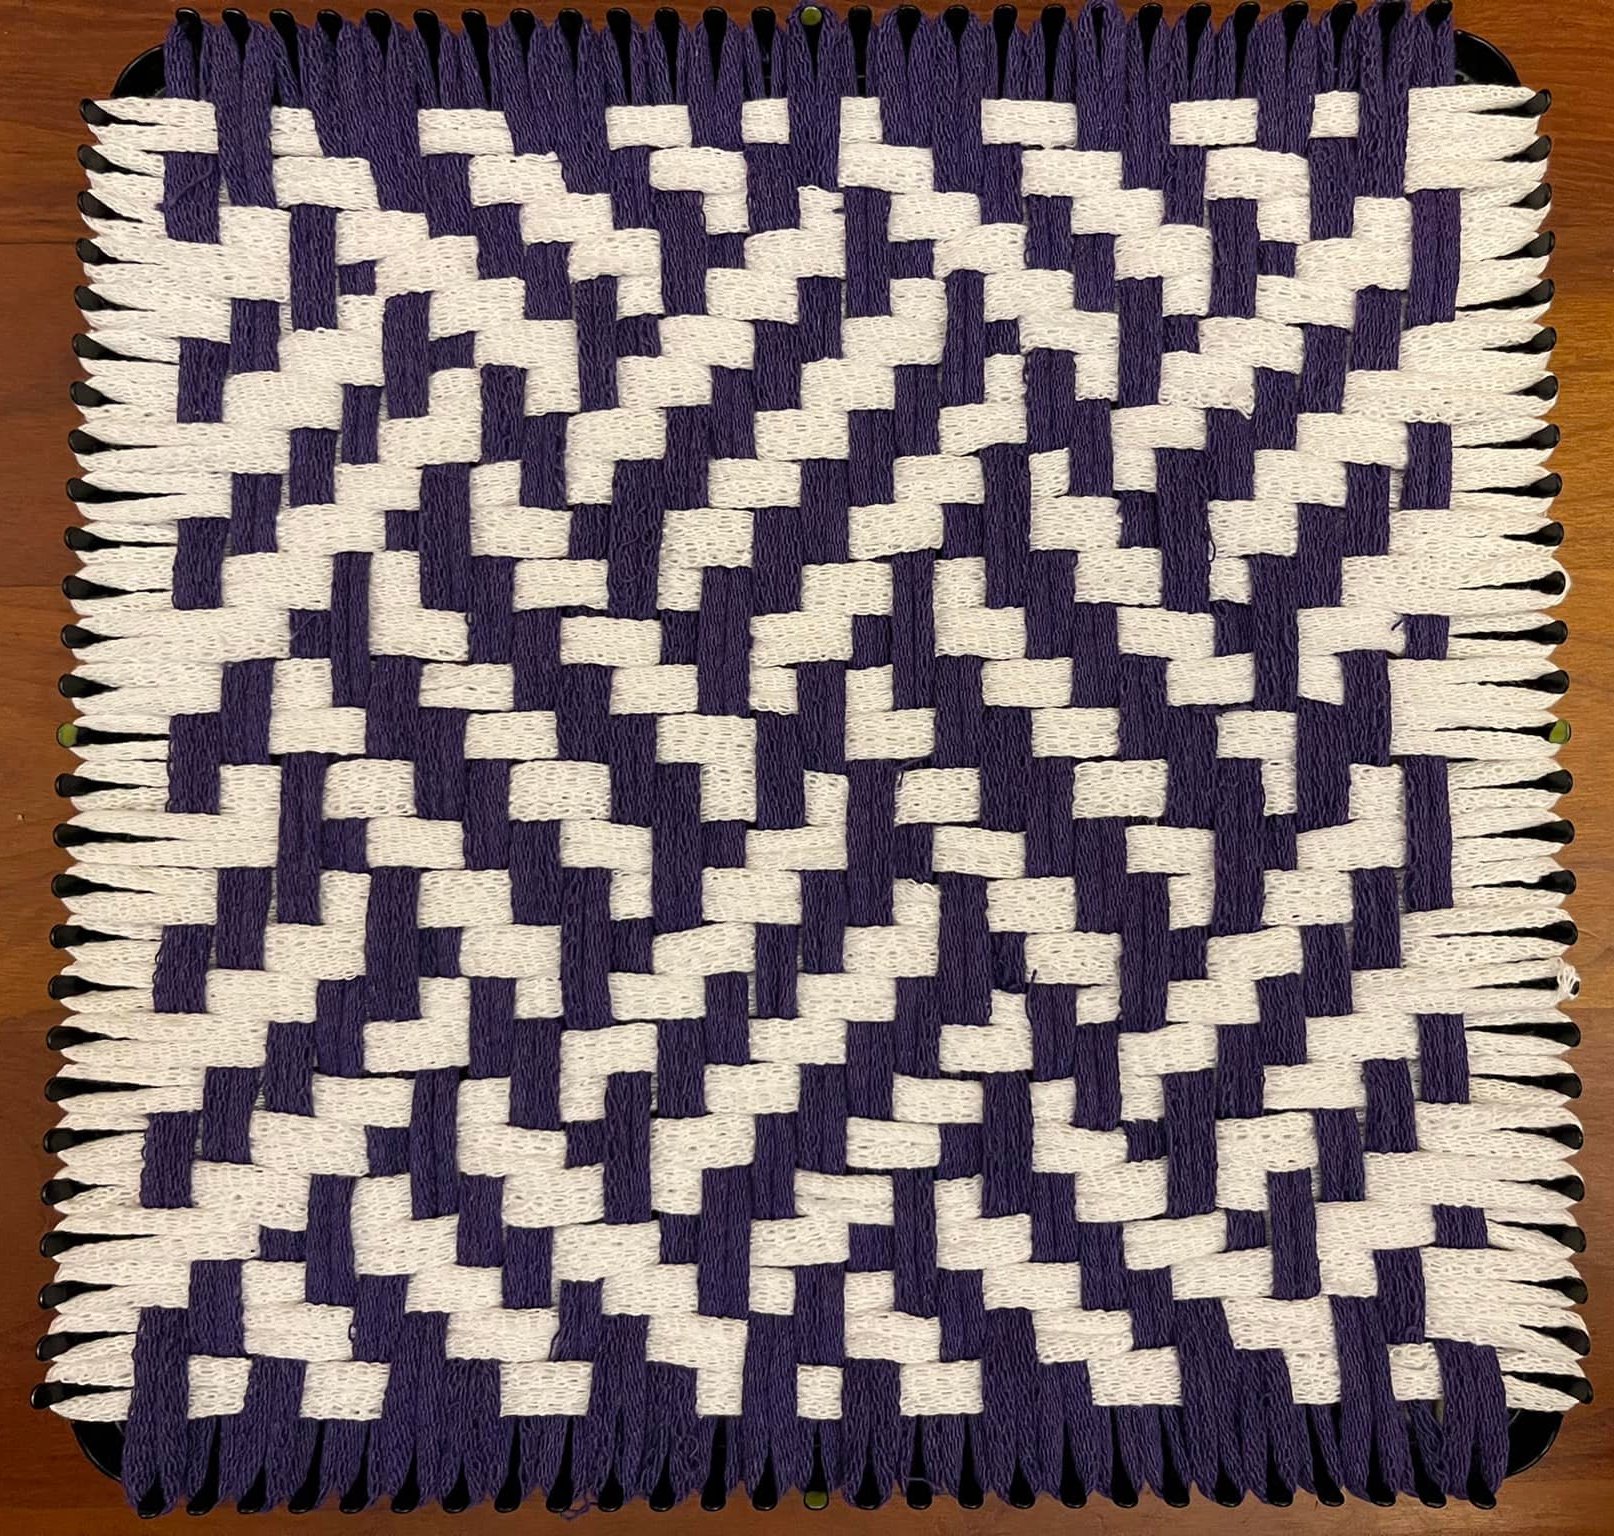
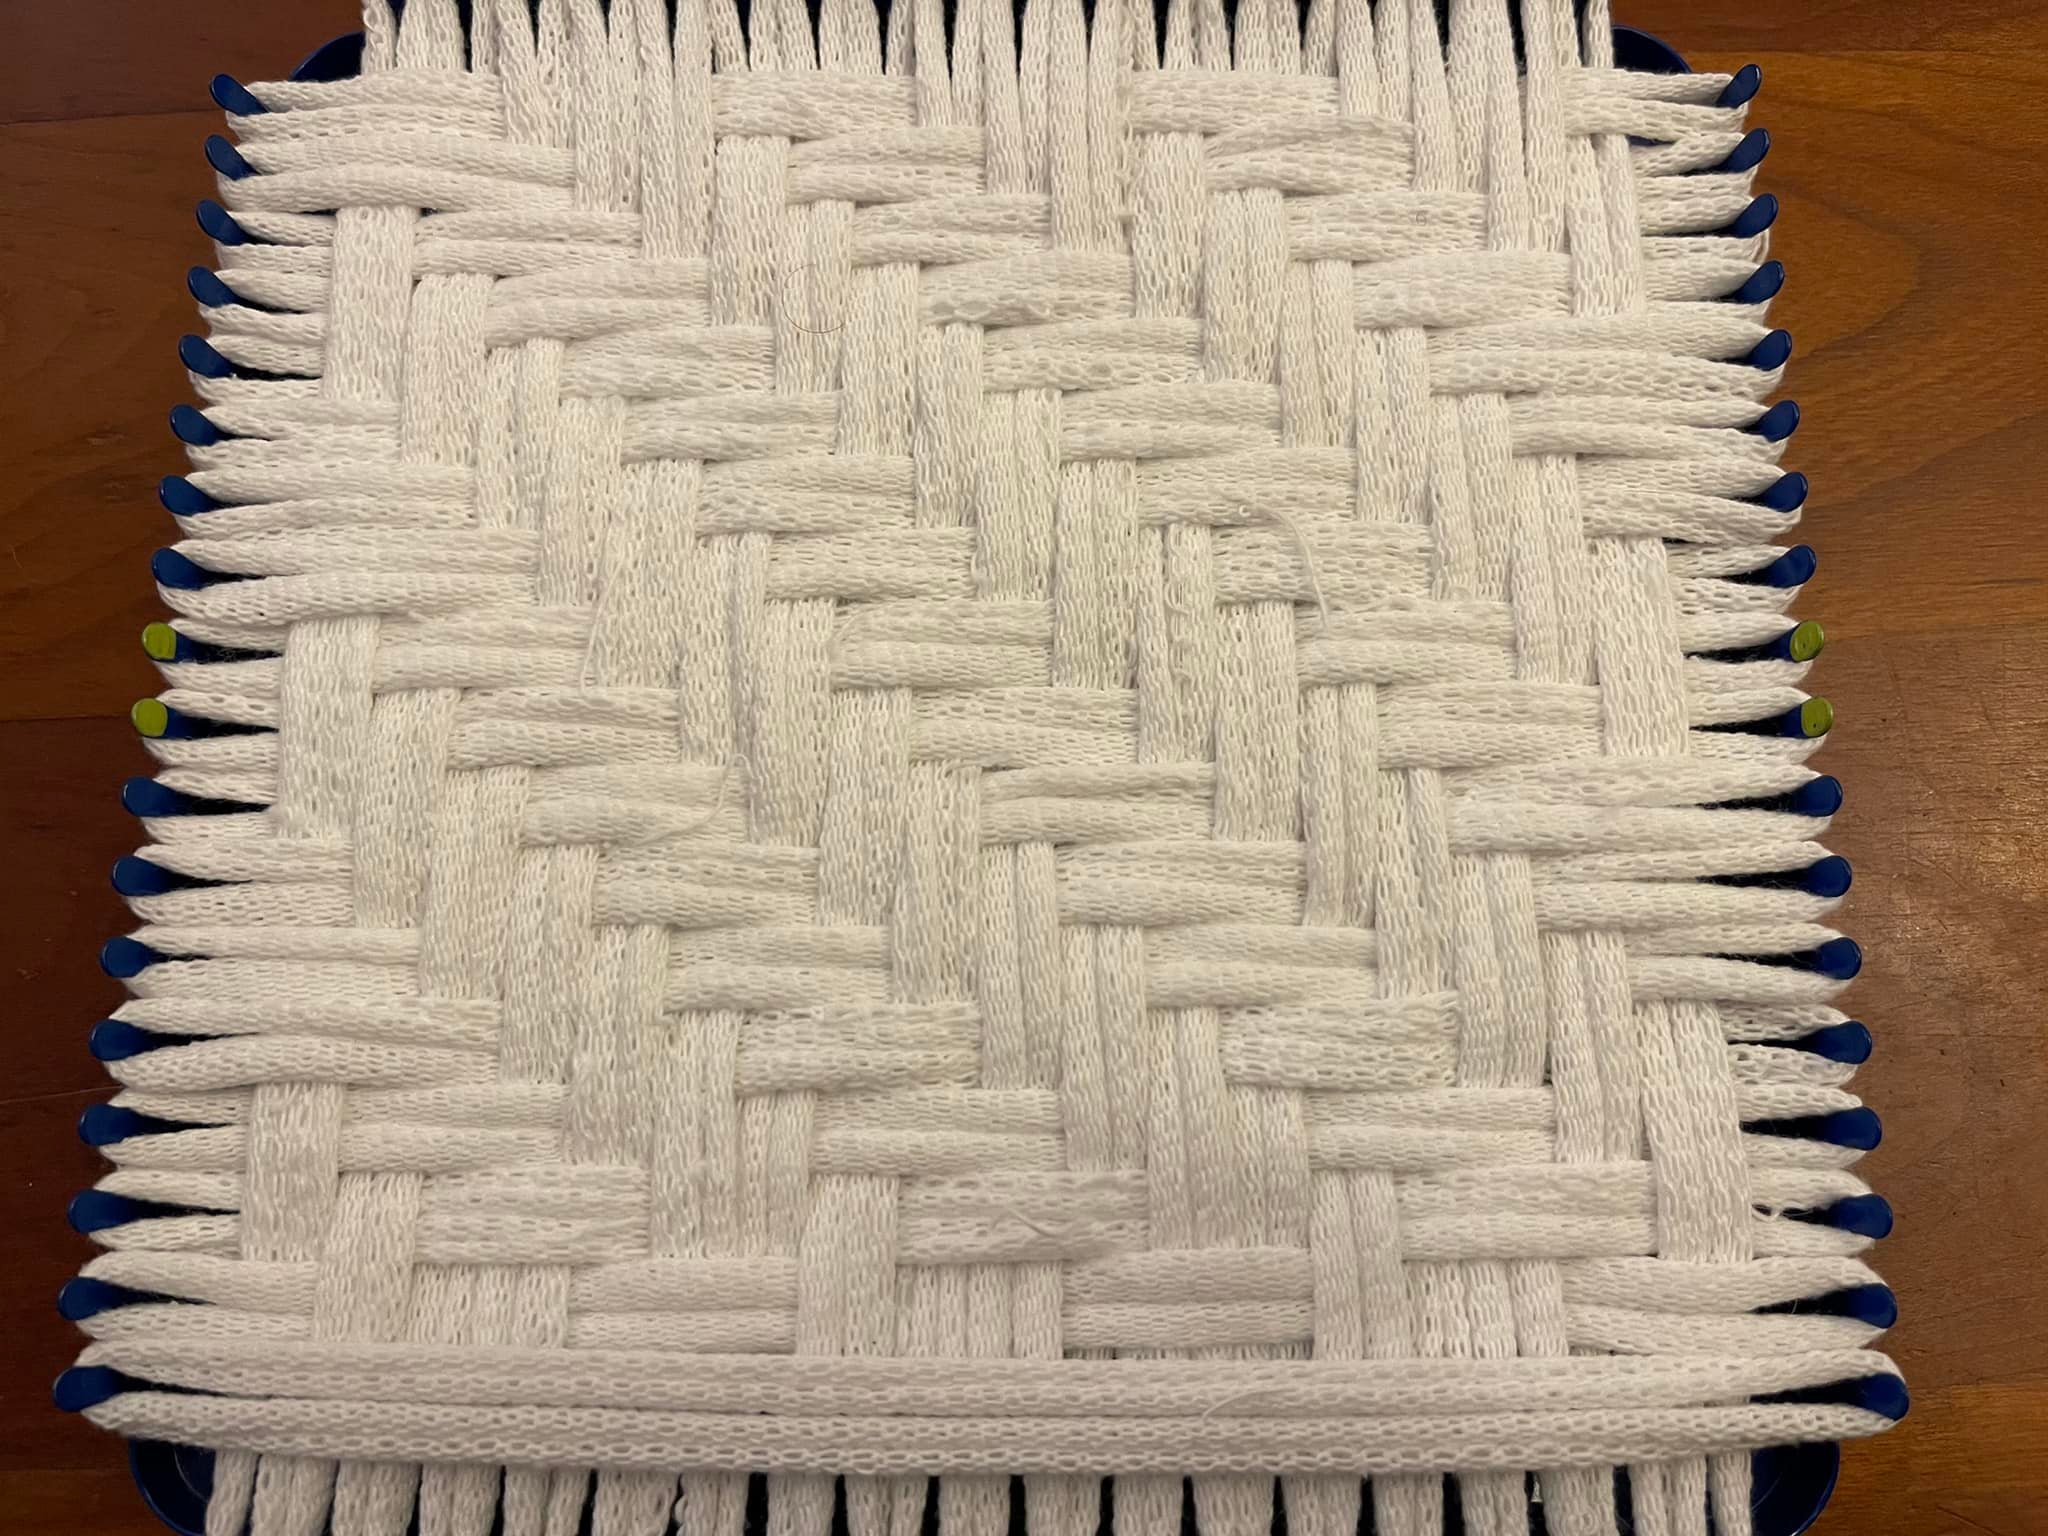
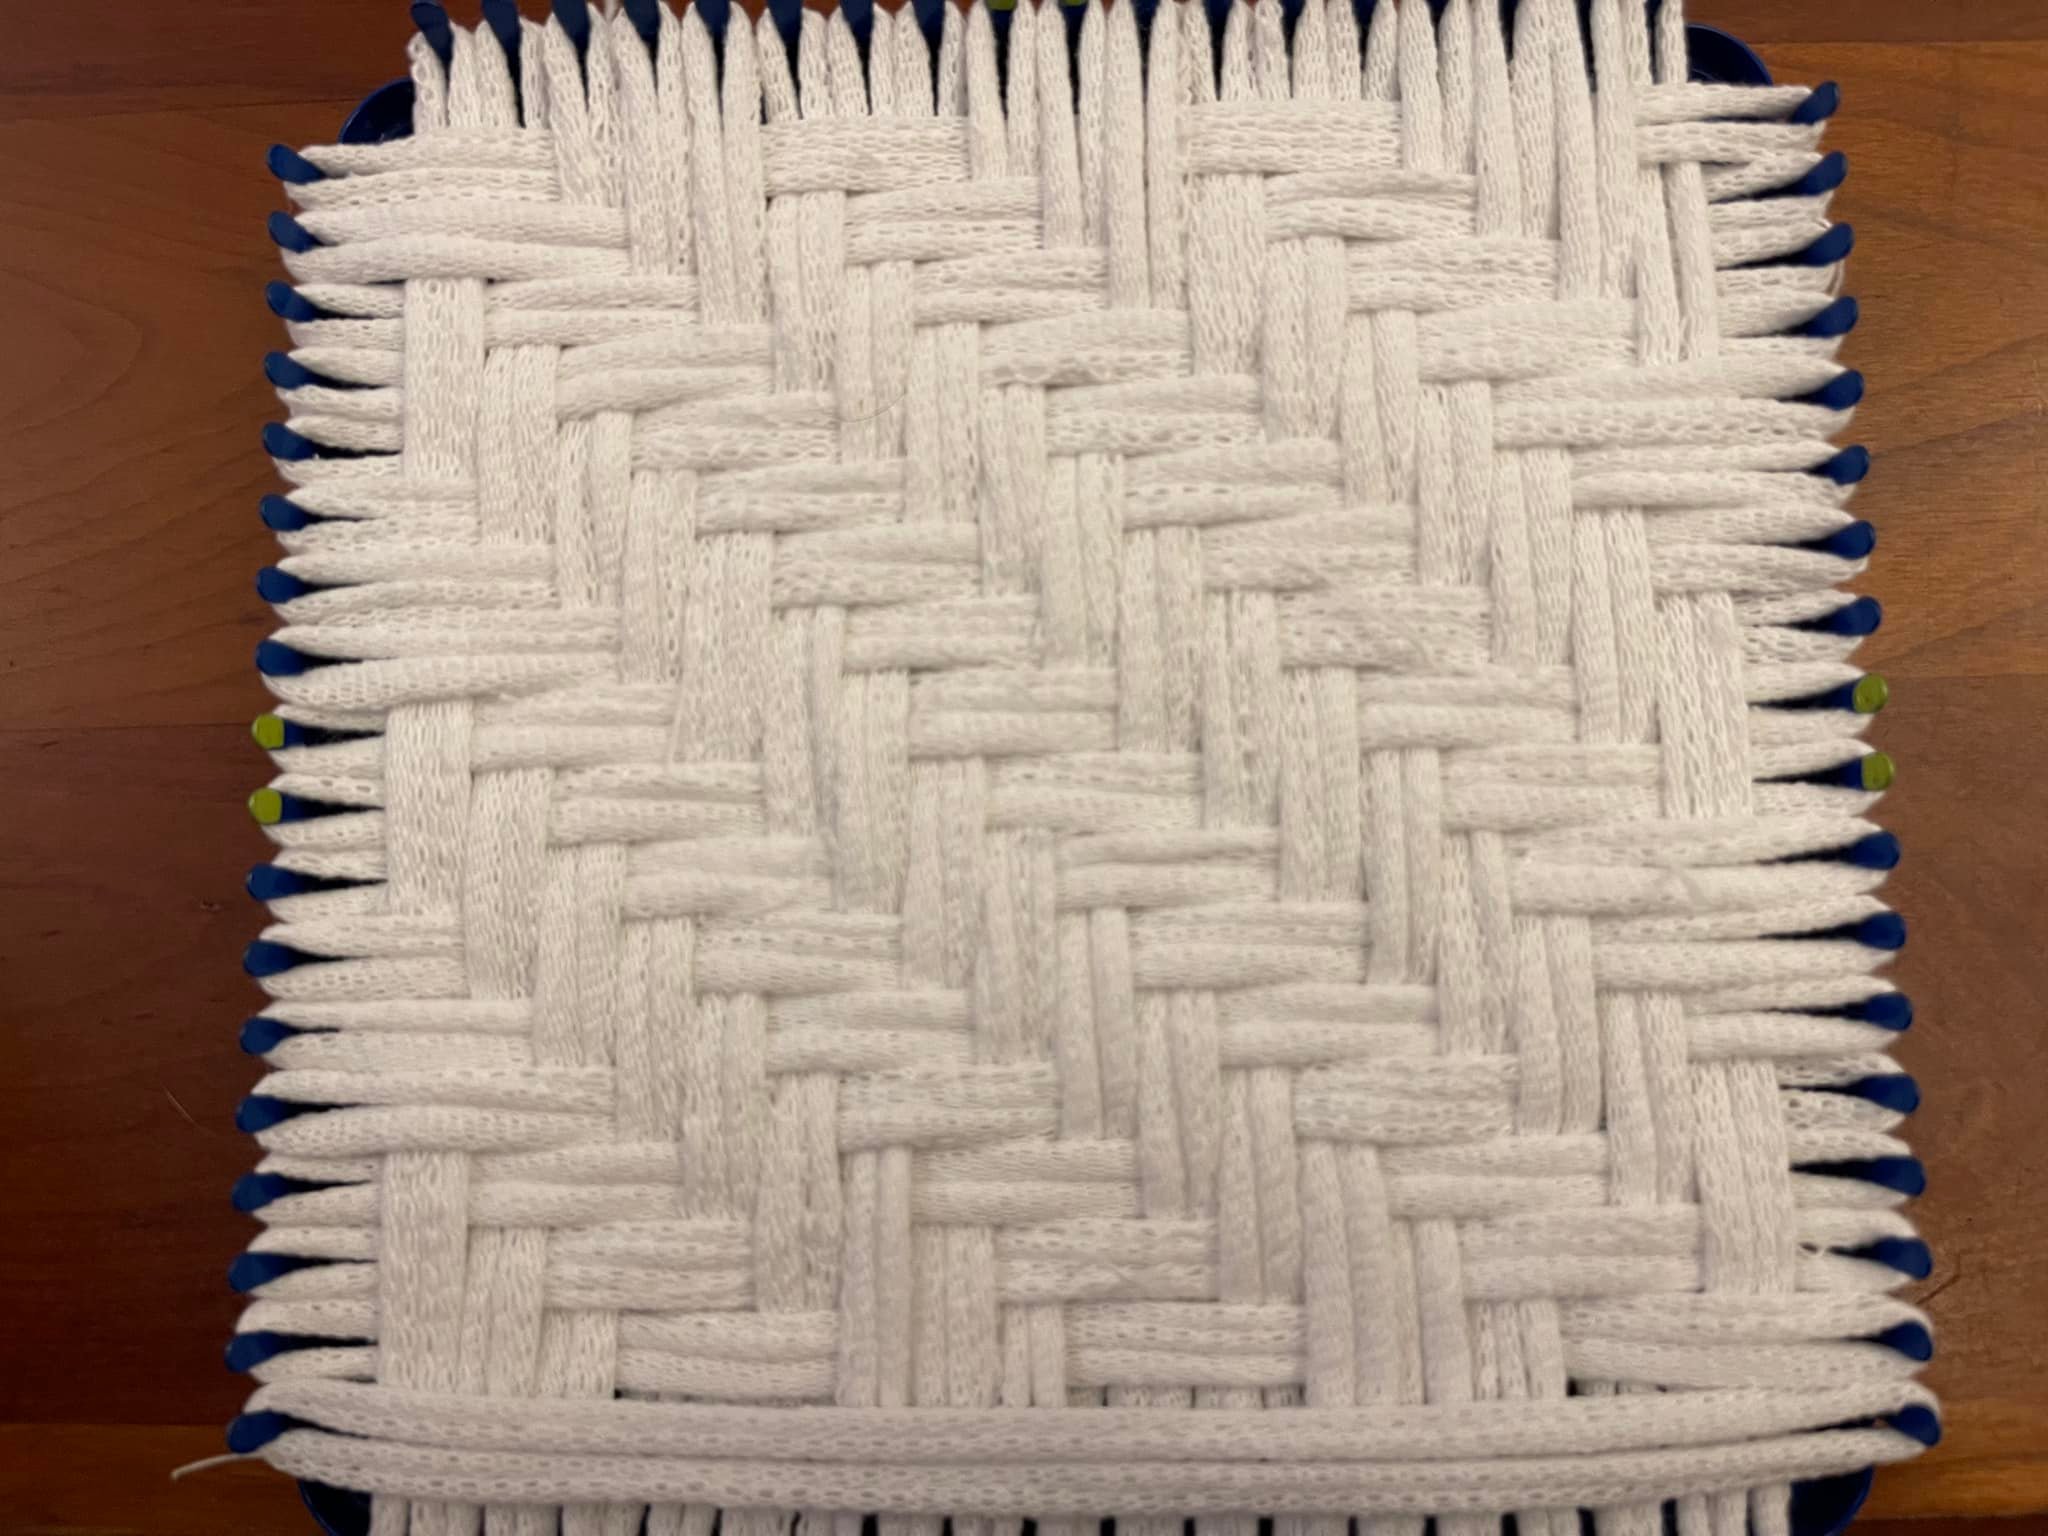
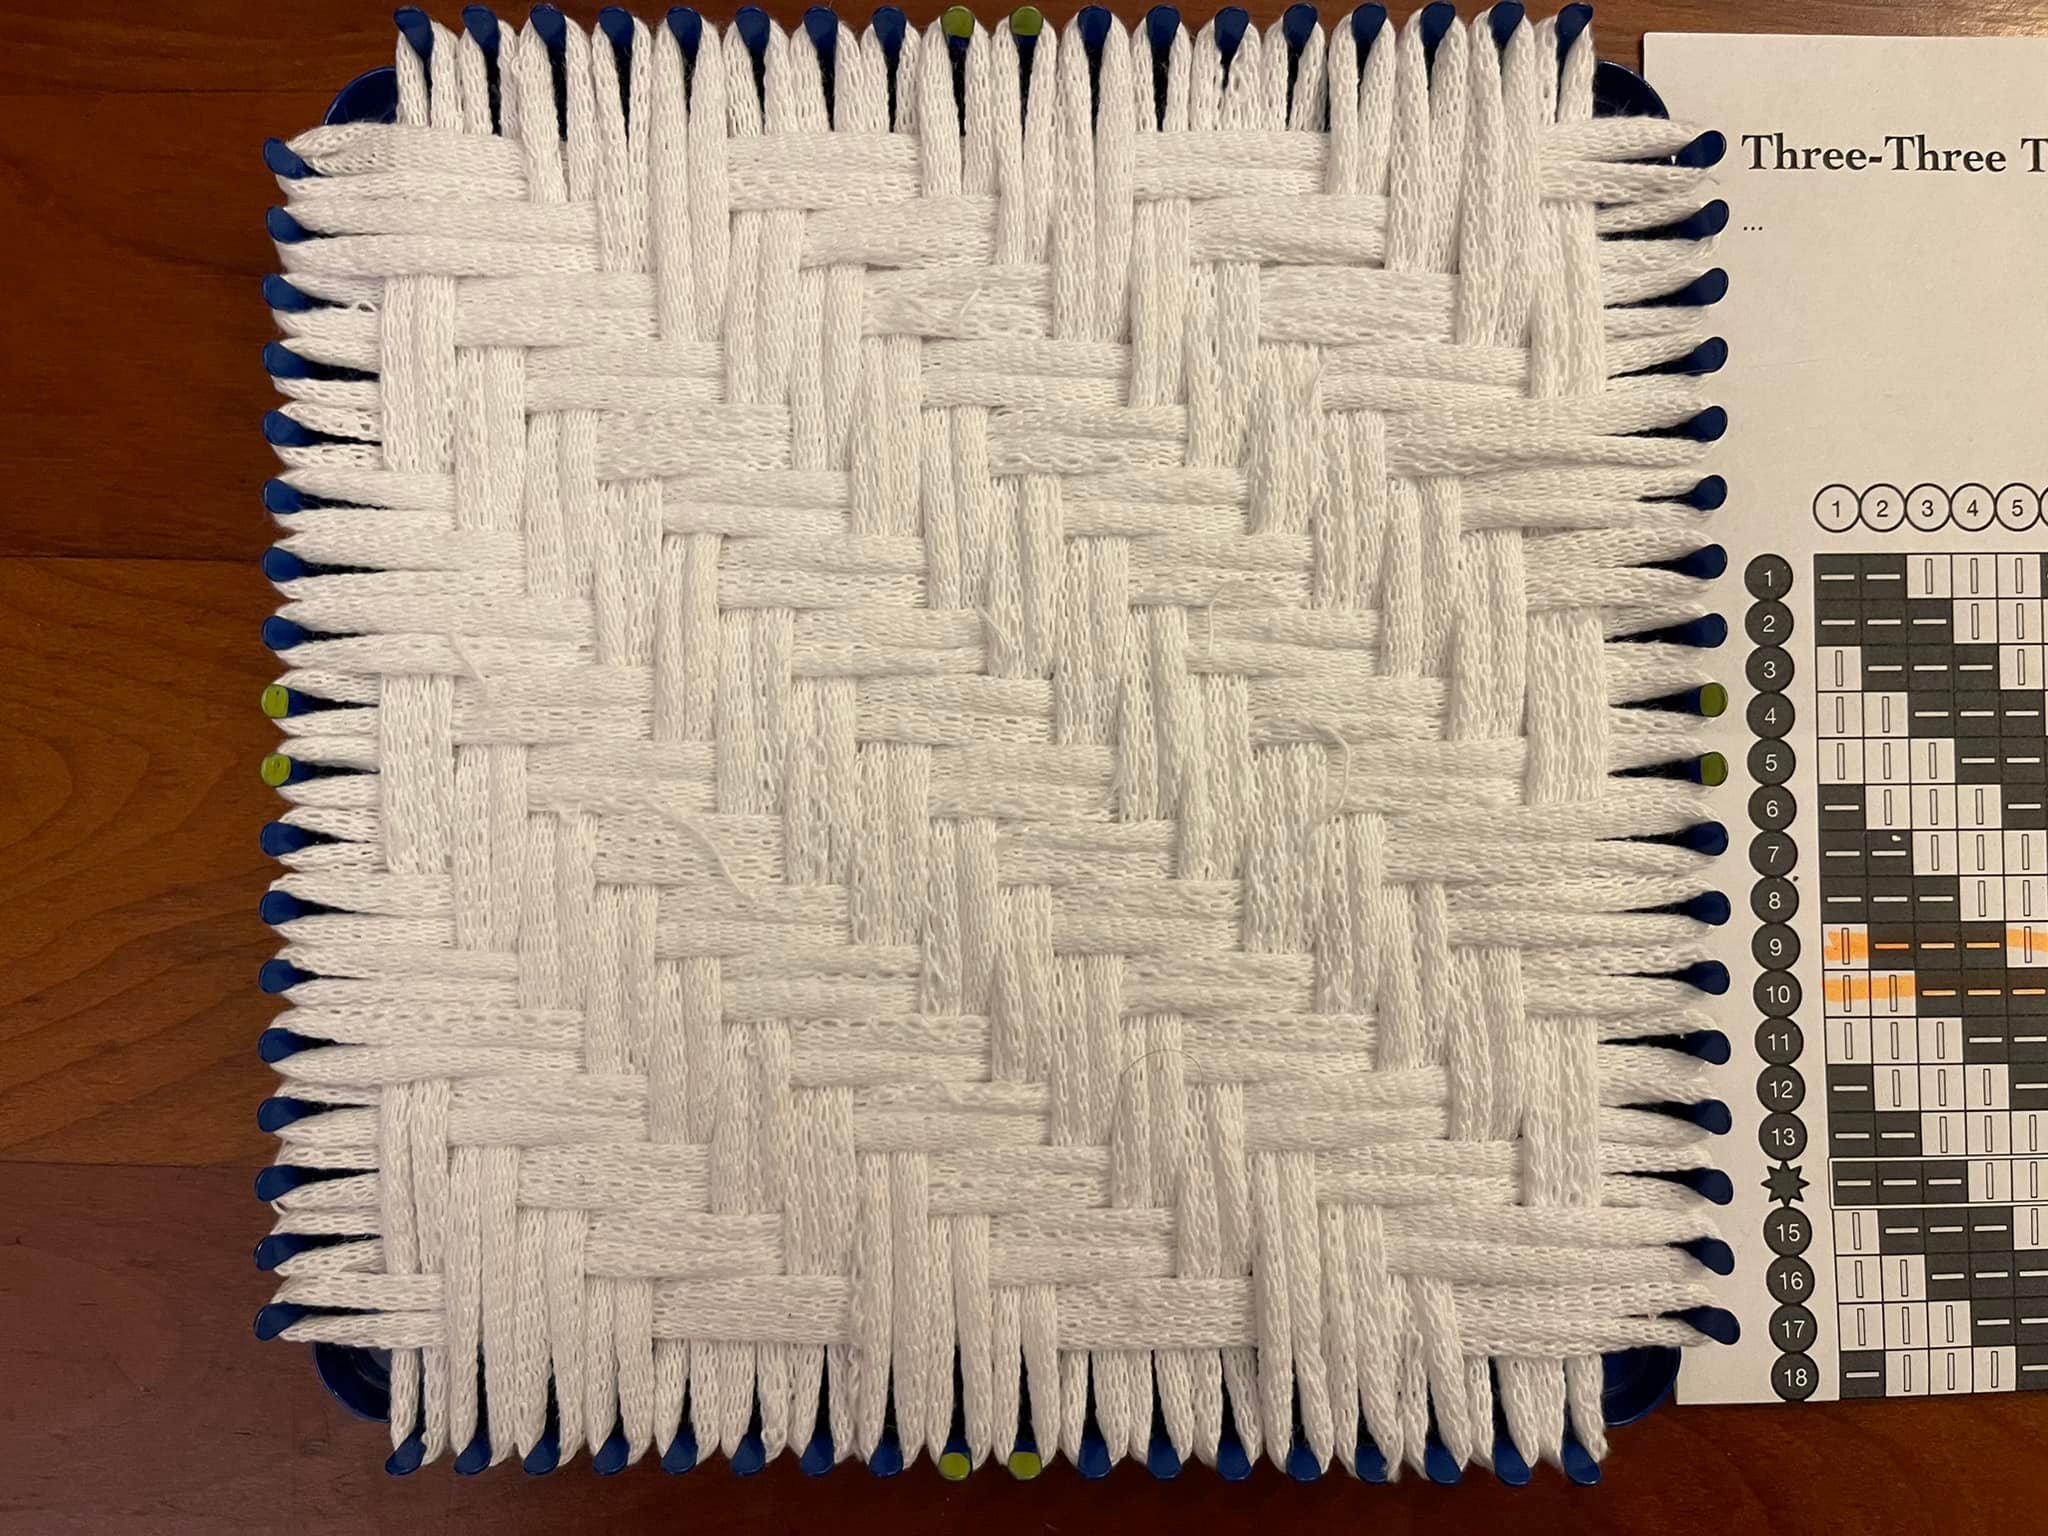
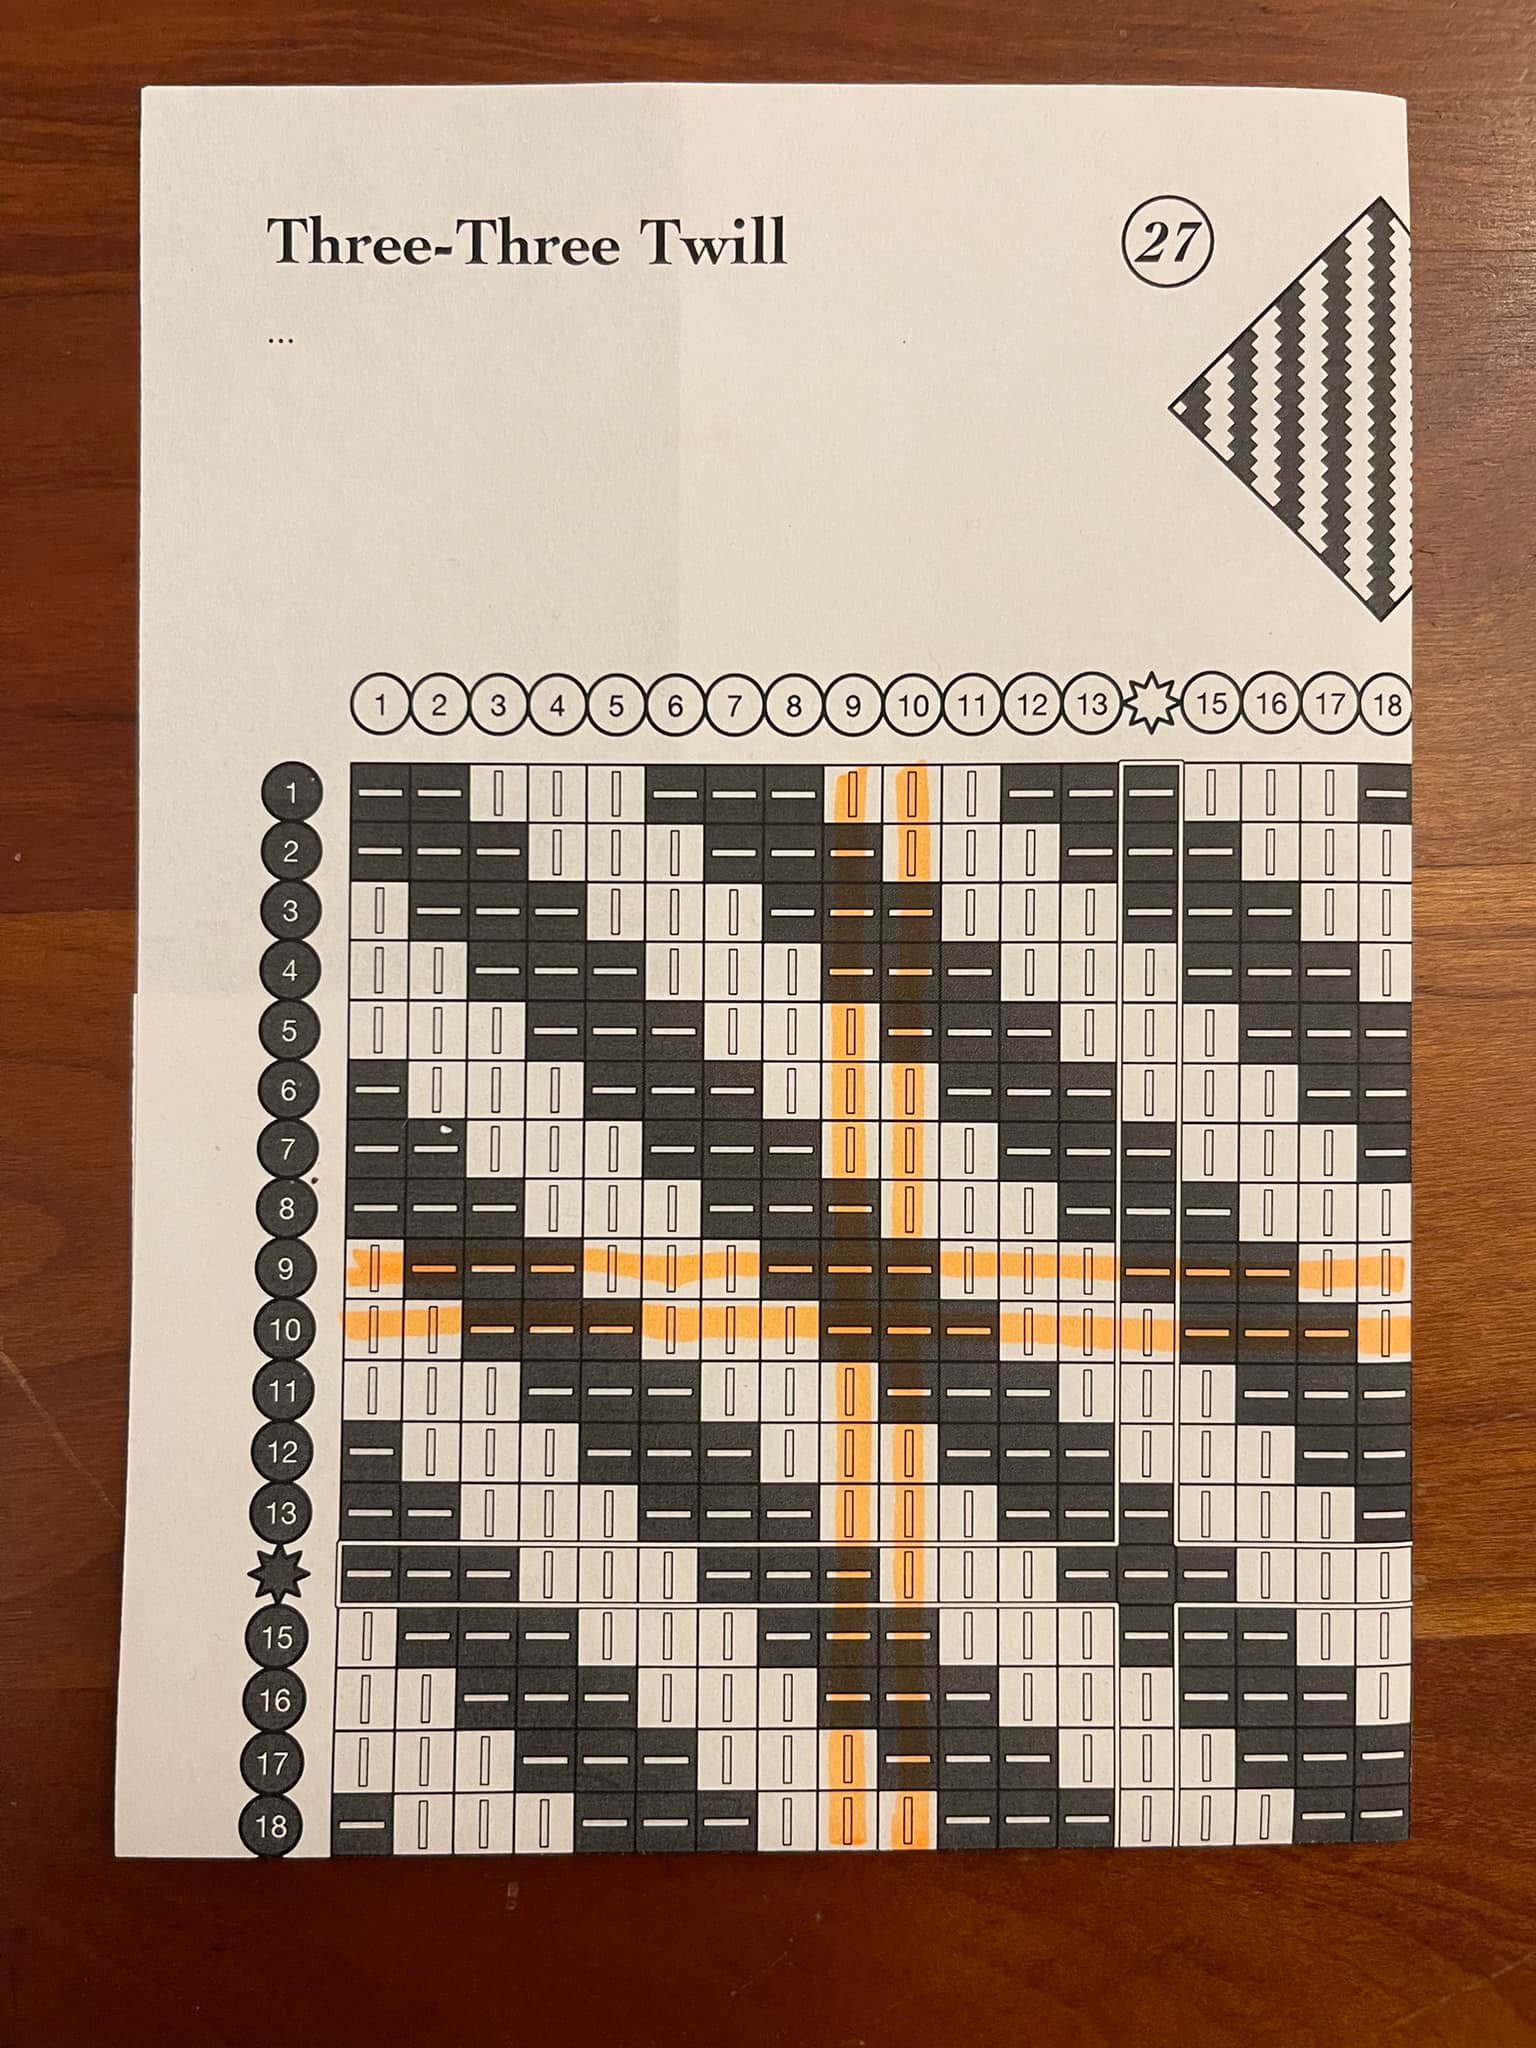
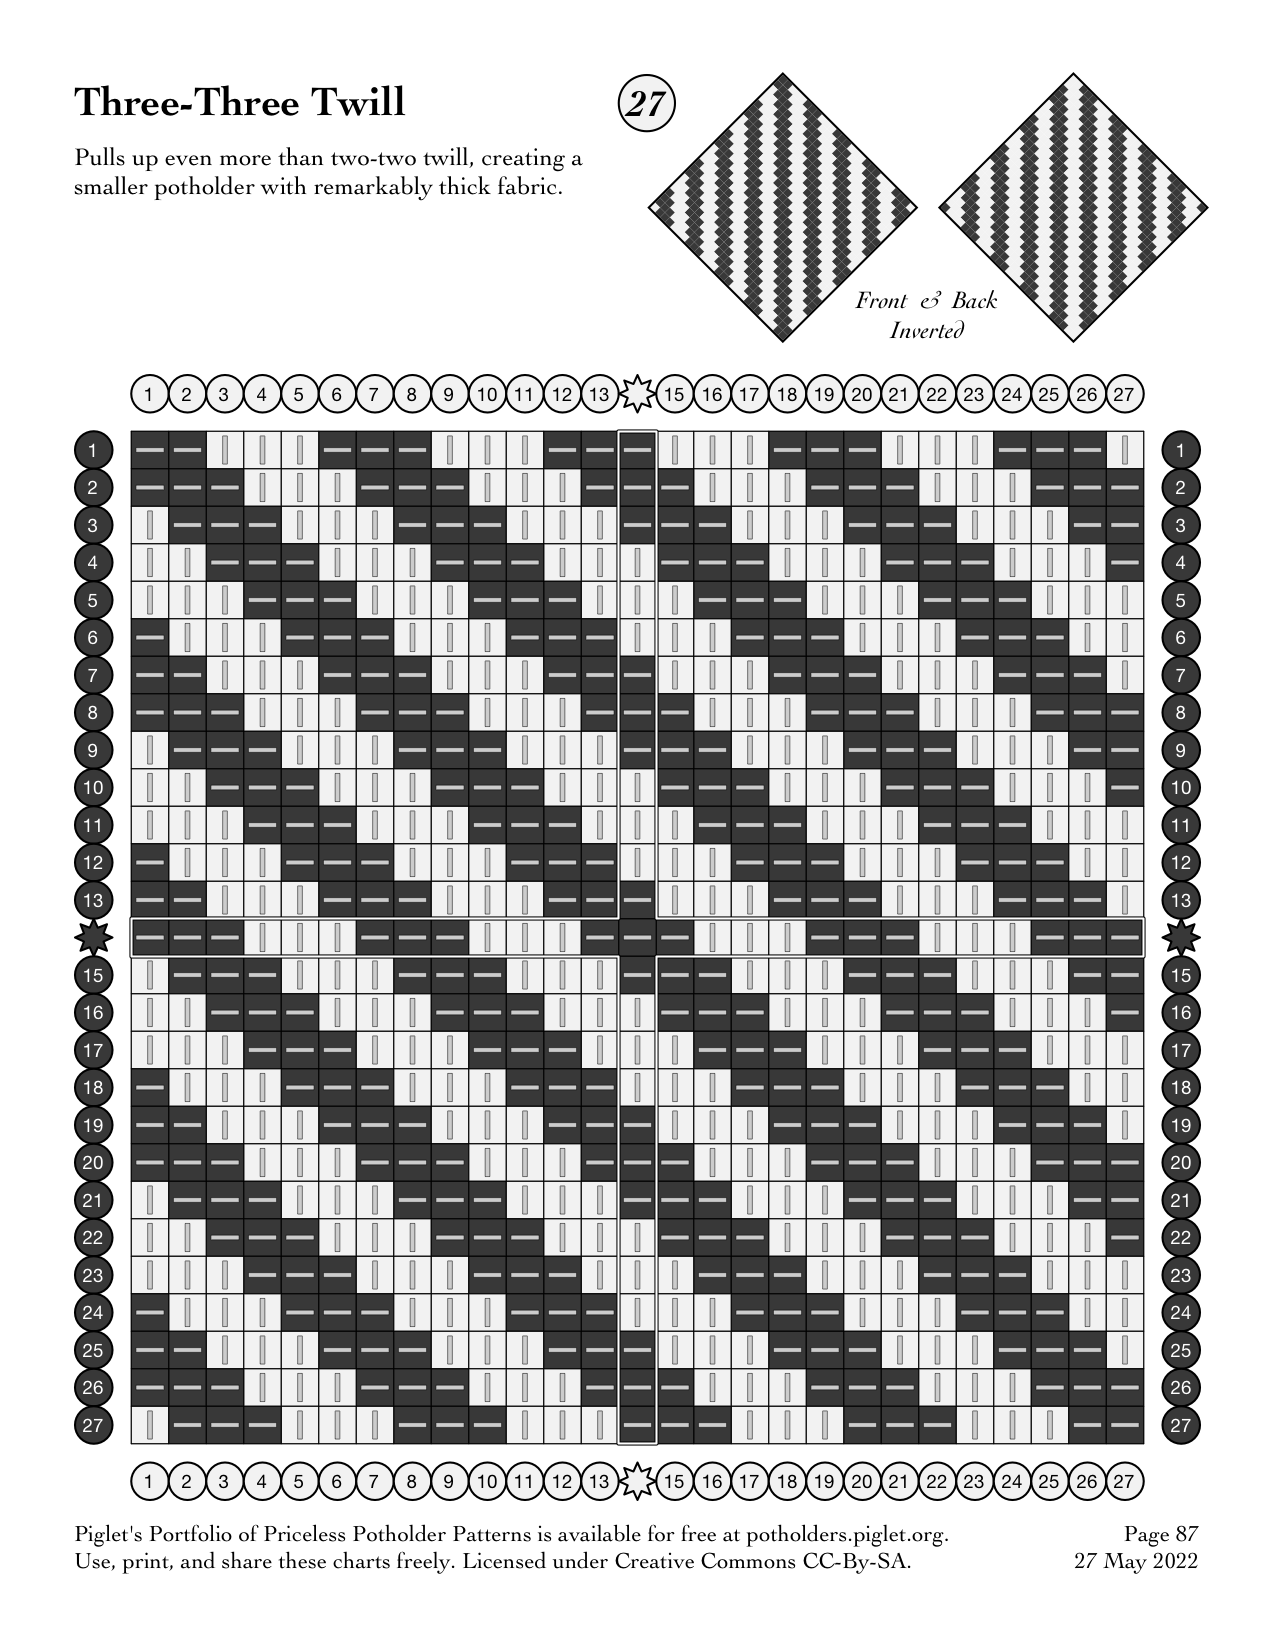
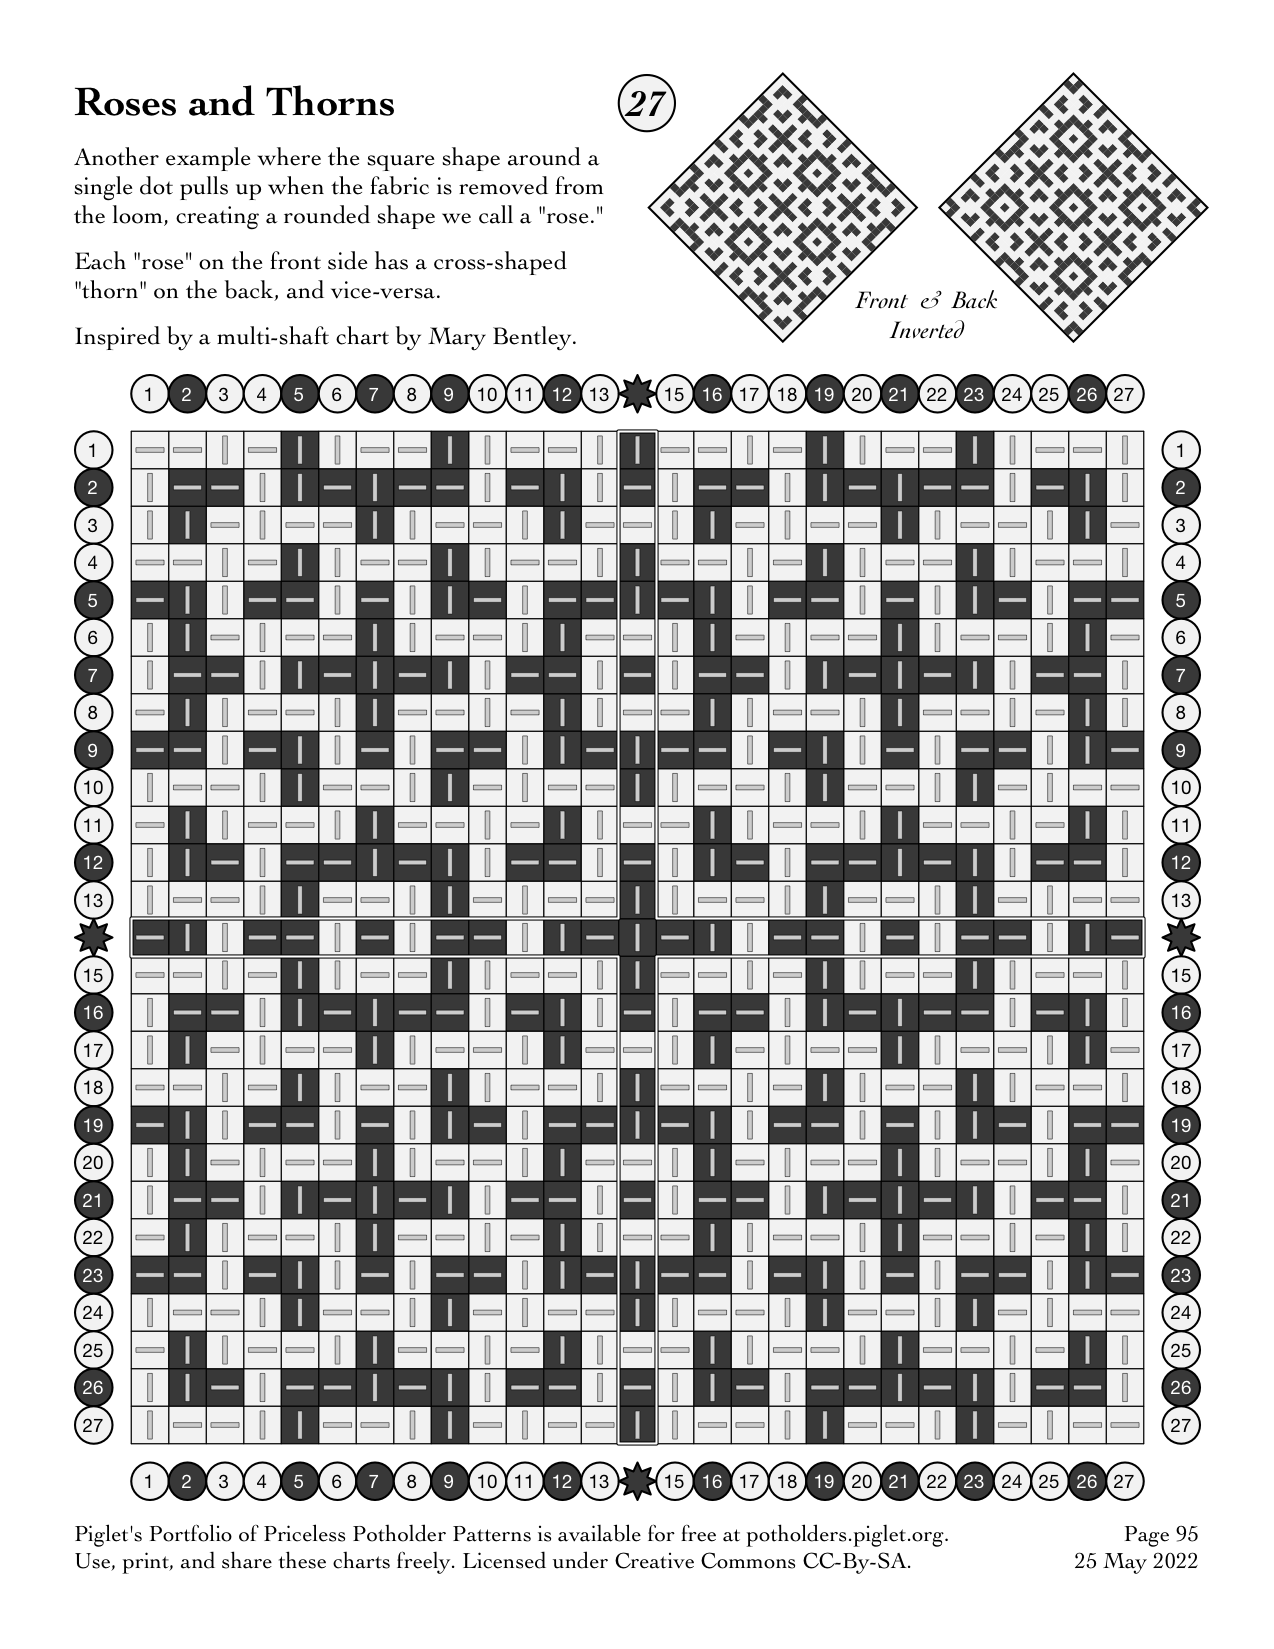
Oh gosh, this traveling twill is pretty. And very well behaved. The fabric does not bias or twist easily. It folds in all directions, lies flat, and has distinct ridges of texture. The 18-peg version is the first 18 rows and columns of this 27-peg chart. (Both are available on our website, and will be incorporated in our book in the next release.)

The 9-peg version should also work up well, and I’d love to see it if anyone tries it. (Use the first 9 rows and columns of the pattern for the mug rug, on alternating pegs of a traditional 18-peg loom.)

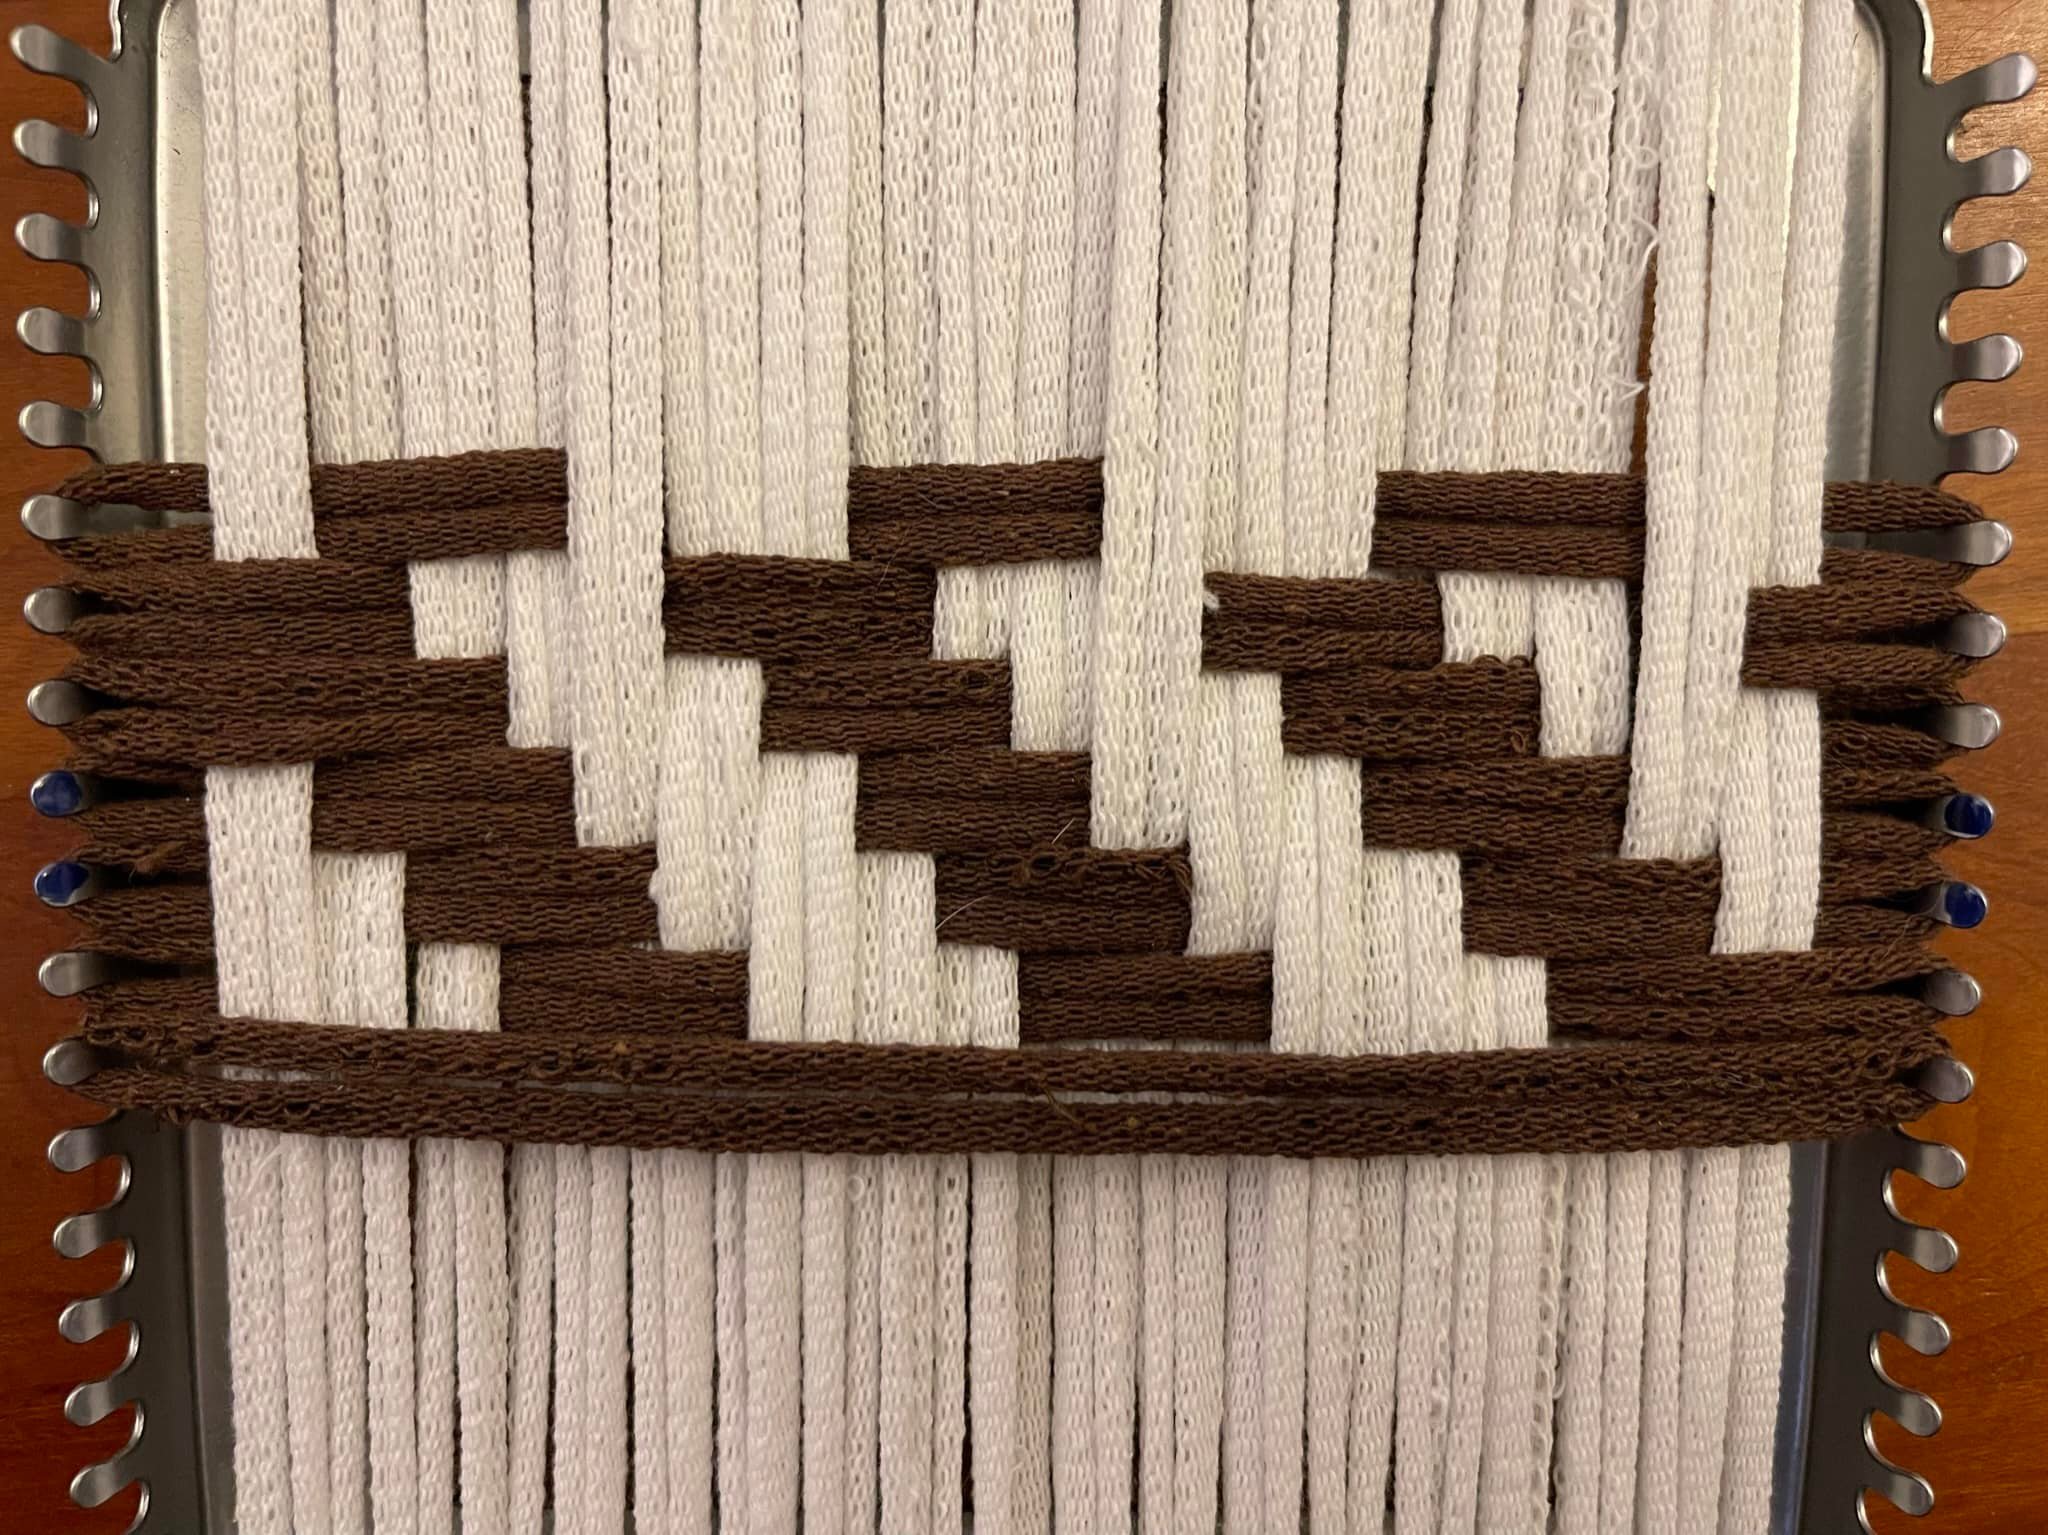
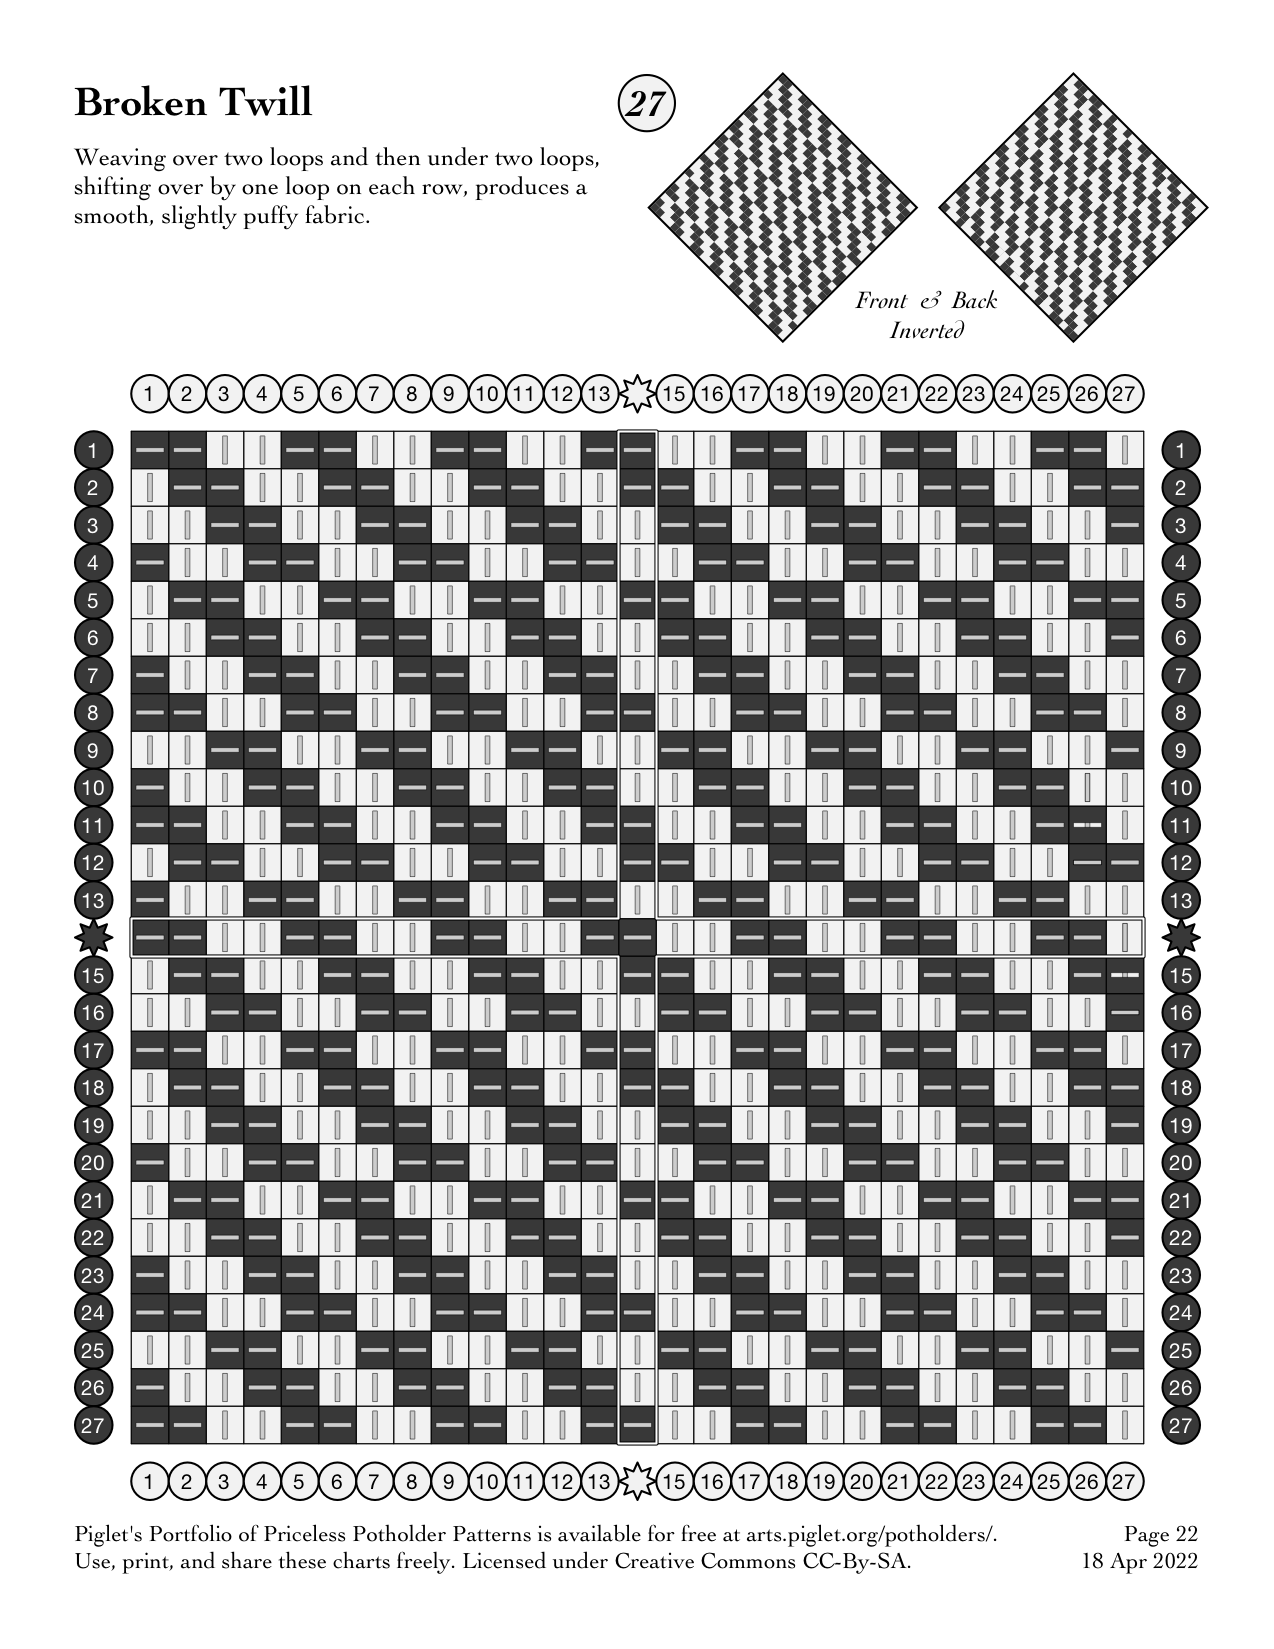
The pattern is surprisingly easy to weave. Because it is in groups of 3, the over/under pattern does not shift: under 2 / over 2 / under 2 / over 1 / under 1 / under 1. Repeat across the row, shift one column to the left on the next row. Once you work a few rows, you can continue without referring to the chart.

If you start from the middle, you will find that each row after the center row is a mirror image of its pair on the other side of the center. If you weave a loop, then rotate your loom, you will work the same pattern on that row.

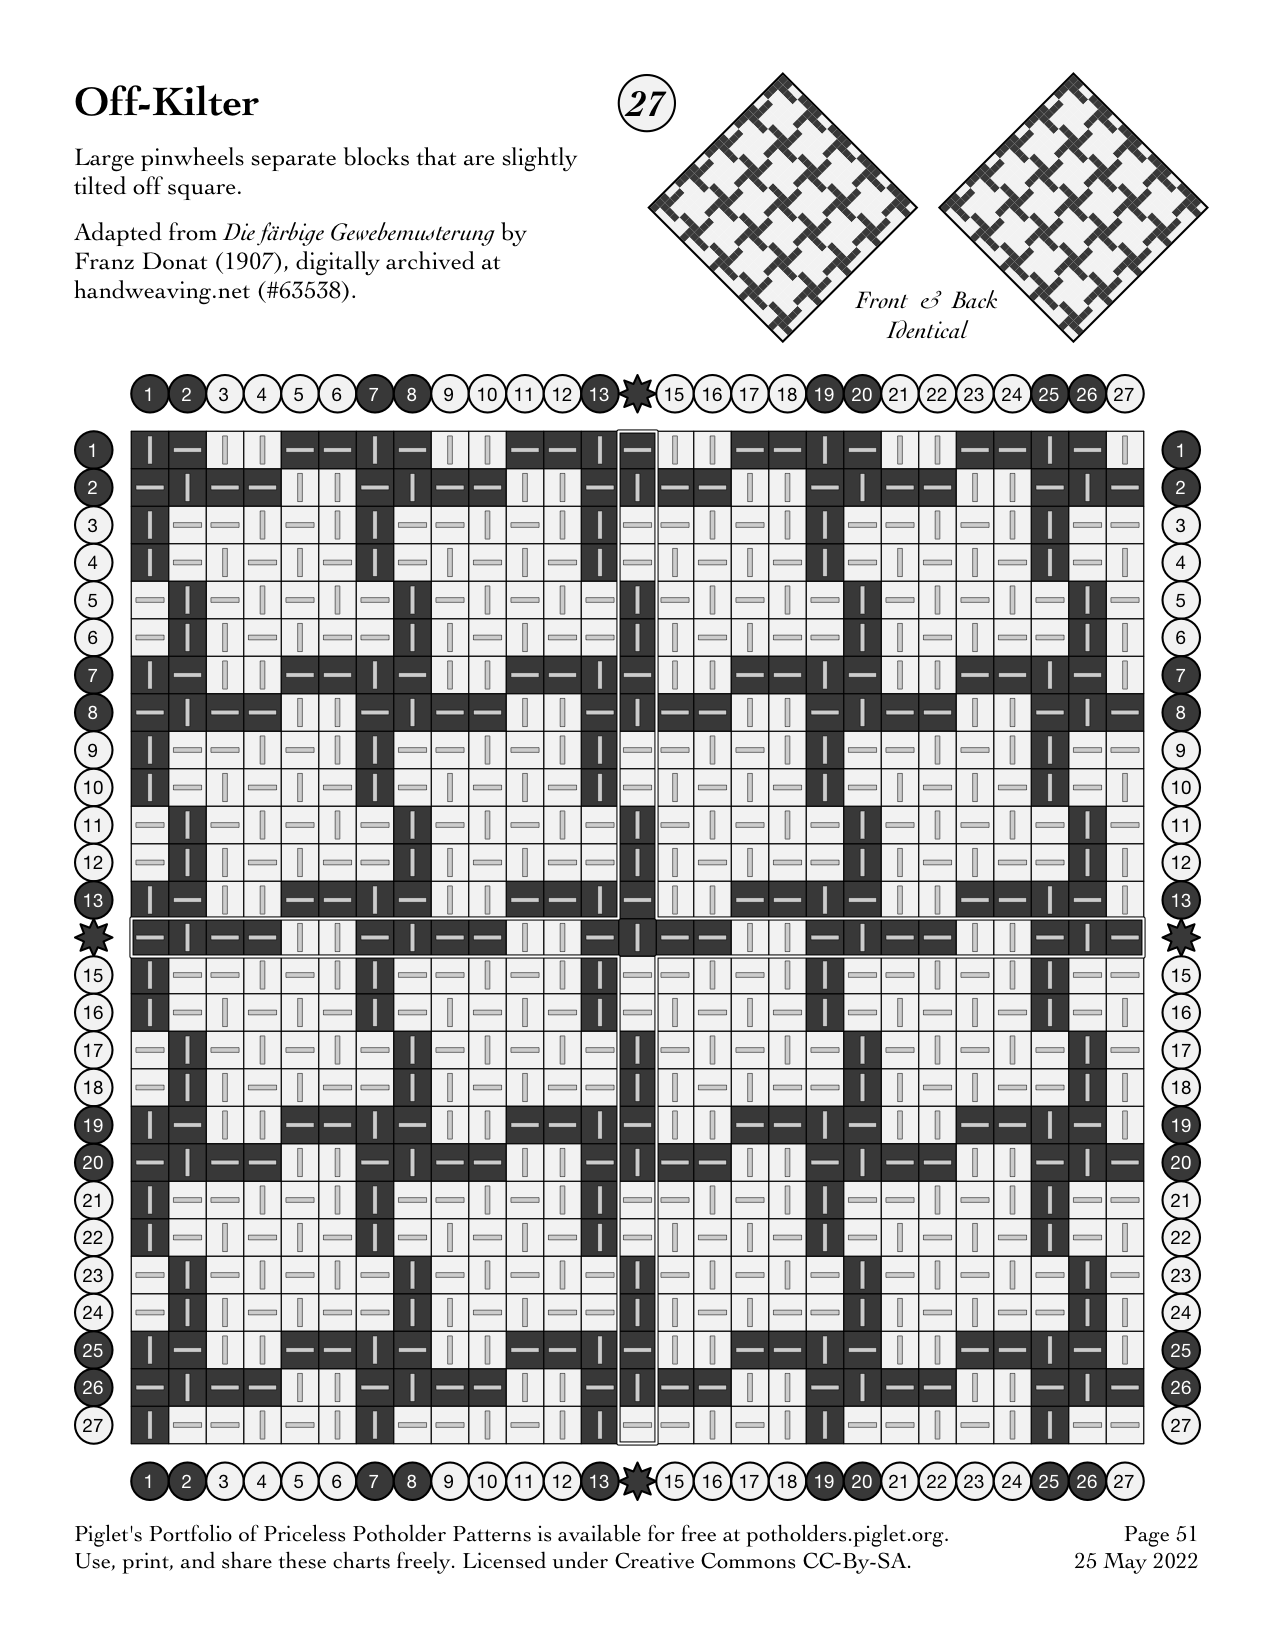
Matthew found the design in “An Album of Textile Designs” (1885) archived on handweaving dot net, and adapted it for potholders.

FAQ: Why don’t our patterns include color?

We’re sometimes asked why our weaving charts are drawn in just black and white (or sometimes shades of gray) rather than including specific colors.

Part of the answer is that keeping the charts monochrome makes it easy and affordable for people to print them at home or local service bureaus — color printing at a neighborhood copy shop is often ten times as expensive as black-and-white, and a design that looks great in color may be an unreadable mess of indistinguishable grays if run off on a basic laser printer.

More importantly, we want our designs to inspire you.  We encourage people to combine our weaving charts with color inspiration from other sources to create new, never-before-seen designs of their own.

One of the most enjoyable parts of this process has been releasing a new chart online and seeing a flood of people post photos of it woven using wildly different color schemes, including ones we would never have imagined.

Broken Twill

So adorable. The 4 rows of 2/2 twill sections are very flexible, then anchored by the staggering of the next set of 2/2 twills, which lock this section in place. I worked this example in traditional sized white and green, using the first 18 rows and columns of the chart I had printed.

The fabric is puffy and thick without any shiftiness. You could do really fun things with color here, so many possibilities.

It’s an easy weave once you establish the pattern. I kept shifting my twills the other direction within sections by mistake; that would make an interesting design, as well.